How to Create a Website Welcome Message in WordPress

Whatever type of website you run, it is essential to offer a unique, competitive advantage to your visitors, to show them that you recognize their needs. Sometimes it is extremely challenging to find some unique feature to distinguish your offer, especially if you are doing business in an already crowded niche. In such cases, it is important to think about the details – the little things that will give your offer and business a personal touch. The probability that you can offer a product or service that is so unique that the world has never seen it before is quite small, but you can always offer your potential consumers a personal, open relationship and willingness to meet their needs. One detail that can completely transform the way customers perceive your business is a website welcome message – a single sentence at the right moment can influence the user experience in such a way as to turn a casual visitor into your loyal consumer.
A well-put welcome website message is a perfect way to offer a more personalized user experience to your potential clients and win them over. The good news is that you can add a welcome website message on your site easily, all by yourself and with no extra expenses. Stay tuned to learn more about:
Qode Themes: Top Picks
View CollectionThere’s no standard rule about where you should add a website welcome message. It depends on what you want to achieve and where you believe you need to engage more with your consumers. If you are running an online store, you may add a website welcome message on specific pages with a specific product, if you are running a travel agency you may want to add a lovely welcome message on your homepage. Some plugins allow you to add different welcome messages on different pages, some are limited to certain kinds of templates only- that’s why it is important that you decide beforehand what you want to achieve with your welcome message and where you want to add it. There are many different types of welcome messages you can enrich your website with. But you should bear in mind that your ultimate goal is to offer consumers added value with each message. You can do that by offering discounts, coupons, live help, encouraging them to contact you, and so on.
There are different ways you can set up a website welcome message in WordPress. Maybe some of the plugins you use for creating forms or for live chat can also serve the purpose though they may lack some valuable customization options. OptinMonster, apart from other things that it does, is also very often used for setting up a website welcome message and if you already have it installed on your site, you can explore its possibilities in that department. But, there’s also a bit more straightforward and entirely free way to add this kind of message to a website – we will show you how to do it all by yourself with the free Icegram plugin.
Icegram is a widely popular, easy-to-use WordPress popup plugin. It allows you to create website welcome messages, fullscreen overlay, exit-intent popup campaigns, action bars, badges, stickies, inline opt-ins, ribbons, sidebar panels, and more, without any coding knowledge whatsoever. It comes with a rich collection of well-designed, ready-made responsive templates which makes it a particularly practical choice.
Using Icegram Plugin to Create a Welcome Website Message
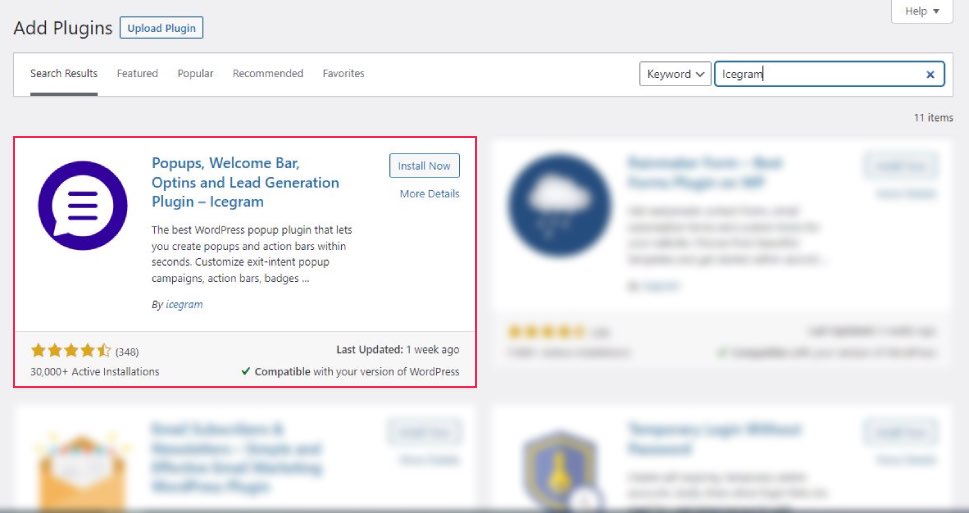
The installation of the Icegram plugin is simple just like the installation of any other WordPress plugin so we’ll not cover this step in detail. If you don’t feel confident doing it by yourself you can always take a look at our guide on installing WordPress plugins.
With this part of the process done, let’s see how Icegram works.
As soon as the installation process is done and the plugin is activated, you will be automatically taken to the Icegram welcome page on your dashboard. You will also notice an Icegram tab in the left-hand dashboard menu.
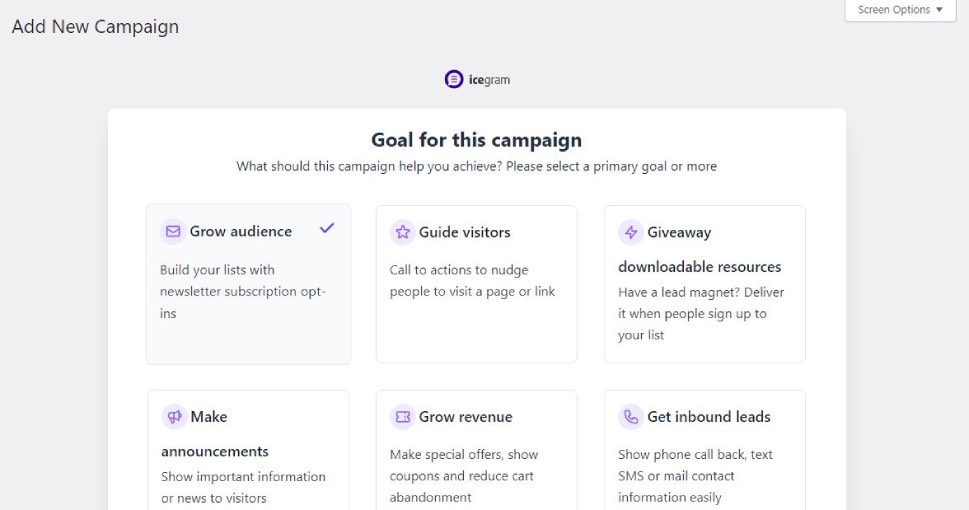
To start creating your first website welcome message, click on the Add New option in the plugin’s menu. You will be taken to the campaign menu, where the first thing you should do is choose the goal of your campaign.
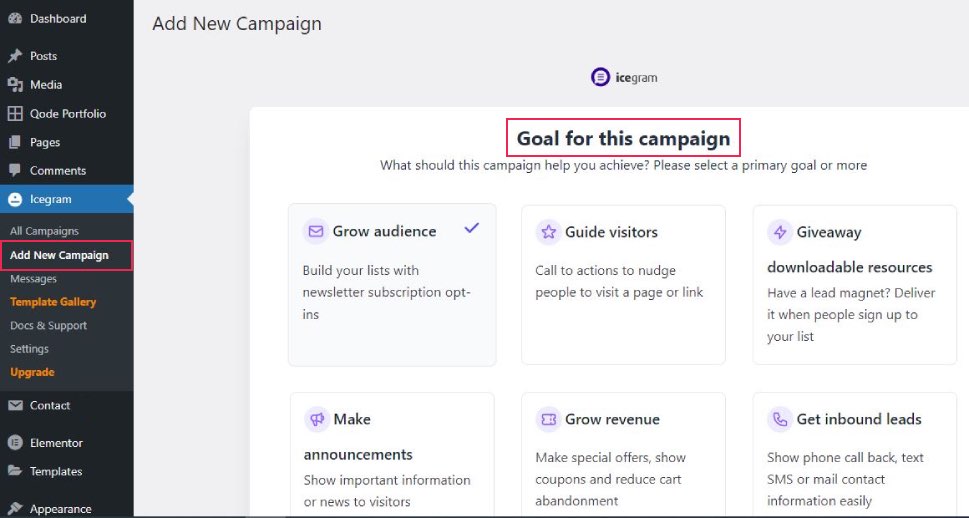
You can choose the goal of your campaign between growing your audience, guiding the visitors, making announcements, collecting feedback, etc, and you can also choose to set your own customized goal for the campaign.
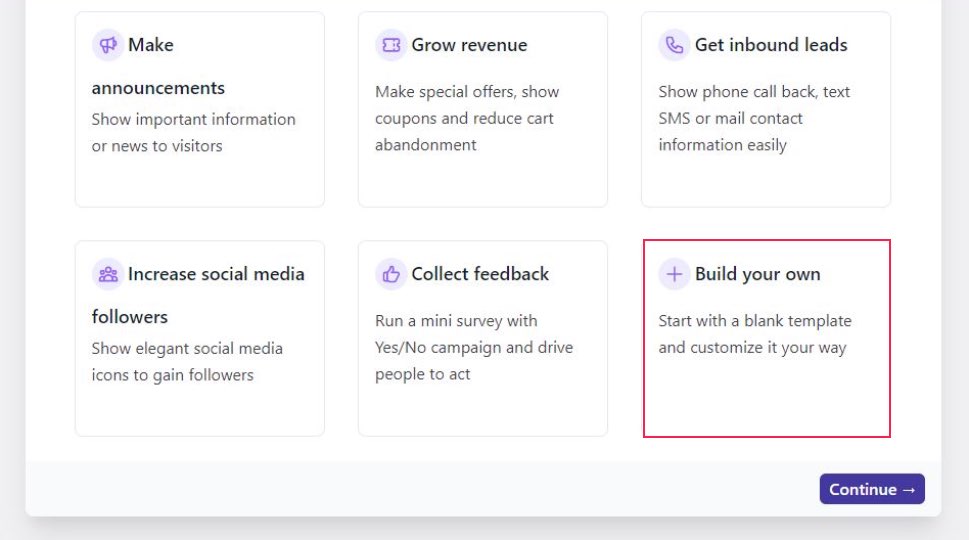
You can tick more than one goal of the campaign, depending on what you want to achieve. For the purpose of this article, we’ll choose that the goal of the campaign is to make announcements and guide visitors. After you selected your goals, click the Continue button to choose the type of message placement for your campaign.
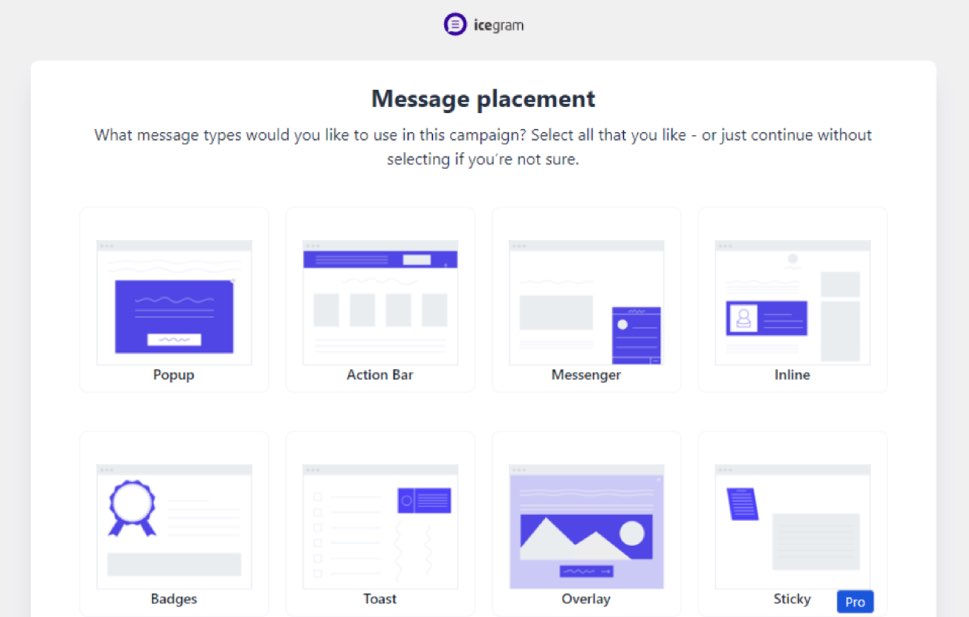
You will notice that some placements are only available in the premium version. Nevertheless, plenty is available for free. Since we are creating a welcome message, we’ll go with the popup. You can also choose more than one placement for your message: simply tick the desired option and click the continue button when you finish with your choices.
And now comes the fun part. You are taken to the messages templates page.
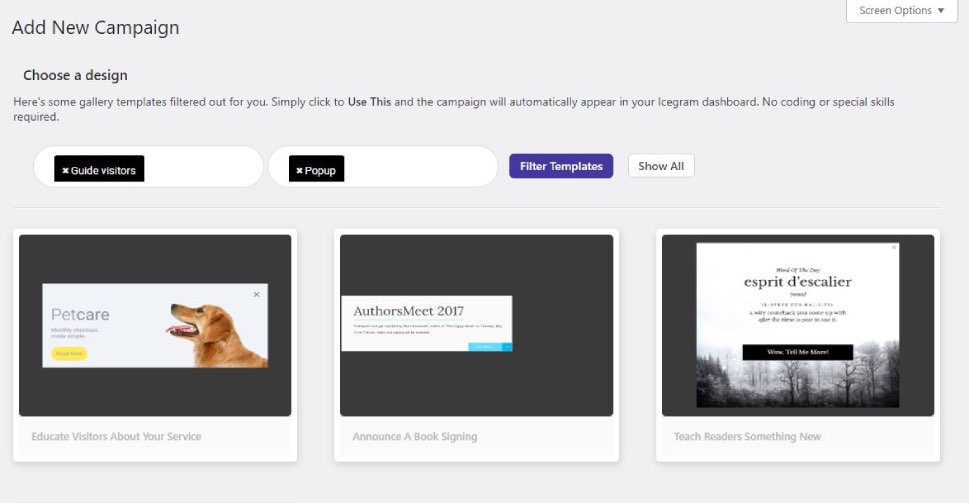
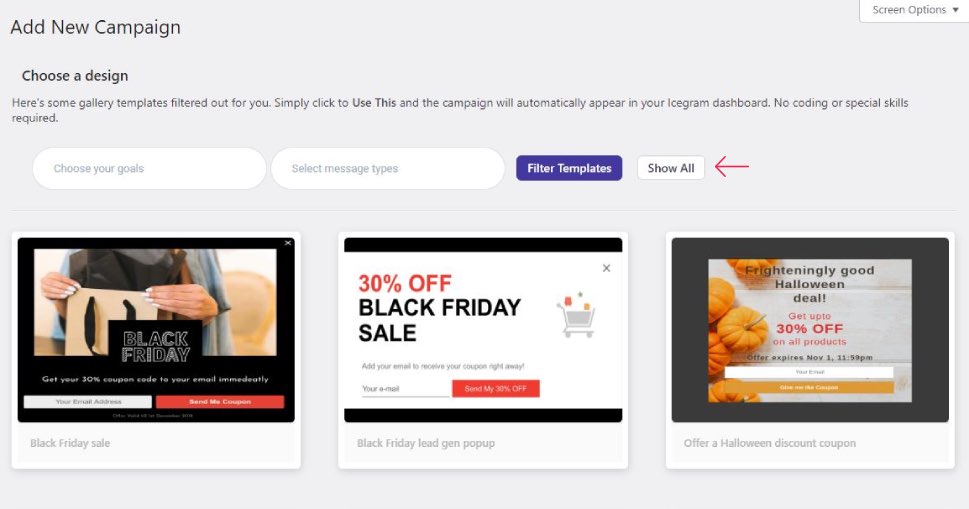
You will see a selection of templates filtered based on your previous choices. If you are not satisfied with the selection you can click the Show All option to see all available templates.
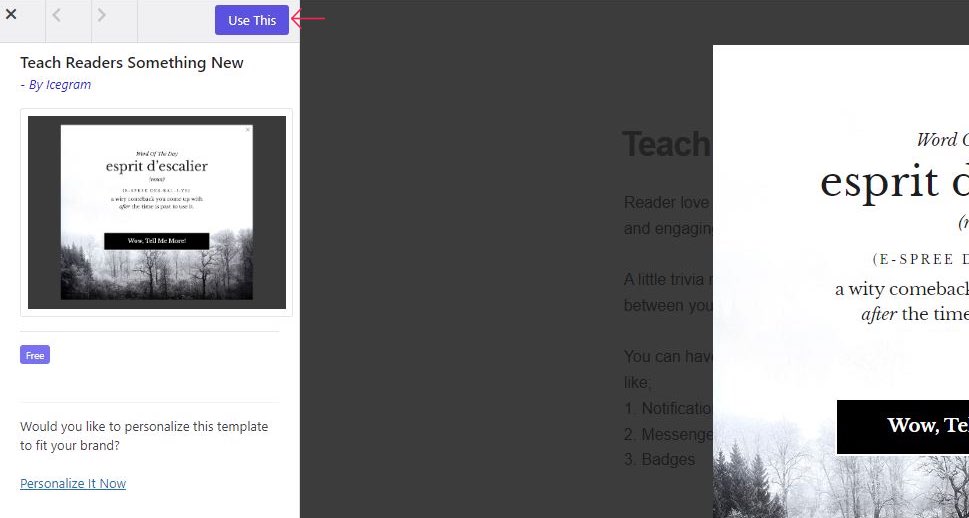
When you make your choice of the template, hover over it and click the Preview button. You will be taken to the template preview page where you can take a closer look. If you are sure you like the template, click the Use This button in the upper right corner.
Now you are getting to the page where you can customize your message, CTA, and all the elements that are included in the template.
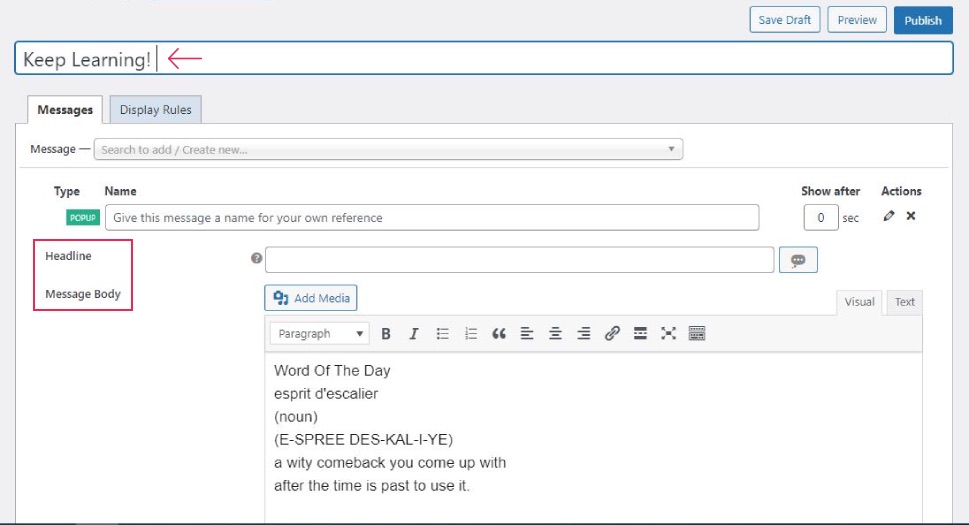
Simply type in the message headline, as well as the content of the message. You can also choose to enter the name of the message just for your own reference, add images or other content by clicking the Add Media button, etc. As you fill in the fields scroll down to see more options.
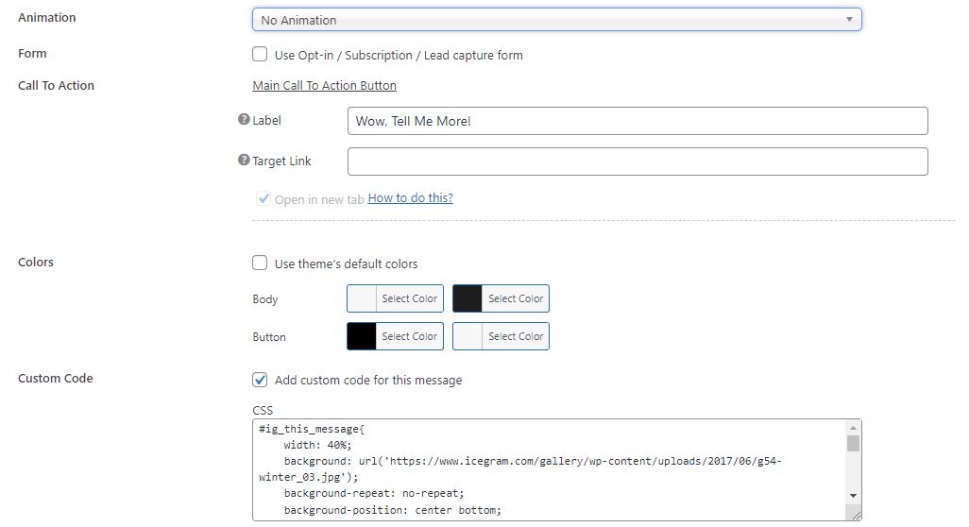
You can choose to add animations to your message, customize the CTA text, change the template colors, and also add custom code to your message. When you are happy with the content of the message you can move on to defining the message display rules.
Defining Message Display Rules
When you click on the Display Rules tab next to the Messages tab, you will see all the settings and options you need for defining where, when, and how your message will be displayed.
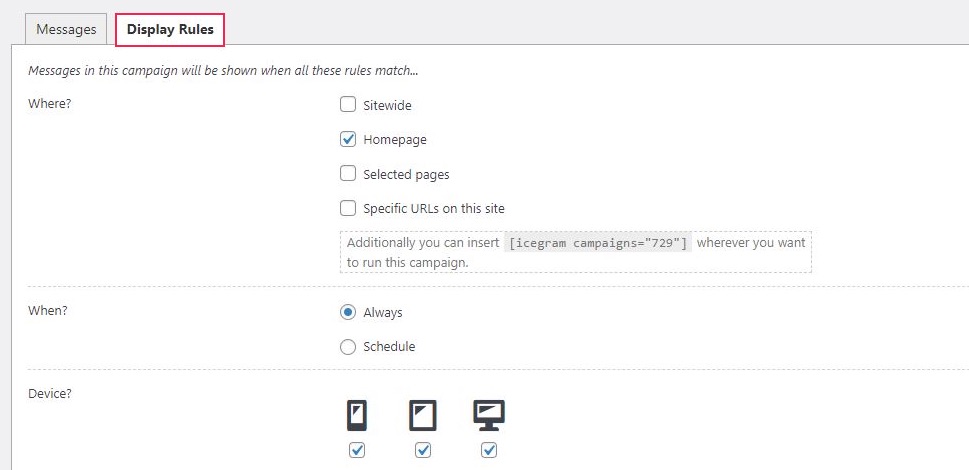
You can choose the message to be displayed sitewide, only on selected pages, only on the homepage, or on specific URLs of your website.
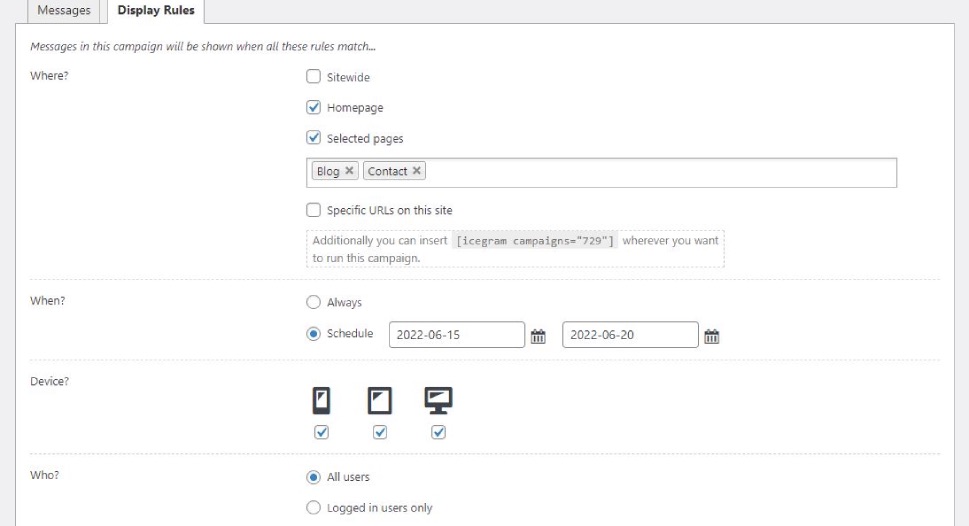
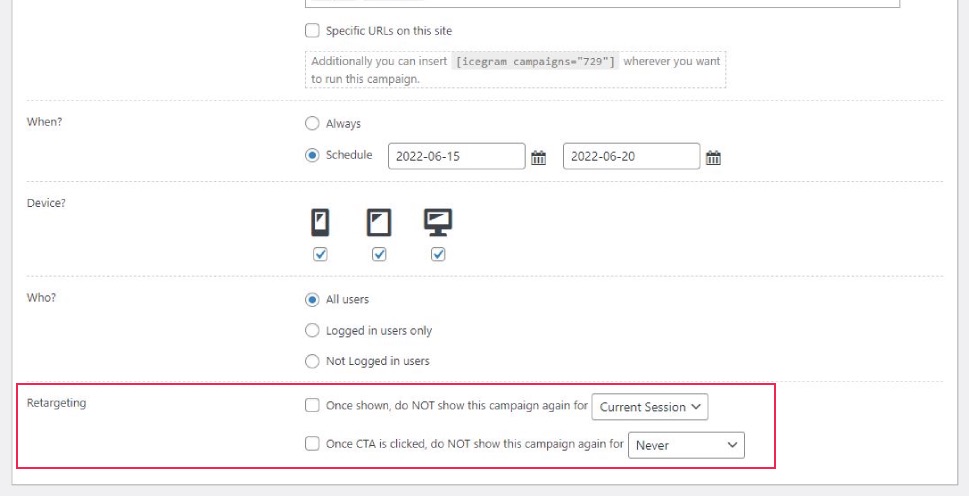
You also get to choose whether you want the message to be displayed at all times, or define a limited time framework within which the message will be shown. If you want the message to be displayed on all devices, simply tick all three options. The plugin is responsive so the message will look just fine on every screen size. You can also limit who can see the message – logged-in users only, not logged-in users, or all users.
Lastly, you can also define whether you want the message to be displayed repeatedly or just during the first session. If you don’t need the message to be displayed after the user clicked the CTA, you can also set it here.
And, voilà, that’s it. Your website welcome message is fully customized and ready. This is what it looks like in our case:

This is the basic procedure. There’s a lot more room for customization if you want to go there. You can easily adjust the fonts, colors, and images as you go.
Since the plugin comes packed with so many beautiful templates, it would be a pity not to explore them all. Take your time and browse the Icegram’s template library, who knows what brilliant idea can pop up as a result of looking into Icegram’s attractive templates.
You know how they say, first impressions are made in seconds and may last for a lifetime – your website welcome message may as well be that first impression you are going to give to your consumers. It is important that you can establish a connection quickly and a welcome message may be the perfect way to do just that. So, to make the best of it, it may be useful to follow some tips:
Use Powerful Images
You only have a couple of seconds to keep the potential consumer’s attention – an image may be way more effective in keeping their eyes on your note than the mere copy alone. Images speak directly to our emotions, so if you know your target audience well you’ll make the effort to find an image that will resonate both with their needs and your message. In case you are creating a welcome note for a product page, you can also use all kinds of graphics to illustrate the benefits of the product. Your brand’s logo should also be properly included. There are surely many more creative ways to take advantage of the visual aspect of your welcome message.
Keywords Matter Here Too
Many of your consumers will discover your website by typing in specific terms – keywords in a search engine. If the first thing they see when they land on your pages are exactly those words they used to find you there’s a good chance they’re going to feel that they are in the right place and continue browsing your website. Not to mention how using keywords in your welcome note can also improve your website’s search engine positioning.
Offer a Unique Benefit
Offering a special incentive for potential consumers may easily lead them to stay on your website and explore your pages further. The longer they stay on your pages, the more the customer’s journey can advance. You may offer different benefits to different segments of your consumers, or focus on what matters to you at the moment – reward loyal consumers, encourage first-time website visitors to become customers, boost your email list, and whatever makes sense for you. The point is to offer added value to all or to the selected target group.
In Conclusion
Now you know why a website welcome message is important and useful, how to add it easily and all by yourself as well as how to make it effective. This little detail allows for plenty of creativity, so don’t miss the chance to use your imagination and really add a personal touch to your website. It is really no exaggeration to say that personalization is the key to success in today’s business. Everything you invest in building an open, honest relationship with your consumers will pay off many times over, through profit, new consumers, increased traffic on your website, etc. The welcome message may be the first brand message your potential consumers see from your company, so make sure it reflects your values and your brand essence. Don’t hesitate to explore the possibilities the plugin offers – after all, it is free. You can add as many different welcome messages on as many different pages, it all depends on what you want to achieve with each page at the particular time. Good luck and enjoy the process!


