How to Allow Users to Add Favorite Posts in WordPress

A post can be favorited for a multitude of reasons: to bookmark the post, as a form of rating the content, to show appreciation towards the content author, or as a response, if you are mentioned in the post. It requires less effort than posting a comment, making your visitors more inclined to do it. Moreover, it increases your website’s engagement and gives you insight into what kind of content your visitors prefer.
And, while this feature might not be suitable for some websites, it is generally helpful for most WordPress websites. Specifically, it is a must-have for WordPress websites which rely heavily on custom post types like movies, recipes, or listings. Unfortunately, as this feature isn’t part of WordPress by default, webmasters often struggle to add it to their websites, even today. This is why we have decided to create this article, explaining how you can allow users to favorite posts in WordPress easily.
Let us begin. This is what we will be covering:
Qode Themes: Top Picks
View Collection


Since some themes do offer the ability to favorite posts, both the regular and custom ones, you should always inspect the functionalities of your current theme first. If such a feature isn’t part of your theme, you should turn to WordPress plugins. For this article, we have thoroughly researched the WordPress plugin repository and decided to showcase a free plugin called WP Favorite Posts as it is perfect for this purpose.
The WP Favorite Posts plugin seems like a simple plugin at first glance. It allows users to favorite posts using a link the plugin provides. The plugin data is stored in the database or the browser cookies, depending on whether you choose to restrict favoriting to registered users only. To display this data to your visitors, you can use the two widgets the plugin provides for displaying the website’s most favorite posts, as well as the favorite posts of a given user. We will explain how you can use them below.
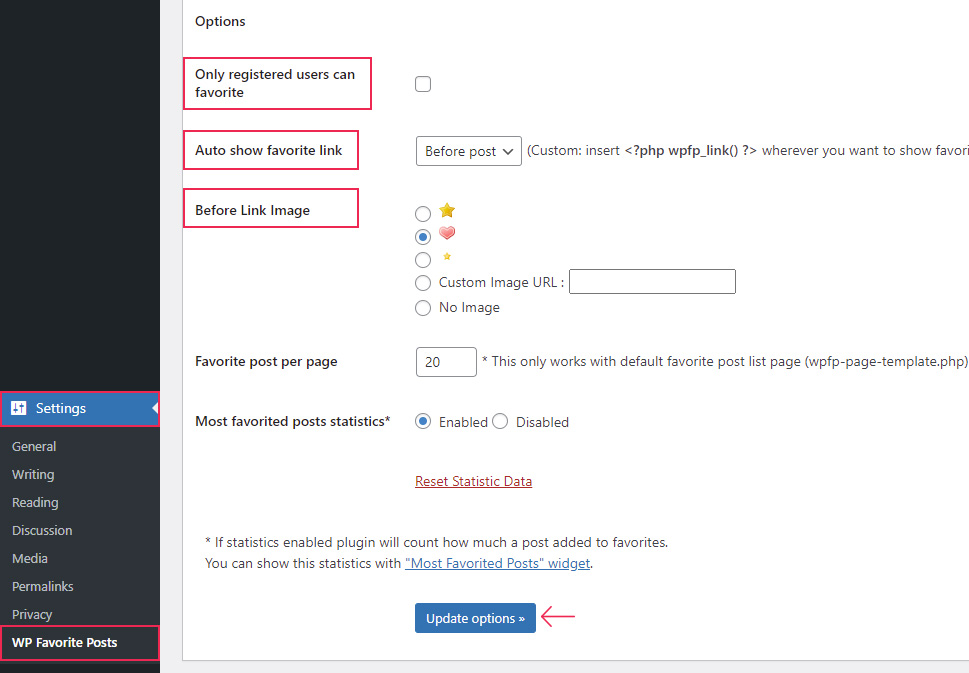
After installing and activating the plugin, navigate to the Settings > WP Favorite Posts section, where you will see all the relevant plugin options. On this page, you will see several subsections. The two named Options and Label Settings are the most important ones and ones which we will focus on in this article.
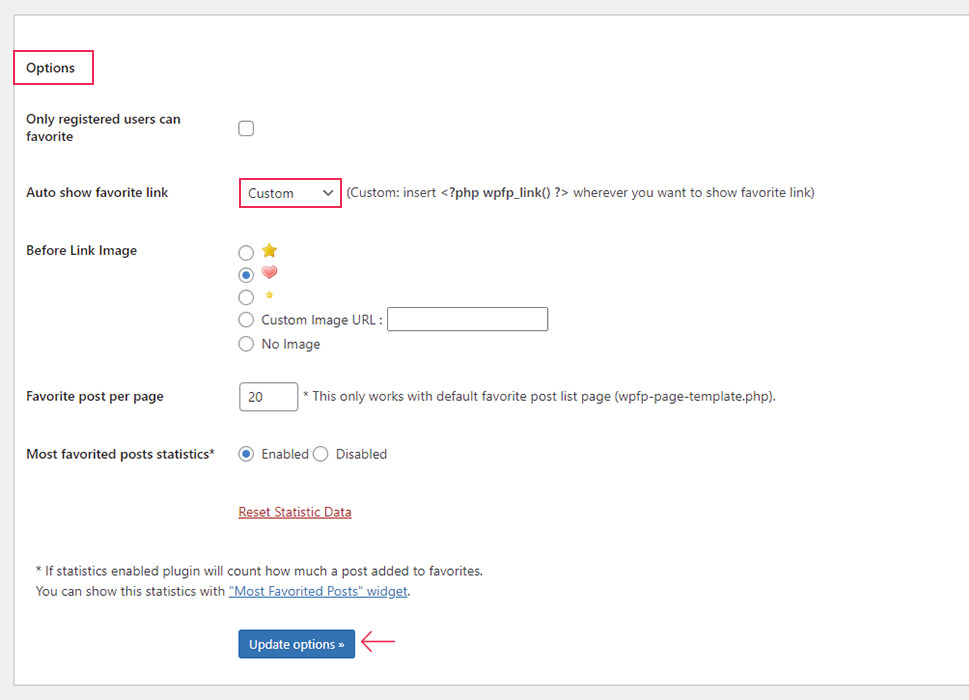
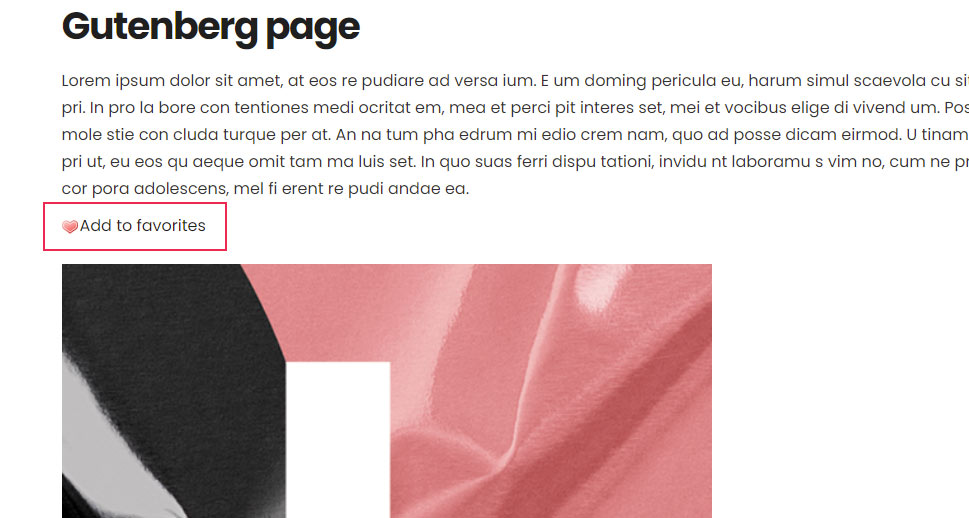
To enable the favorite functionality on your posts and custom post types, you will need to adjust several settings in the Options subsection. These include placement of the favorite link by default, choice of the image forming part of the link, and whether to limit the ability to add favorite posts only to logged-in users. As noted below, for this article, we have opted not to restrict this functionality to logged-in users only. Additionally, we chose to place the link before the post content, preceded with a heart icon. Of course, you can adjust the settings to your preferences. Having done that, click the “Update options” button to save your settings.
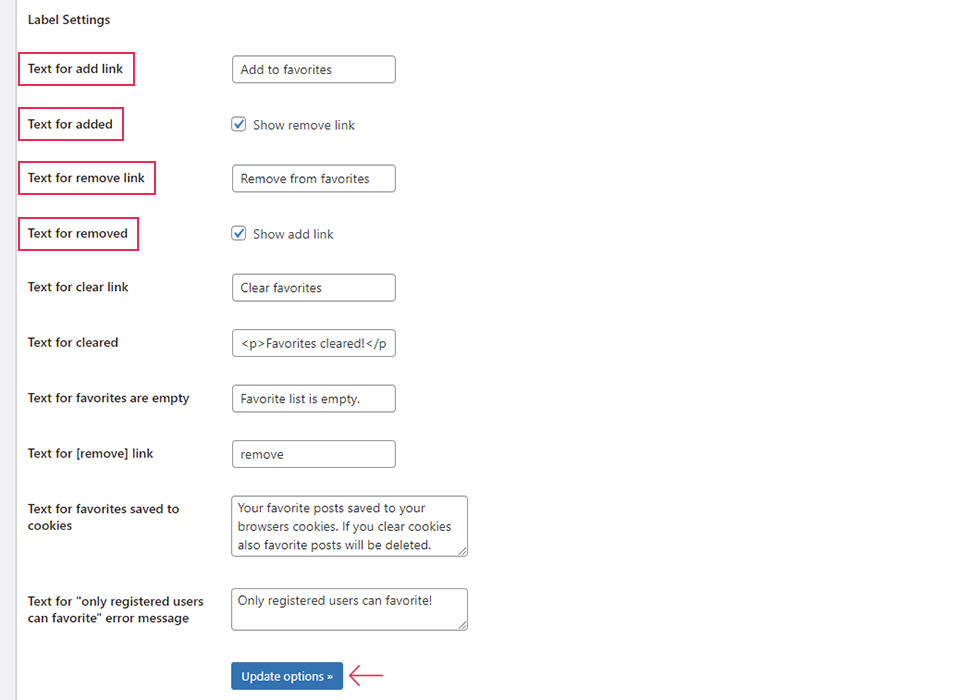
Afterward, scroll down to the Label Settings subsection, where you can enable and adjust the relevant labels. For this article, we will be focusing on the first four options in this section which concern the process of adding and removing favorite posts. You can choose whether to show the add and remove link, as well as which labels it will show. In this case, we have opted to show both variations of the links, while using the default labels set by the plugin. But, as in theo the previous section, you can adjust these options to your liking. Having done that, press the “Update options” button to save your settings.
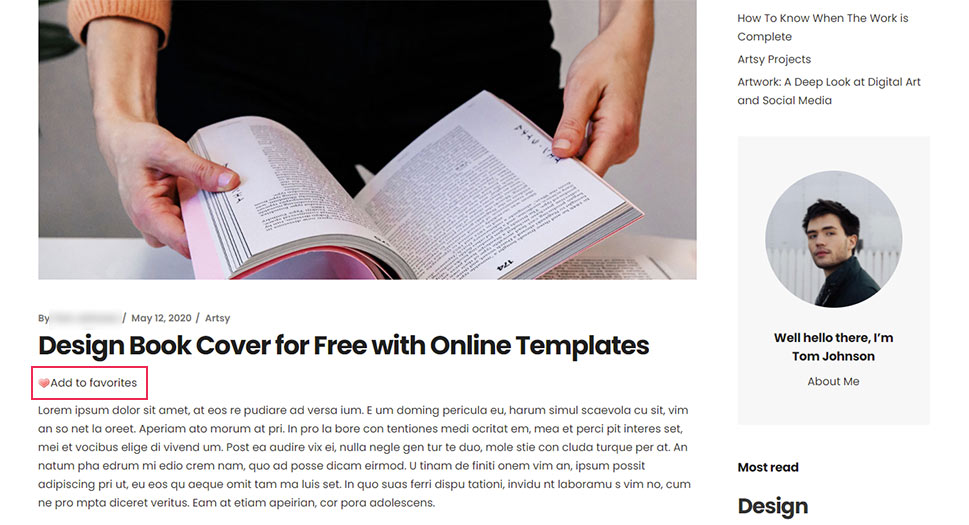
Then, check the result by opening one of your posts on the front end. Of course, make sure that you are viewing it while logged in if you have set a restriction that only logged-in users can favorite the post.
The plugin has a predefined stylization acceptable for most websites. However, in some cases, additional stylization might be added in the form of custom CSS code. As this is done on a case-by-case basis, we can’t suggest any that would work for all websites. Instead, we will include the snippet that was sufficient in our case.
.wpfp-span {
display: inline-block;
margin-bottom: 15px;
}
Such a CSS snippet can be added to the Appearance > Customize > Additional CSS section of the WordPress customizer or into a suitable CSS-inserting plugin. In our case, after inserting the CSS, we have gotten the following result.
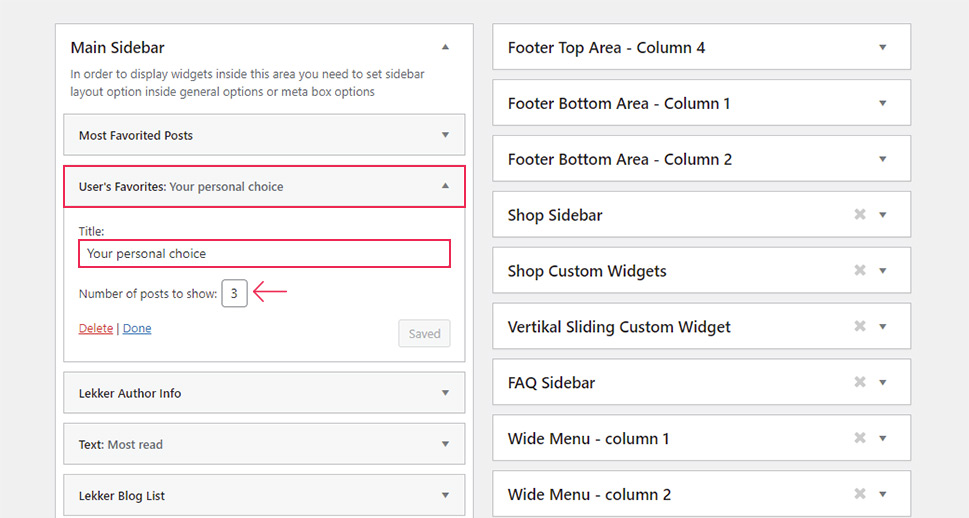
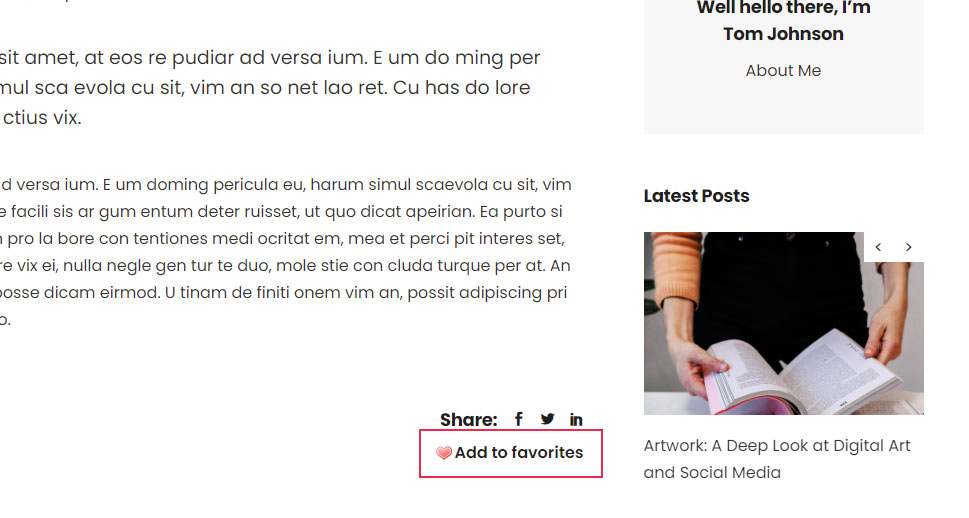
Apart from the ability to favorite a certain post using a link, this plugin provides you with two widgets used for tracking and displaying your favorite posts. More precisely, these are Most Favorited Posts and User’s Favorites widgets. The former shows the most favorite posts on the website, while the latter shows the posts favorited by the user accessing the website. For logged-in users, the info is stored in the database, while, for the rest, it is stored in the cookies of their current browser.
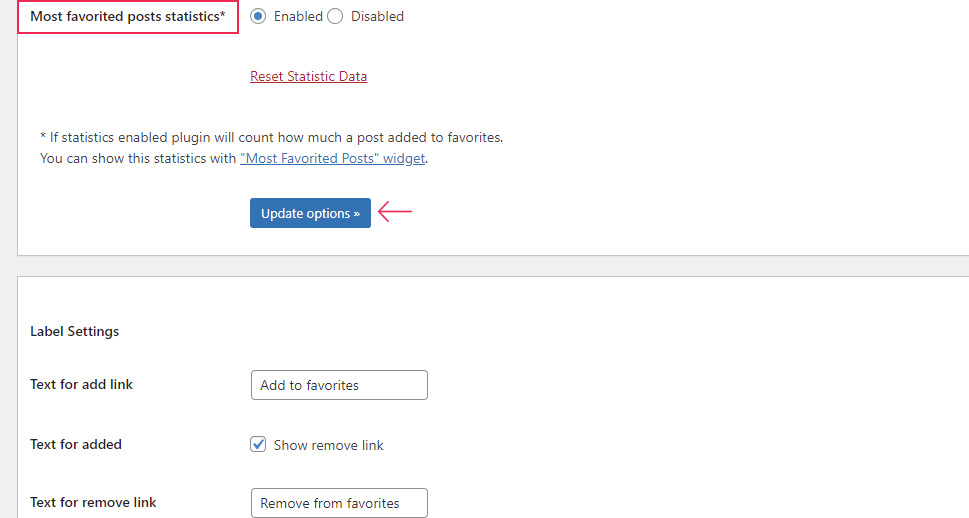
Having said that, before looking at the widgets, we suggest checking some of the options tied to them. By that we mean you need to enable the most favorited posts statistics option, as it is a prerequisite for the widgets to function properly.
Having ensured that the statistics option is enabled, navigate to the Appearance > Widgets section and find the two widgets previously mentioned. If you aren’t able to find them in the Available widgets subsection, try looking in the Inactive Widgets one. After finding the widgets, you can add them to the widget area you plan on using for displaying your favorite posts or the website’s most favorite posts.
Both widgets have only two options – the widget title and the number of posts that you can show. In the case that the title field was left empty, the default titles (widget names) will be used. That said, after entering the title and number of posts, make sure to click the “Save” button below to save your settings.

Afterward, review a page or post that shows those widgets. As mentioned previously, the plugin comes with some predefined stylization, which you can further adjust with CSS code. Similar to before, this CSS varies on a case-by-case basis, which is why we can’t suggest any universally applicable stylizations. Instead, we will only leave you with the code we used, in hopes that you will be able to adjust it accordingly.
#wpfp-most_favorited_posts, #wpfp-users_favorites {
margin-bottom: 35px;
}
#wpfp-most_favorited_posts ul , #wpfp-users_favorites ul{
padding: 0;
margin: 0;
list-style: none;
}
As before, we suggest adding the CSS into the Appearance > Customize > Additional CSS section of the customizer or a suitable CSS-inserting plugin After inserting the above mentioned CSS snippet, we have gotten the following result for the two widgets provided by WP Favorite Posts plugin.

Despite appearing simple, the WP Favorite Posts plugin also offers some advanced functionalities mostly reserved for intermediate and advanced WordPress users. These uses include the [wpfp-link] shortcode, the custom wpfp_link() function and wpfp page template. We have decided to explain them in a separate section.
The [wpfp-link] Shortcode
Using the previous instructions, you will be able to enable favoriting on all your posts, either before or after the post content. However, sometimes webmasters want flexibility in choosing whether to include this link on certain posts, as well as a possibility of adjusting its placement. Both of these can be achieved either by using the [wpfp-link] shortcode or correctly calling the wpfp_link() function. But, if you choose to use either of these methods on posts or custom post types, we advise adjusting the Auto show favorite link option to Custom, to avoid displaying duplicate favorite links.
Additionally, either of these methods can be used to display the favorite link on pages, extending the favoriting capabilities to pages as well. Meaning, you can opt to display the favorite link in a predefined location on posts, while maintaining the flexibility on pages, if you choose to do so.
We will cover both of these methods, starting from the one easier to implement. To display the favorite link on pages or posts using a shortcode, you only need to insert the shortcode call – [wpfp-link] into a suitable shortcode-rendering element. These elements depend on the page builder you are using for editing.
For the Gutenberg editor, it is the Shortcode block, Elementor uses the Text Editor widget, and for the WPBakery plugin that element is the Text Block, while WordPress users who use the Classic Editor can insert the shortcode call into the editor’s visual tab. We will demonstrate how this is done within the Gutenberg editor, as an example.
First, open a given page or post where you wish to add the favorite link and insert the Shortcode block in the place where you wish the link to appear. You can do this by selecting the “+” icon, searching for the Shortcode block, and selecting it.
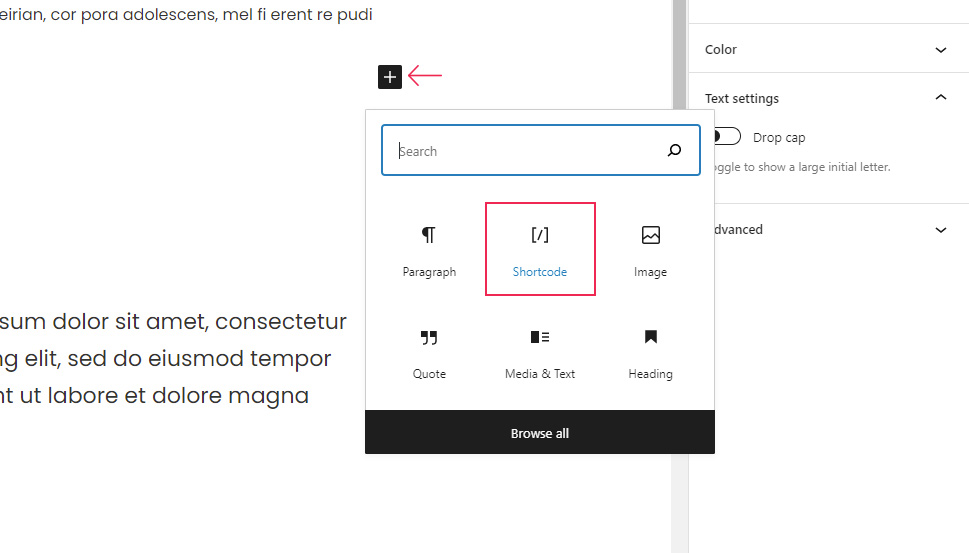
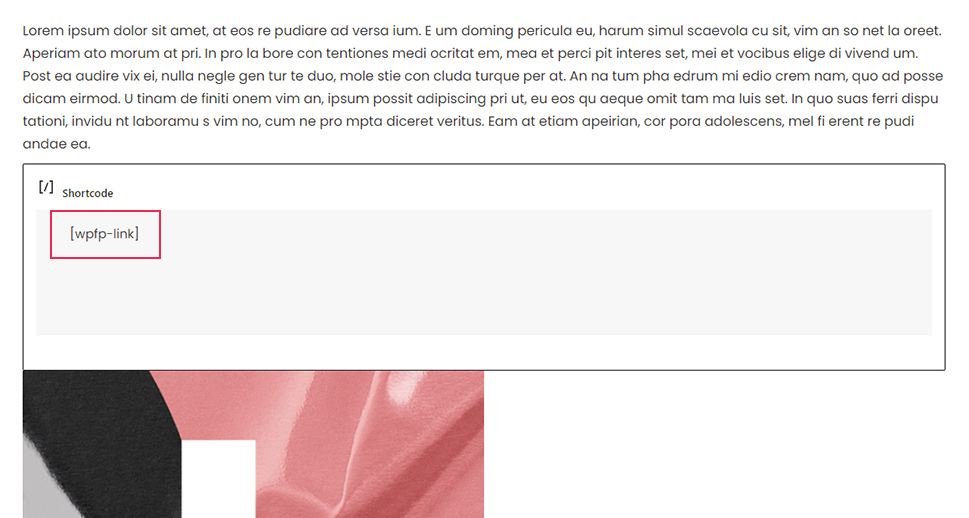
Then, enter [wpfp-link] into the Shortcode block and update the page/post.
Afterward, you should check the position and functionality of the newly created favorite link on your page/post. In some cases, additional CSS code might be needed for its stylization. As previously, the CSS is created on a case-by-case basis. In our case, the CSS we previously used was sufficient.
.wpfp-span {
display: inline-block;
margin-bottom: 15px;
}
With that CSS, we have gotten the following result.
Calling the wpfp_link() Function
While using the [wpfp-link] shortcode is more suited for displaying the favorite link on specific pages and posts in a custom location, by using the wpfp_link() function you can adjust the custom placement of that link for pages and posts in general.
Of course, doing so requires considerable WordPress knowledge as it involves calling the custom wpfp_link() function in an appropriate location. And, while the plugin suggests editing the single.php and page.php template files, we argue for a different approach – hooking the function onto an appropriate hook. Since this is quite an advanced and difficult subject, we will try to give a quick overview of it, before explaining what it means in this specific case. Let us first explain what WordPress hooks are.
WordPress hooks are a piece of placeholder code developers leave within their code which other WordPress users can use to add new functionalities or change existing ones. Thus, all WordPress hooks are divided into two categories – action hooks, used for adding new functionalities, and filter hooks, used to alter existing ones.
To use hooks, WordPress users need to write custom functions called callback functions or callbacks, which contain the code behind a given functionality. In this case, such a function is already provided by the plugin: the wpfp_link() function. But, for the functionality to work, the callback function needs to be “hooked onto” a suitable WordPress hook. This is done by using the add_action() function for action hooks and add_filter() function for filter hooks.
These functions accept the same four arguments: hook name, callback function name, priority, and the maximum number of arguments the callback function can accept, in that order. And, while the first two are most commonly used, the choice of the hook makes this method so difficult for most WordPress users. Specifically, every time you wish to implement new functionality or change an existing one, you will need to find a suitable WordPress hook on which you need to hook your callback. As a possible hook could be part of WordPress core files, as well as part of your current theme and plugins, finding it often requires a lot of time and in-depth coding knowledge.
Even though it is difficult, this approach to WordPress customization has some benefits over directly editing template files, which was the preferred coding approach in the past. The most obvious one is that, by using WordPress hooks, you will not lose customization every time a theme, plugin, or WordPress update comes along. The other, less obvious benefit, is that this method allows you to keep track of your modifications easily, as the suggested way of adding code which relies on WordPress hooks is to insert it either into the functions.php file of your child theme or into a site-specific plugin.
Now that you understand what WordPress hooks are, you are one step closer to adding the favorite link correctly. Since you will be adding a new feature, you only need to figure out a suitable action hook. In most cases, asking your theme authors for help in finding that hook is best. Additionally, in case you want to implement the same link inside a specific custom post, you can also consult with the plugin authors that enabled that custom post type.
Having said that, after you figure out the appropriate action hook, you need to hook the wpfp_link() function onto it by calling the add_action() function. Even though add_action() function uses four parameters, using the following call is sufficient in most cases:
if ( function_exists( 'wpfp_link' ) ) {
add_action( 'suitable-action-hook-here', 'wpfp_link' );
}
Of course, you need to replace the suitable-action-hook-here part with the correct action hook in your case. To reiterate, this code snippet should be inserted either in the functions.php file of your child theme or a site-specific plugin, using FTP. We won’t go over the details of how the code is inserted via FTP in this article. Instead, we will include the code we used for our example, as a final point in our overview on using WordPress hooks. The code snippet we used for the article is given below.
if ( function_exists( 'wpfp_link' ) ) {
add_action( 'lekker_action_after_blog_post_item', 'wpfp_link' );
}
As noted, we have used the lekker_action_after_blog_post_item as the action hook. Since this action hook is specific to the Lekker theme we used while creating the article, this code snippet can’t be copied and pasted, as the code won’t do anything unless the same action hook is present in your current theme.
With that being said, apart from creating the code and inserting it into a suitable location, you also need to make sure the favorite link is set to show in a custom location, to avoid duplicate links. Navigate to Settings > WP Favorite Posts > Options section, locate the Auto show favorite link, and set its placement to Custom. Then, click the “Update options” button to save your settings.
Afterward, the only thing that remains is to review the design and functionality of the newly added favorite button. Depending on the website, some CSS code might be needed to adjust the stylization of that link, as said previously. We used the following CSS snippet:
.wpfp-span {
position: relative;
display: inline-block;
width: 100%;
text-align: right;
font-weight: 600;
color: #1f1f1f;
}
Having inserted it into Appearance > Customize > Additional CSS of the customizer, we have gotten the result shown below.
Using the WPFP Page Template
Finally, the plugin also has a built-in page template which displays the list of users’ favorite posts. It also allows the user to clear that list completely or to edit the list by removing some of the entries. However, this page template is slightly less flexible than the User’s Favorite widget previously covered, as it only displays the user’s favorite blog posts. Nevertheless, we have decided to cover it as well, as this page template can be a valid option for some websites.
To use this page template effectively, we advise adjusting some of the plugin options beforehand. Navigate to Settings > WP Favorite Posts to find the relevant options directly tied to the plugin’s page template. Sadly, most of these options don’t directly specify where they are used, making it difficult for novice WordPress users to use them properly. Luckily, as we have thoroughly inspected the plugin’s code for this article, we will explain which options you should change.
Firstly, you should set the Favorite post per page, which determines the maximum number of user’s favorite posts that can be displayed per page. If a user has more favorite posts than the chosen limit, he will be able to access them using pagination which is part of the template. After setting the posts per page option, click the “Update options” button and scroll below.

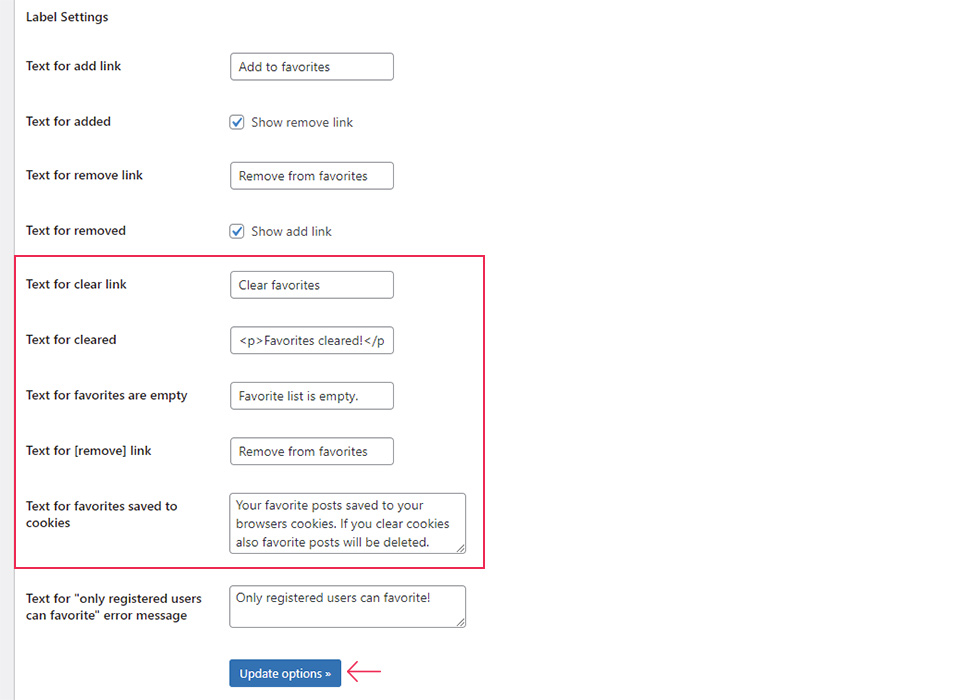
In the Label Settings subsection found below, you will be able to adjust the corresponding labels: the label for the clear link, label after clearing the list, label for the remove link, the label shown when the list is empty, and notice shown to users who aren’t logged in. After adjusting them, click the “Update options” button once more, to save your option choices.
Having done the previous, let us explain how you can use the wpfp page template. As this page template is technically more similar to a shortcode, the explanation is similar to the one given above.
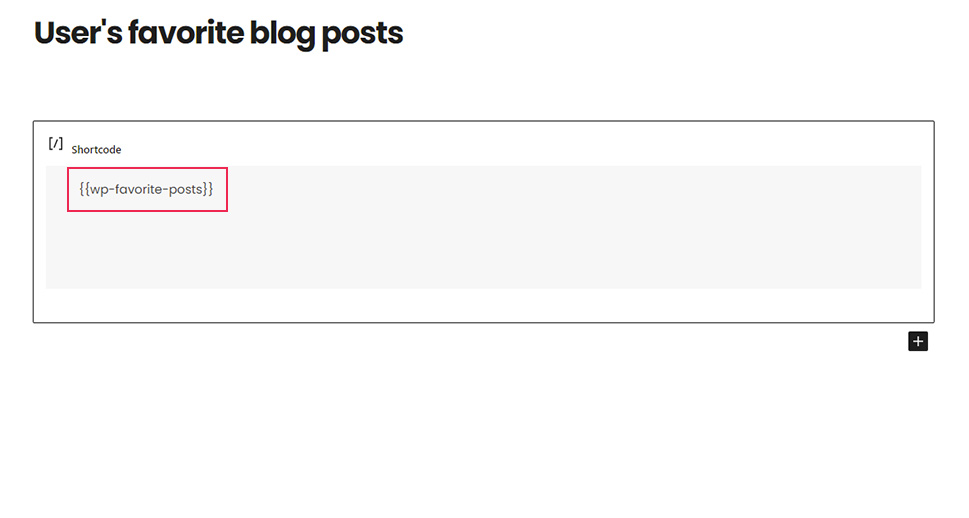
First, create a new page and insert a shortcode-rendering element in it. As mentioned previously, this element differs based on the page builder plugin you are using. For Gutenberg, which we are using as an example, that is the Shortcode block.
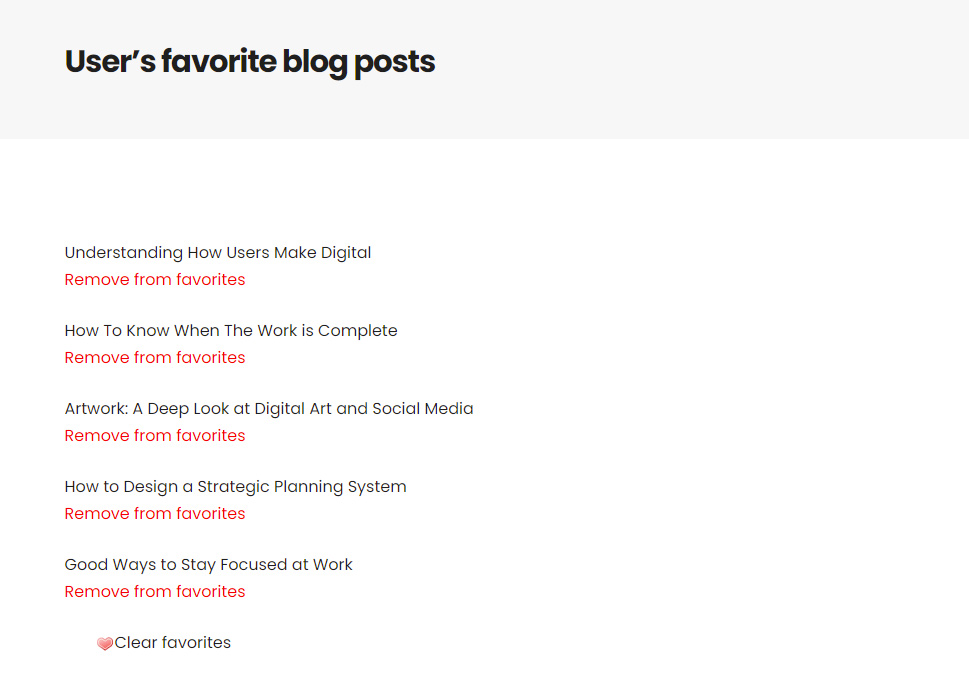
Having done that, insert the shortcode call in the following form – {{wp-favorite-posts}} into the shortcode-rendering element. This will display a list of favorite posts thanks to the wpfp-page-template.php file which is part of the plugin’s files.
Furthermore, it is worth mentioning that the plugin’s page template doesn’t restrict other content from being displayed on the page with the corresponding shortcode call. Meaning, you can add different elements/blocks to this page apart from the one you already inserted. However, note that if you opt to add more content to the page, that content will always be displayed below the list of favorite posts. Having said that, after adding the call, make sure to publish the page and examine how it is displayed on the front end of the website.
Similar to previous uses of the plugin, additional CSS code might be needed to further stylize the outcome. The CSS code we used is given below.
.wpfp-span {
display: inline-block;
}
.wpfp-span ul {
list-style: none;
}
.wpfp-span ul li {
margin-bottom: 1.5em;
display: -webkit-box;
display: -ms-flexbox;
display: flex;
-webkit-box-orient: vertical;
-webkit-box-direction: normal;
-ms-flex-direction: column;
flex-direction: column;
}
.wpfp-span .remove-parent {
color: red;
}
As mentioned previously, this code needs to be created on a case-by-case basis. Therefore, you should try to use our code only as a starting point in finding the CSS code suitable for your website. Having said that, after inserting the CSS code inside the Appearance > Customize > Additional CSS section, we have gotten the following result.
With it, we conclude this article.
Final Thoughts
Favoriting posts in WordPress increases the visitors’ website engagement while providing valuable info regarding your website’s content and visitors’ preference. This feature is especially useful for websites that rely on custom post types as the majority of their content. While not available by default, it can be easily implemented thanks to some WordPress plugins.
In this article, we have explained how you can use the WP Favorite Posts plugin to implement and use the favorite posts feature. While the options and widgets that we covered are mostly straightforward, the plugin leaves room for intermediate and advanced users, and we also covered these functionalities. Thus, by carefully reading and applying our instructions, you should have no problem allowing your users to add favorite posts on the website. Finally, as this feature is beneficial for most WordPress websites, bookmarking the article for future use is something we strongly recommend.
