How to Fix the “Your Connection is Not Private” Error in WordPress

Even though WordPress is a reliable and sturdy platform, errors now and then are unavoidable. Therefore, when an error occurs, it is important to stay calm and troubleshoot it efficiently. Depending on the error you are experiencing, various other issues can happen that can endanger your website.
In this article, we will talk about the Your connection is not private error. This is a very common WordPress error that prevents users from accessing a certain website. Even though it might not seem troublesome on the surface, your site being a website inaccessible can have significant repercussions. For website owners, this error can mean a loss of revenue and a deterrent to traffic, as well as a potential hit to SEO ratings, if it’s not resolved promptly. To help you avoid this, we have made a detailed article explaining the causes of this error and the many possible ways of troubleshooting it and broke it down into manageable sections:
Qode Themes: Top Picks
View Collection


Firstly, let us examine what the Your connection is not private error is and how it manifests. This error concerns HTTPS websites and signifies that there was an issue in the process of creating an SSL connection.
When a user visits a website, his browser sends a connection request to the website’s server. The server will reply with the certificate information and a public key, used for the validation process. The user’s browser will, then, try to validate the SSL certificate. If successful, the browser will encrypt the data, making the connection between the user’s browser and the website secure. However, if the browser ascertains that the certificate is invalid or if there was an issue during the validation process, the browser will prevent users from accessing the website by showing the Your connection is not private error message.
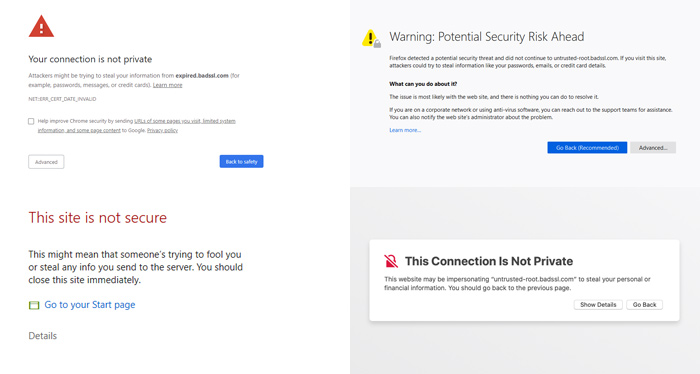
Some of the more obvious reasons why this error occurs include the certificate expiring or being issued by untrustworthy organizations. However, there are several other possible reasons, as we will soon see. Similarly, the error messages can vary across browsers. Below we have included examples of error messages in Google Chrome, Mozilla Firefox, Microsoft Edge, and Safari, in that order.
Now that you have a grasp on what the issue is and how it presents across multiple browsers, let us see how it can be solved.
Since there are quite a few reasons for the Your connection is not private error to occur, you might feel overwhelmed when trying to troubleshoot it. But, worry not. For the most part, all possible causes of the error could be classified into two categories – client-side and certificate-related issues. In this section, we will cover the possible solutions for the error, starting from the ones that are easier and less time-consuming to execute.
Reloading the page
When facing an error, you should always double-check if it wasn’t only temporary. This is done simply by shutting the browser down and then reopening it. Then, you should open the page where you were previously experiencing the issue and examine it. As there is a slight chance that the SSL certificate was being reissued at the exact time when you first saw the error, it doesn’t hurt to test.
If the error isn’t resolved after that, try reviewing several other pages on that website to investigate if the issue is restricted to a single page or not. If the error appears only on a single page, it is most likely that the error is due to the cache on that page. As such, we also suggest doing a hard reload of the page. Windows or Linux users can do so by pressing the CTRL and F5 keys at the same time, while the macOS users should press Cmd, Shift, and R, at the same time. By performing a hard reload of a single page, you will delete its browser cache. After that, examine the page to see if the error has disappeared.
Clearing browser cache and cookies
If the error is present throughout the whole website, we still shouldn’t neglect to test for caching issues. As caching issues can cause a wide array of errors, it is always advisable to test for it. Clearing the cache and cookies of your preferred browser should be one of your first troubleshooting steps. Therefore, we will explain how to do so in several different browsers.
Furthermore, you should either do a hard reload of a page or clear the browser cache and cookies after each of the other suggested methods we included in this article. By doing so, you will be able to properly check the effectiveness of those methods, as you will be seeing the latest version of a certain page.
-
Chrome
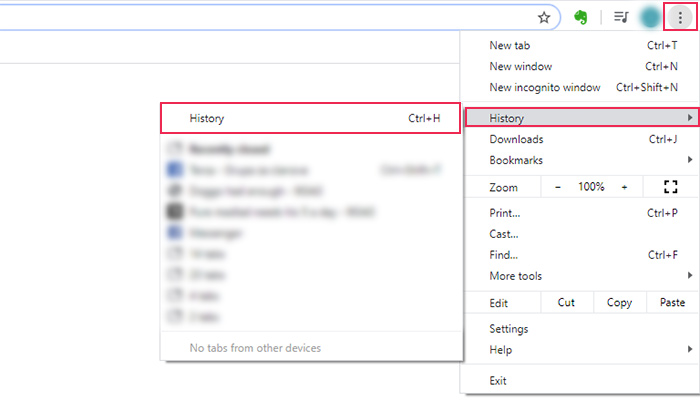
To clear the browser cache and cookies in Chrome, click on the three dots in the top right corner. Then, hover over the History option found in the menu that opens and choose the second History option in the subsequent submenu. This will open the History page within the Chrome browser. The same page can also be manually accessed by putting the address chrome://history/ in the address bar.
Locate the menu on the left side of this page and select the Clear browsing data option.

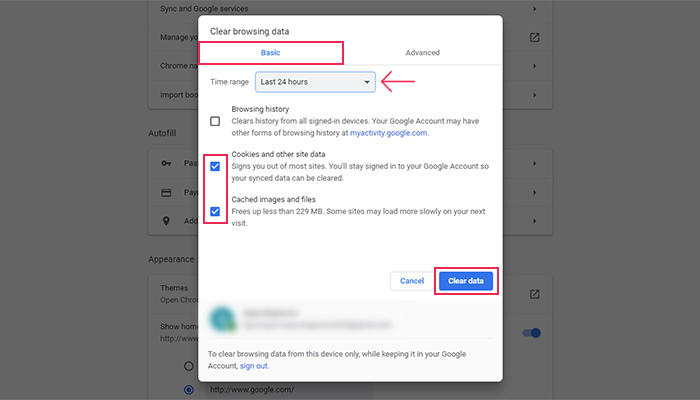
On the following page, you will see the browser clearing popup window. The popup window has two tabs – Basic and Advanced, and the Basic one is displayed by default.
Choose the time range and what type of data you wish to delete and press the Clear data button below to clear browsing data. If you want more control over what data you delete, switch to the Advanced tab and follow the same steps described above.
-
Firefox
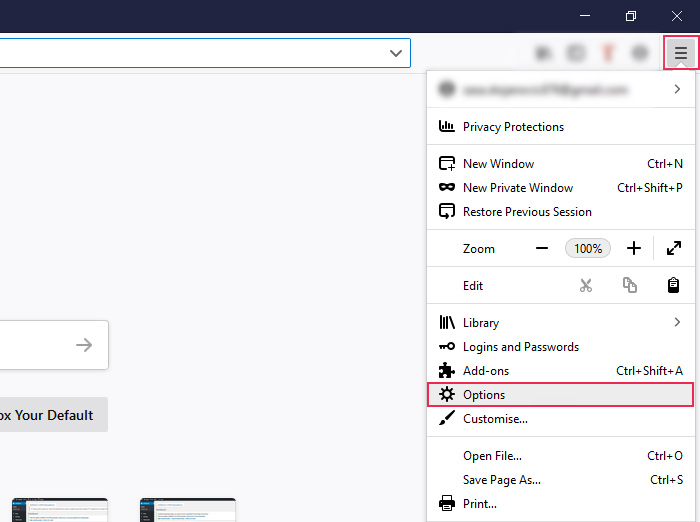
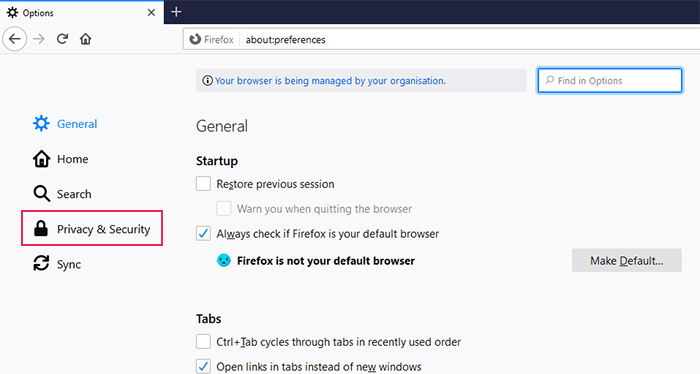
To clear the browser cache and cookies in Firefox, press the hamburger menu icon in the top right corner of your screen. Then, select Options from the menu that opens. This will open the Options page. You can access the same page manually by typing about:preferences in the address bar.
Then, click on the Privacy & Security option from the menu on the left.
This will open the Privacy & Security tab, after which you should scroll down to the Cookies and Site Data section within. Then, press the Clear Data button.
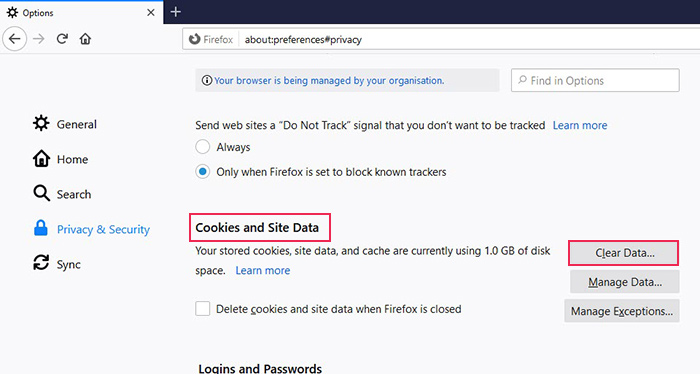
Clicking on the button will open a popup window. Make sure that both the Cookies and Site Data as well as the Cached Web Content options are ticked and press the Clear button.

-
Safari
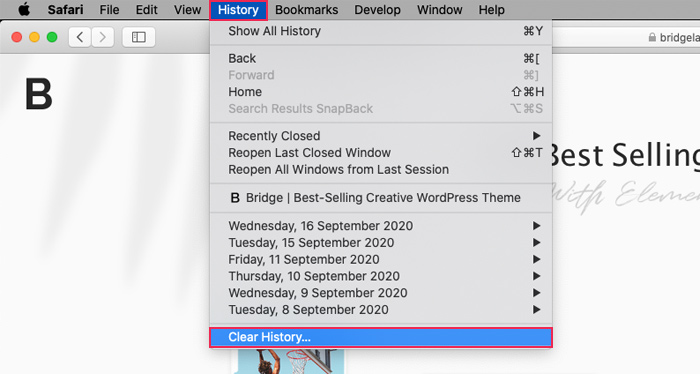
To clear the browser cache in Safari, you can opt for one of the following two options. If you want to delete your whole browsing history, including cache and cookies, you can do so by navigating to the History tab and clicking on the Clear history option.
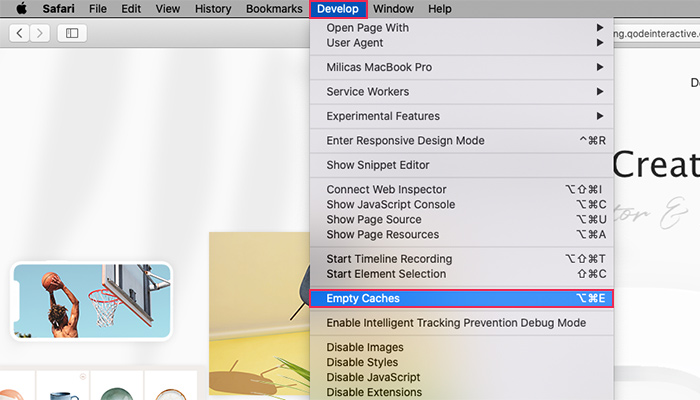
If you only want to remove the browser cache and cookies, you can remove one at a time. To empty the browser cache, navigate to the Develop tab and press the Empty Caches option.
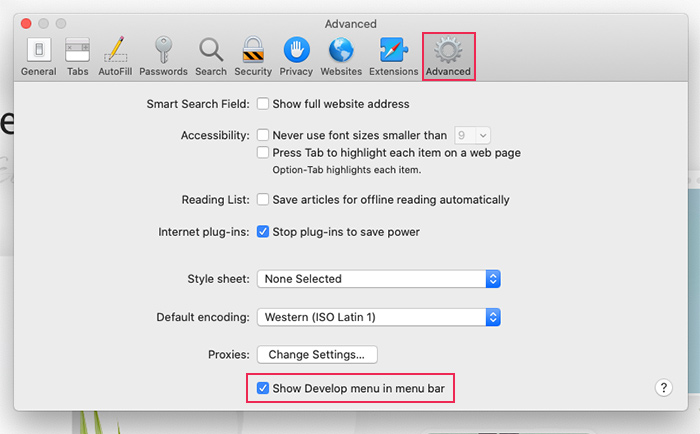
If you aren’t able to see the Develop tab, you will need to enable it first. To do so, navigate to the Safari tab and click on the Preferences option.
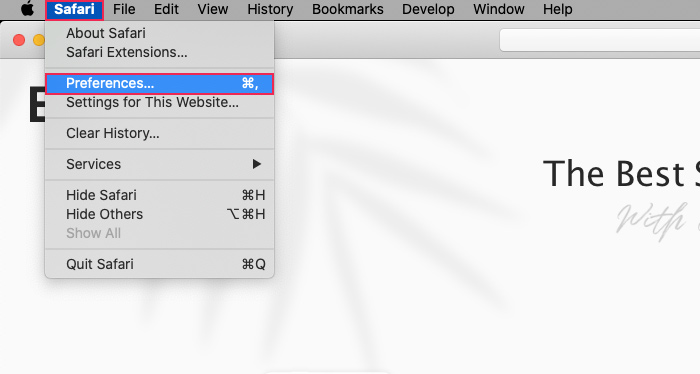
Then, click on the Advanced tab in the popup window and tick the Show Develop menu in menu bar option.
Afterward, proceed as described above.
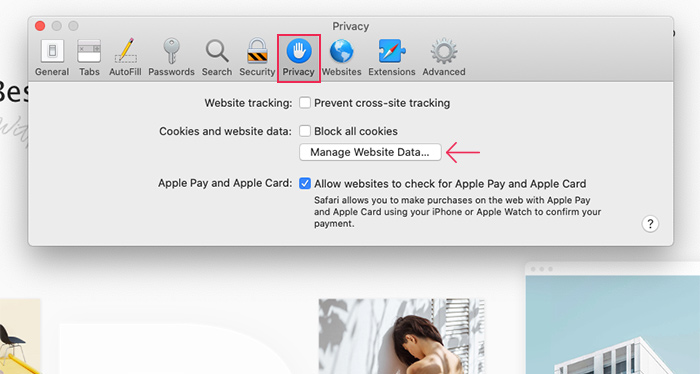
To clear cookies only, click on the Privacy tab (within the same popup window) and press the Manage Website Data… button.
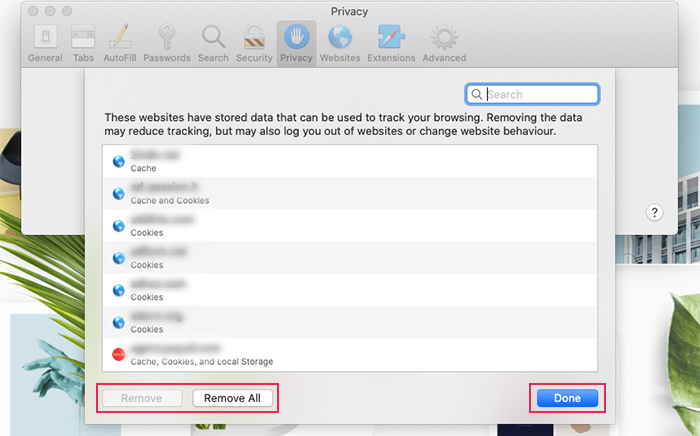
Then, either manually choose websites whose cookies you want to remove and press the Remove button, or press the Remove All button to remove cookies from all the websites shown in the list. To finish the process, press the Done button.
-
Edge
To clear the browser cache and cookies in Microsoft Edge, press the three dots in the top right corner of your screen. From the menu that opens, press the Settings option.
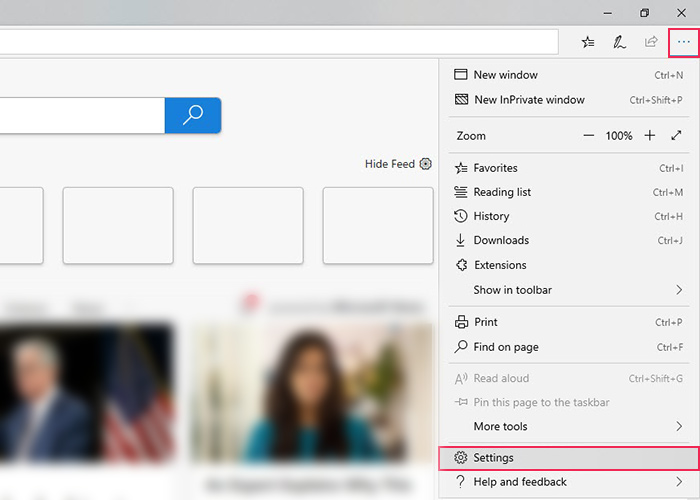
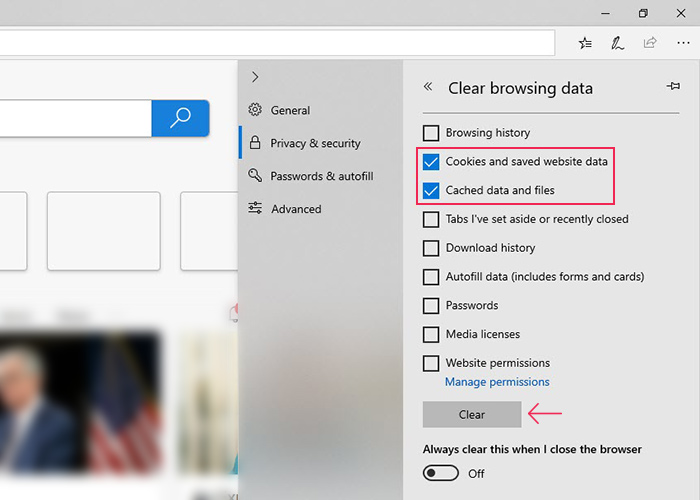
This will open a menu with all your settings on the right and place you within the General tab of that menu by default. Click on the Privacy & security tab, find the Clear browsing data option, and press the Choose what to clear button below.

Make sure to tick the Cookies and saved website data as well as the Cached data and files options before you press the Clear button below.
Accessing the page using multiple browsers
If you weren’t able to solve the error using the steps above, we suggest checking if it persists across multiple browsers. Open the page where the error appeared in different browsers. If the error is constrained only to a single browser, then either the browser version isn’t up to date or there is an issue with the browser itself. To solve the error, you should simply reinstall that browser.
Syncing the date and time on your computer
Having your date and time improperly set is one of the more unexpected reasons for this error occurring. It is because browsers rely on your date and time settings to tell if an SSL certificate is expired or not. Therefore, you should always have your date and time synced on your device, to avoid such problems. We will show how you can do so below.
-
Windows
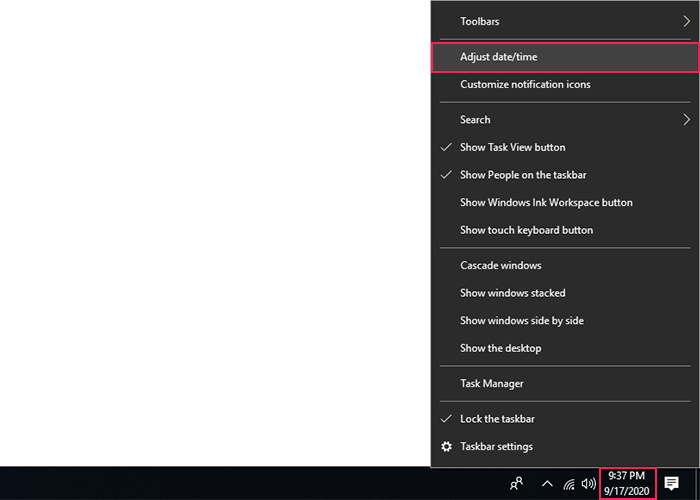
To sync the date and time on Windows, right-click on the date and time settings in the bottom right corner of the screen and then select the Adjust date/time option.
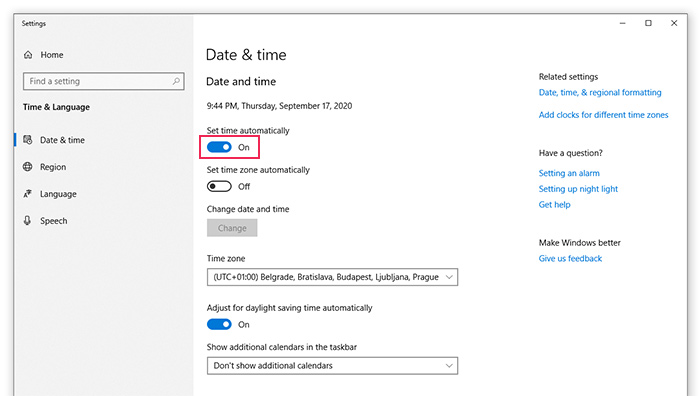
In the popup that appears, find the Set time automatically option and make sure it is switched on. Close the popup window and check the time and date in the bottom right corner once more, to ensure it is properly set. If the time wasn’t properly set automatically, you can switch the Set time zone automatically option to Off and manually select the time zone.
-
Mac
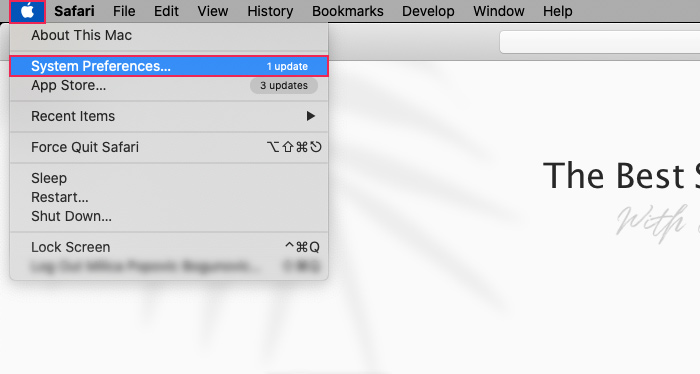
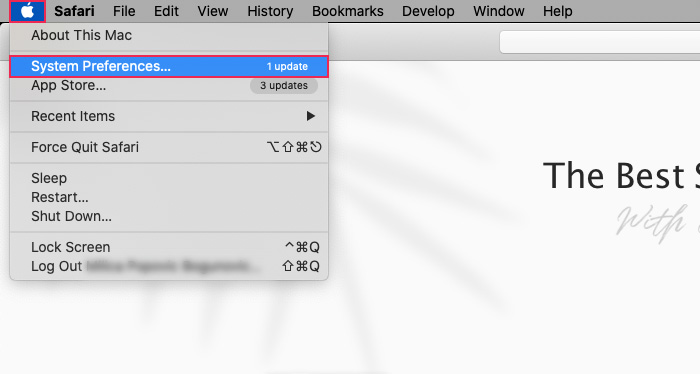
To sync the date and time on Mac, click on the Apple menu and, then, click on the System Preferences option.
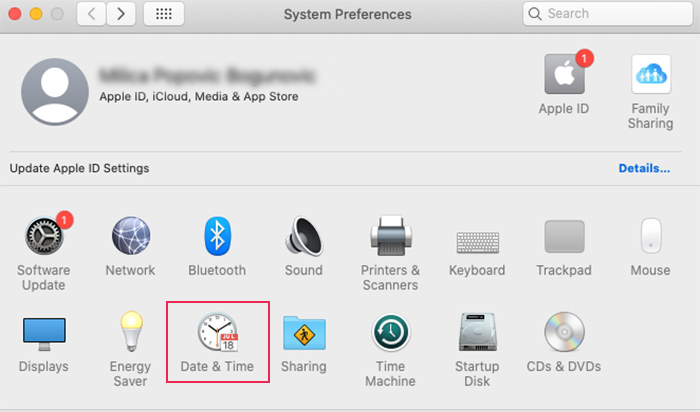
Within the System Preferences window, click on the Date & Time option.
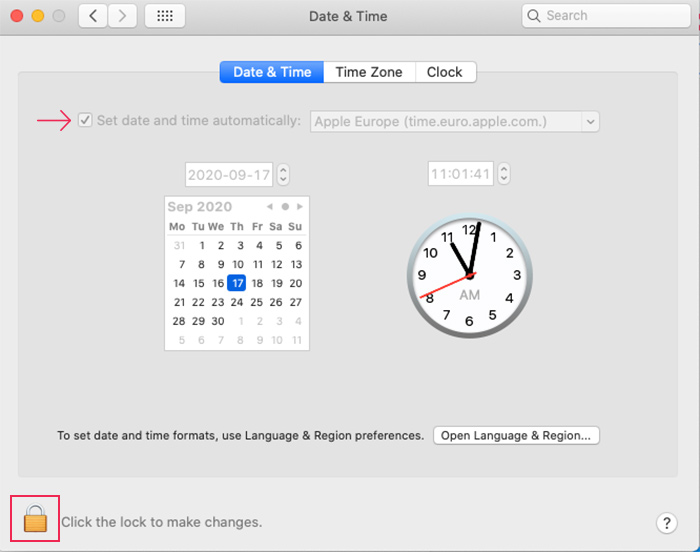
If a padlock icon appears in the bottom-left part of the window, click on it and then insert your administrator username and password so you can make changes to those settings.
Then, within the Date & Time tab, tick the checkbox next to the Set date and time automatically option.
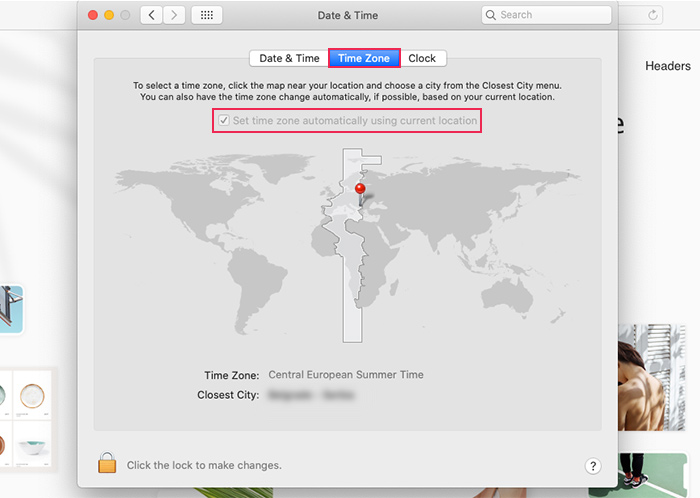
Open the Time Zone tab afterward and make sure your time zone is selected correctly. If your time zone isn’t automatically assigned, uncheck the Set time zone automatically using current location option and manually select the region and city on the map below.
After you sync your date and time, close the browser you were using. Then reopen it, and access the same page where the error previously appeared to see if it is gone.
Checking if the SSL certificate has expired
One of the most obvious reasons why you may be experiencing Your connection is not private error is because the SSL certificate has actually expired on that website. This could be due to some issue with the SSL auto-renewal procedure. Alternatively, the website owner might not have realized the previous certificate has expired so they haven’t created a new free SSL certificate yet.
There is an easy way of investigating if this is the reason for the error. To start, click on the padlock next to the website address in the address bar. This will let you know whether the connection is secure or not.
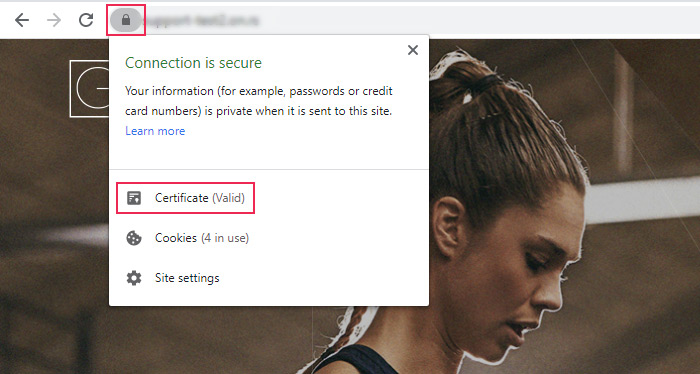
Furthermore, by pressing the Certificate option, you will be able to see the certificate information, including whether it is valid and the date on it expires.
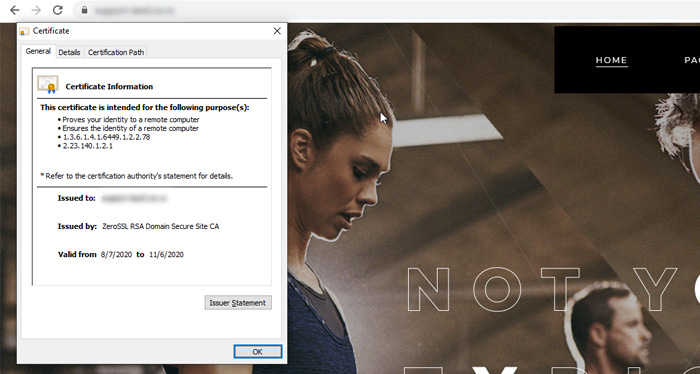
If your certificate has expired, you should contact your hosting or SSL certificate provider about renewing it.
Checking the SAN of a certificate
The SAN or Subject Alternative Name certificates serve to secure multiple domains and subdomains with a single certificate. This includes all the www and non-www domain name variations. Therefore, the reason for a Your connection is not private error can be as simple as not including either the www or the non-www URL variation under the SAN certificate. However, as adding a 301 redirection code is becoming common practice, this, as the reason for the error, should be less likely nowadays.
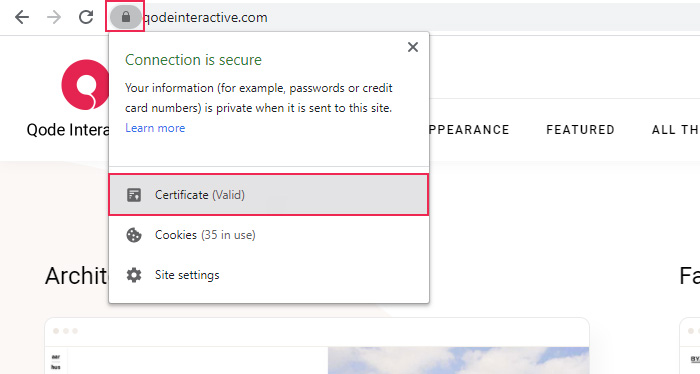
The error can also happen when moving a website from a server or domain where the first domain had a valid SSL certificate and the second does not. To determine if this is the reason behind the error, you should first inspect which domains are included within your SAN certificate and which are not. You can do so by clicking on the padlock in the address bar, followed by a click on the Certificate option.
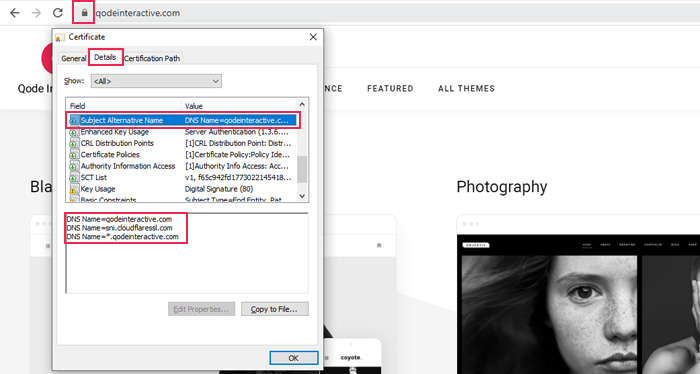
Then, select the Details tab and manually search for the Subject Alternative Name within the list of fields. After you find it, click on it to see its value below.
Then, to solve this instance of Your connection is not private error, you can either issue a free SSL certificate for your second domain (where the website was moved to). Alternatively, you can insert a redirection that leads the visitors from an insecure version of your site to the version with a valid certificate.
Checking your internet connection
If you are using a public wifi connection, it is most likely that you will experience this error. It is because most public connections use HTTP and even those that use HTTPS could have configuration issues. You should be aware of the risks that it poses – any personal data you send in a transaction can be stolen. As such, we suggest always using a private wifi connection instead of public ones.
Temporarily disabling VPN and antivirus services
Sometimes your VPN or antivirus services could be the cause of the Your connection is not private error. To test if this is the case with you, disable them temporarily and reload the page. If the error is no longer present on the website, it confirms the VPN or antivirus service was the culprit. To solve the issue, you should ask for help from your VPN or antivirus support service.
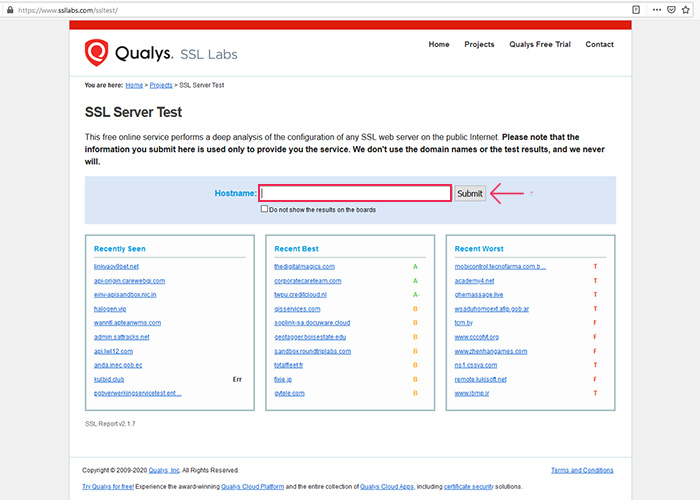
Running an SSL server test
If you set the SSL certificate on your website manually, there is a chance you did so incorrectly. Therefore, to ensure everything was set up properly and to exclude misconfiguration as a possible culprit for the Your connection is not private error, you should run an SSL server test.
To do so, insert your website URL in the Hostname: option and press the Submit button next to it.
You will need to wait until the test results are generated, which could take up to a few minutes. Then, you will see which grade your website got, as well as all the details regarding its SSL configuration.
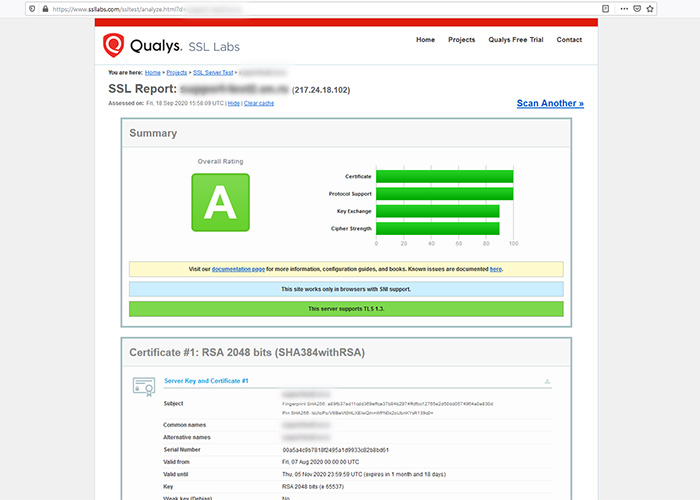
You should always strive to get an “A” as your grade. If the SSL server test locates any issues, you will get a lower grade and a list of the issues you should address. We suggest studying their documentation for the best common practices as well as contacting your hosting or SSL certificate provider for added help.
Updating your operating system
In some cases, the Your connection is not private error can be because of an outdated operating system. As such, we suggest only using newer operating systems and keeping them up to date. Below, we will show you how to run system updates for Windows and macOS (Windows 10 and macOS Catalina, more precisely).
-
Windows
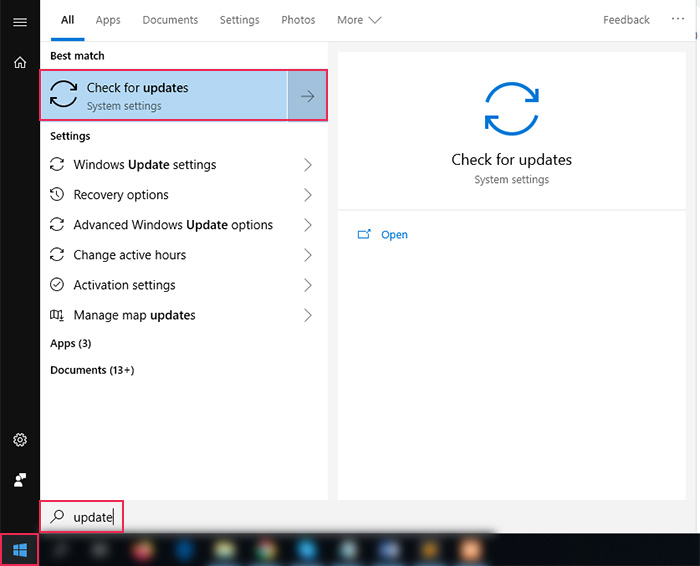
To update the Windows OS, press the Start button and start typing the word update, which will open the search field. Then, from the Best match results, click on Check for updates.
This will open a new window and place you within the tab called Windows Update. Locate and click the Check for updates button within.
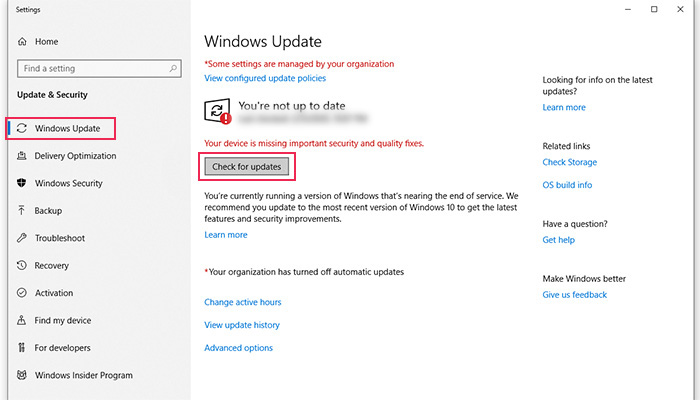
By pressing the button, your PC will check, download, and install the latest update, if one is available. But, you should be aware that this process can be lengthy, so we advise having patience until it finishes and conducting it during your off-hours.
-
Mac
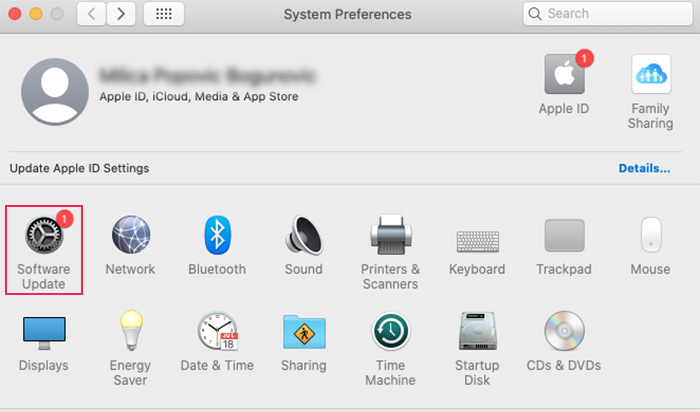
To update the macOS, click on the Apple menu and select System Preferences.
Then, click on the Software Updates option within the System Preferences menu.
If there is an update available, you will see a message stating so. You can press the Update Now button next to the message to start the update. You can also press the More info link below if you wish to review what exact updates are available and which ones you should run.
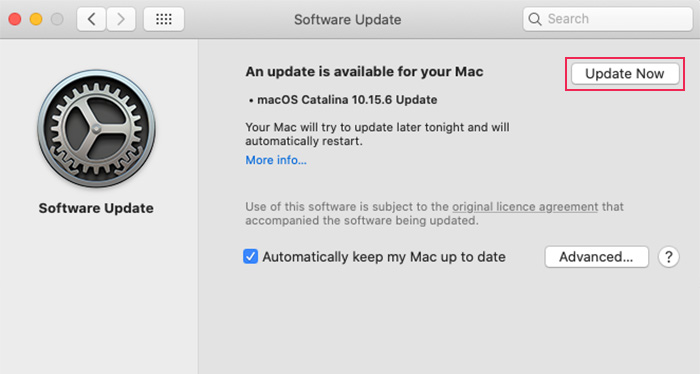
If appropriate, you can also tick the checkbox next to the Automatically keep my Mac up to date to ensure your Mac updates automatically.
Restarting your computer
If none of the methods so far worked for you, we suggest restarting your computer. Shutting down all the applications that are running is time-consuming, and then you have to re-enable them, and generally no one likes to do it. However, restarting your computer can solve any temporary issues which it has that could be related to the Your connection is not private error. Examine the page afterward to see if the issue has disappeared.
Contacting your hosting provider
As we mentioned earlier, you should make sure to clear the browser cache and check the page after trying each of the methods in this article. This will help you ensure the effectiveness of your troubleshooting. However, if the issue persists, you should ask for professional help in solving this error.
Contact your hosting or SSL certificate provider and let them know about the error you are facing. If the error is due to the SSL certificate, ask them to reinstall or renew it for you. Even though we briefly mentioned this option in some of the previous steps, it deserves its own section. Your hosting provider can also offer help in case the error is caused by something else you might have overlooked.
We will also include a couple of less popular troubleshooting steps below. You should only try them after exhausting all previous methods without success. Follow them only if you completely understand what security risks they might pose.
Manually proceeding
When accessing a page that has the Your connection is not private error, you will most often be given a choice to disregard the error and proceed to the website anyway. Since the error is present, it means that the connection isn’t encrypted, which makes it insecure. As such, if that website requires you to insert login information, credit card information, or other sensitive user data, you shouldn’t ever proceed.
For websites where you want to manually proceed, despite the aforementioned risks, you can do so by pressing the Advanced button.
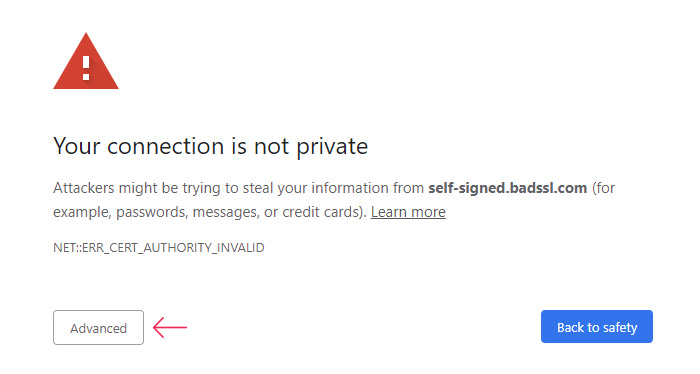
Then, you should click on the Proceed to your-website-url.com (unsafe) link to proceed.
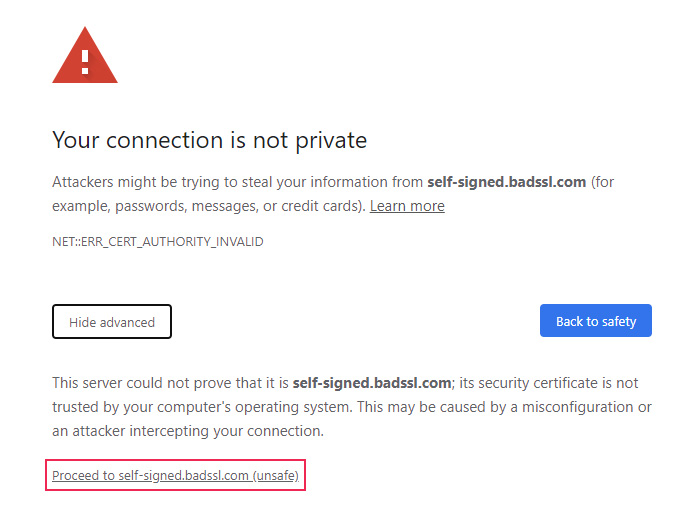
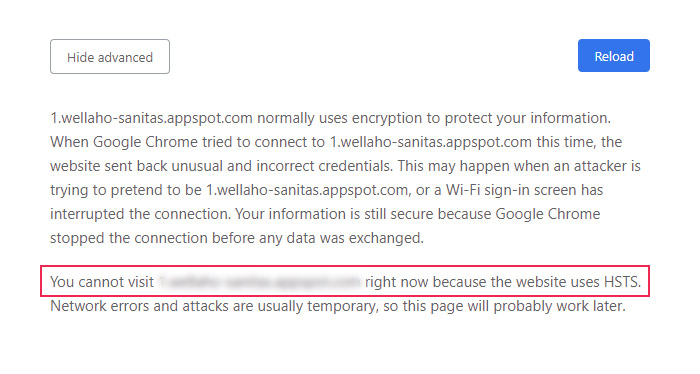
It is worth noting that this option won’t be available if the website uses HSTS (HTTP Strict Transport Security).
Setting Chrome to ignore certificate errors
Another way of solving the Your connection is not private error is to set your browser to ignore certificate errors. This approach is usually advised for testing purposes and developers only. Nevertheless, we will show how to do it using Chrome so you can decide whether to proceed.
Start by finding the Chrome icon on your desktop, then right-click on it and select the Properties option. This will open a popup with a view of the Shortcut tab.
Locate the Target: field and add –ignore-certificate-errors at the end, after the closing quotation marks. Press the OK button afterward.
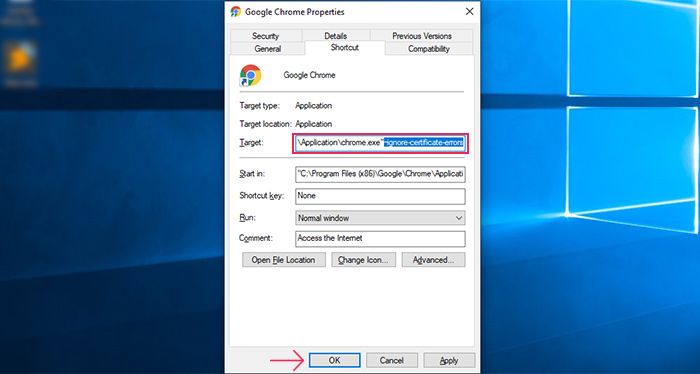
Then, exit the Chrome browser, relaunch it, and access the page that was previously showing the error. The error should no longer be present.
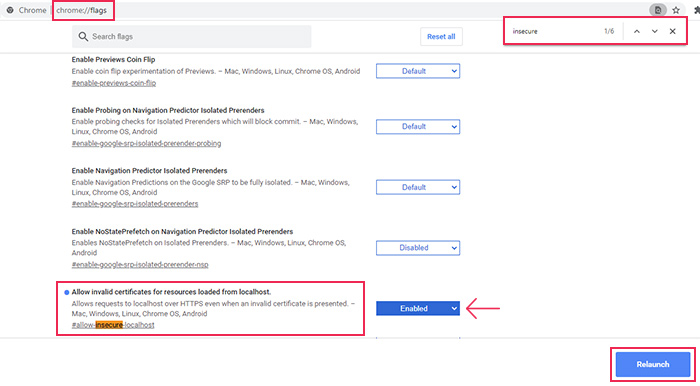
If you are testing something in a local environment, you can also use Google flags to allow insecure connections coming from the localhost. Access chrome://flags/ by typing it in the address bar and pressing the Enter key. Then, press the CTRL and F key simultaneously and insert the keyword insecure. Set the option Allow invalid certificates for resources loaded from localhost to Enabled. Then press the Relaunch button in the bottom right corner to apply the change and relaunch the browser.
Final thoughts
WordPress errors can be difficult and stressful to tackle. Your connection is not private error is one among many, but it can happen suddenly and for a multitude of reasons. However, if you carefully follow the steps outlined in this article, you will be able to locate the exact cause quickly and solve the error with ease. Since this is a common WordPress error that you will likely encounter in the future as well, we suggest bookmarking this article to keep it close at hand.
