What to Do If Your WordPress Changes Are Not Showing
Creating and managing a WordPress site requires a lot of daily edits to your content. These changes include edits on posts, pages, widgets, theme options, etc. One of the most common issues you may face in this daily routine is your WordPress changes not showing after you make edits to your site. Solving this error can be quite challenging for WordPress beginners. Since you’ll probably run into this issue more than once, it would be useful to learn the troubleshooting steps. In this guide, we’ll show you what to do if your WordPress changes are not showing after update/publication. It doesn’t matter whether you’re a beginner or an experienced developer – knowing these things will come in handy either way.
To help you, we’ve broken this article down into several smaller steps:
How to Fix WordPress Changes Are Not Showing
Caching is the main reason why your site doesn’t appear changed after the edit. In the following sections, we will thoroughly describe the ways you can clean various types of caching to solve the issue. Before that, there are several preparation steps you need to take to be sure there is an error, so we’ll quickly run through them.
Forgetting to save the changes after editing a file or a page can happen to anyone. So, before you go any further, make sure this simple mistake isn’t the cause of the issue.
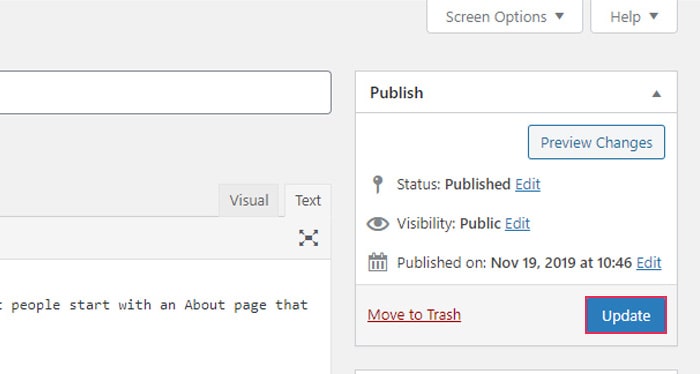
If you change the page/post content or its options, make sure that the page/post is updated properly. Review the changes, make some edits, if needed, and press the Update button, in the upper-right corner of the screen.
If you edited your theme’s options or general settings within your dashboard, make sure that the changes are properly applied. Review them once more and then click on the Save Changes button to save them. This button’s location may vary, but it is most often found either in the bottom-left or the top-right corner of the screen.
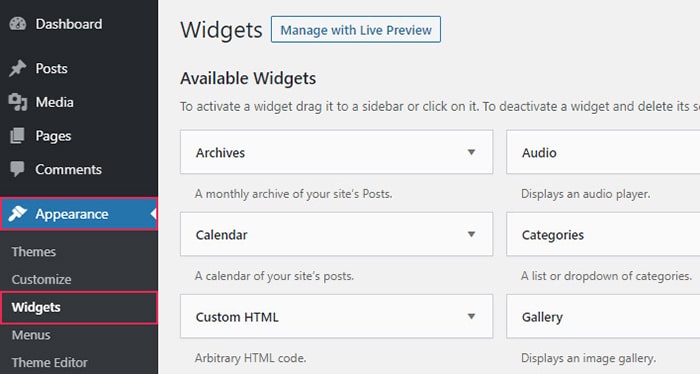
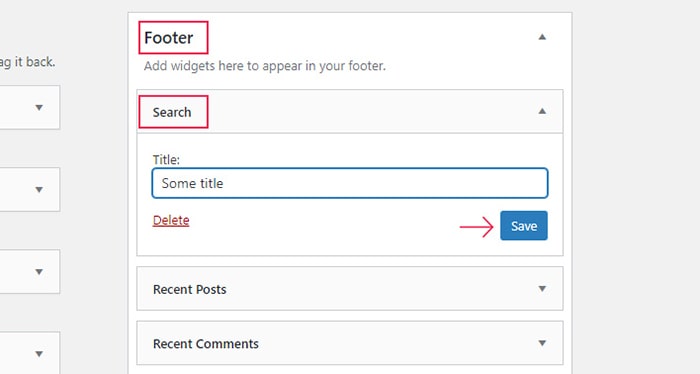
Also, make sure that the widget changes are saved properly. Navigate to Appearance > Widgets, find the widget area and the widget you changed and click on the Save button.
Finally, check if you’re viewing the proper URL, especially if you’ve recently changed domains or migrated your site.
Make sure to review your page/post, after going through each step we’ve suggested. If the issue is still present, proceed to the next section.
After your site loads successfully for the first time, web browsers will store a copy of your site’s static content in a part of your computer called cache. Browsers use that copy every time your site loads, to decrease the overall loading time. This greatly enhances the user experience, but this comes at a cost of caching issues.
More precisely, by showing a cached version of your site, your browser won’t acknowledge any changes on your site. It doesn’t matter whether you edited a couple of words or the entire page content – you won’t be able to see any changes. Simply reloading the page doesn’t help. In that case, you’ll have to do a hard refresh, which both reloads the page and clears its browser cache in the process.
Here are the instructions on how to do a hard refresh of your page.
Windows:
-
Chrome : Ctrl + F5 or Ctrl + Shift + R
-
Mozilla : Ctrl + Shift + R
-
IE : Ctrl + F5
macOS:
-
Chrome : Cmd + Shift + R
-
Mozilla : Cmd + Shift + R
-
Safari : Cmd + Opt + R
If you can see the edits after the hard refresh, the issue is solved. In time, you’ll probably come to the conclusion that clearing cache will usually solve this issue. To prevent this issue, make sure you routinely clear the cache before reviewing content edits.
While clearing browser cache should be the first go-to solution for this issue, we’ll explore the other types of cache that exist and the ways to clear them.
Caching plugins serve the same purpose as the browser cache and can cause the same problems.
There are, however, several ways to deal with these errors. You can either clear/purge all cache or a single page, decide not to cache your homepage (if the issue is present on it) or deactivate the caching plugin altogether. However, the names and locations of these options differ depending on the caching plugin you are using. Additionally, caching plugins’ prices and compatibility with your current theme may vary. In that case, finding the adequate caching plugin is up to you.
For the purposes of this article, we used W3 Total Cache and its options. The same or similar options exist in any other caching plugin.
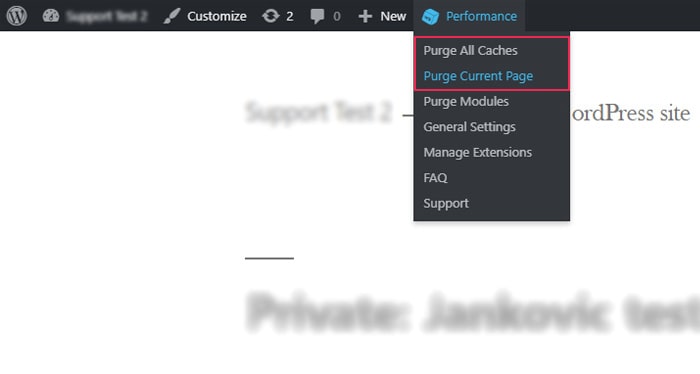
To clear all the plugin cache, hover on the Performance option in the top navigation tab and click on Purge All Caches in the dropdown menu. To purge the cache of a single page, click on the Purge Current Page option from the same dropdown menu.
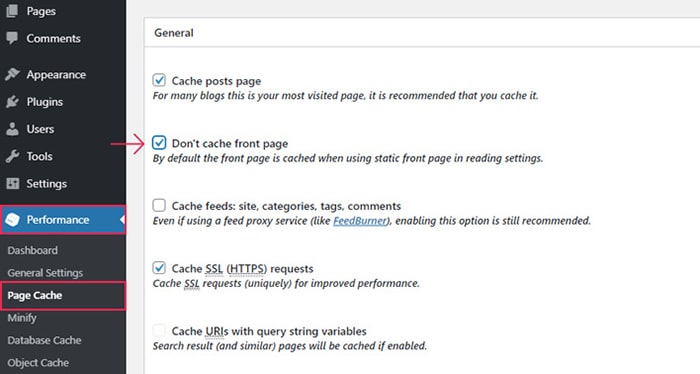
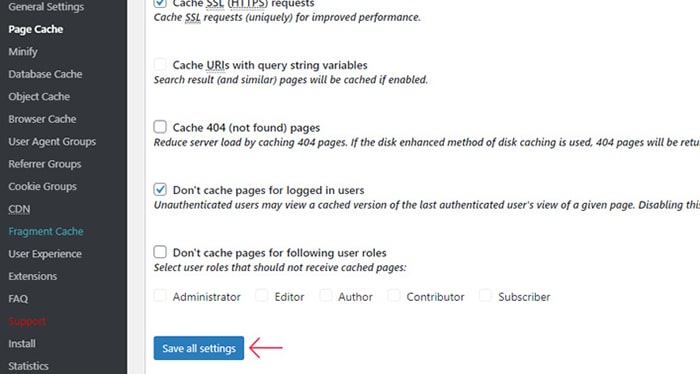
If you are editing your site’s front page quite often, it may become daunting to clear the cache every time. In that case, you should disable caching on that page specifically. You can disable the caching on a static front page by navigating to the Performance option in the left menu and selecting Page Cache. In the General section, choose the Don’t cache front page option and click on Save all settings. Additionally, you can see further examples of such options in the following two screenshots.
As you can see, caching plugins are quite practical. The only instance where you should avoid plugins is having an extremely “lightweight” website. So, when choosing the best caching plugin for your website, the amount and size of your site content should be one of the main considerations.
However, if your site is currently under development or you are making frequent changes to it, consider disabling the plugin temporarily. When you do this, you will eliminate the need to purge the cache after every edit.
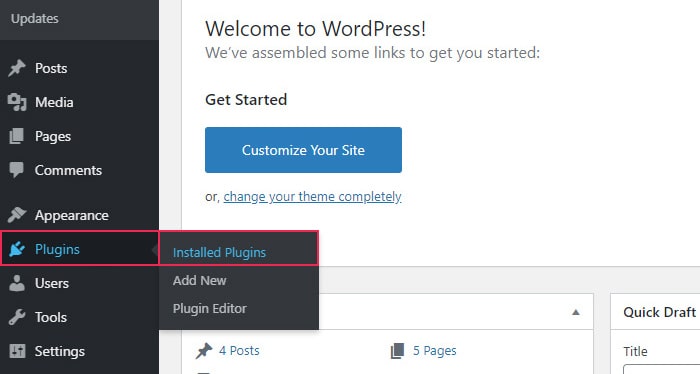
You can deactivate your chosen caching plugin by navigating to Plugins > Installed plugins, finding the plugin and selecting the Deactivate option.

As with all previous steps, you should review your content after each step. If the content is shown correctly, the issue is gone.
If the issue remains after clearing both browser and plugin cache, it is likely that you have a caching option enabled on your server, which is causing the issue. To clear the server cache, we suggest consulting with your hosting provider.
Qode WordPress Themes: Top Picks
View Collection


Additional Steps to solve WordPress Changes Are Not Showing
In most cases, the issue should be solved using the methods suggested in the previous section. Nevertheless, we will leave some helpful tips for those rare cases when the changes are still not showing correctly.
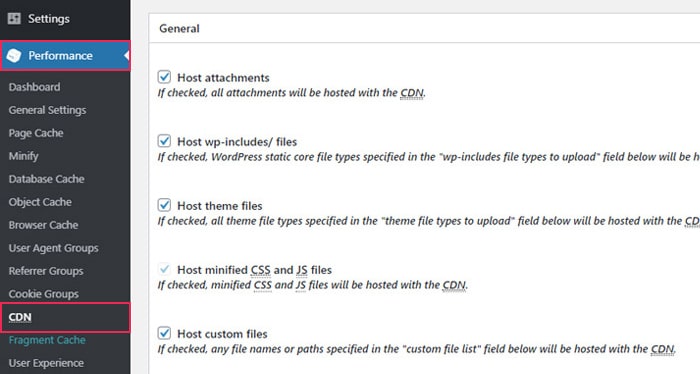
CDN stands for content delivery network and it is an important asset for improving website speed, especially for sites with high traffic rates. It should only be used for serving static site resources, such as CSS and JS stylesheets and images.
But, as with all other types of caching, CDN caching issues can happen, albeit very rarely. Therefore, purging your CDN cache is sometimes required to show the newest version of your site. One of the many benefits of a good caching plugin is that you can integrate your CDN with it and purge the CDN cache.
The plugin we used works this way. Simply navigate to the Performance section and click on CDN. At the top of your screen, you will see two buttons for purging single files or purging all cache.
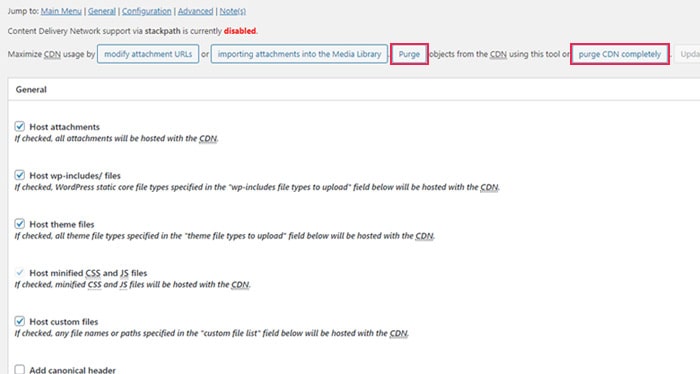
Keep in mind that completely purging CDN can affect your site’s performance negatively. However, it might be necessary if you made numerous changes to your site. In case you only made a few targeted edits, purging single files can be more effective.
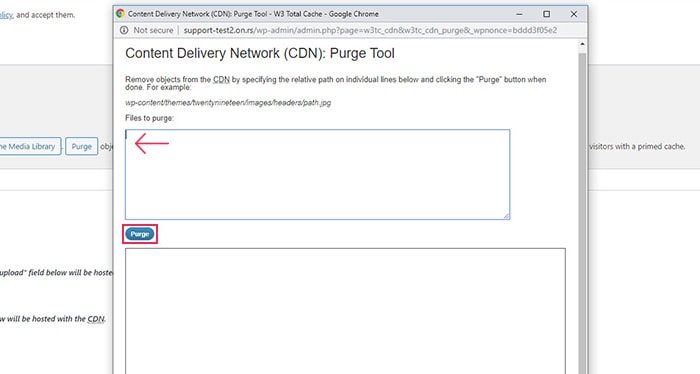
If you decide to use the first option, i.e. purging single files, a popup window will appear. Then, insert the URL of the file that needs cache purging and click on the Purge button.
When adding code to your site, be it via theme options, shortcodes, widgets or via a child theme, it is important to follow the proper coding syntax. Failing to do this will result in no changes being applied to your site or errors showing on your site. Therefore, please check for any errors in the code you inserted and try to correct them. Often, the issue comes down to missing opening or closing brackets, or a semicolon (;). Also, if you’re adding custom HTML or JS code, make sure that all the opening tags have their corresponding closing tags. Having a mismatch in the number of opening and closing tags is a very common error. To prevent these errors, use proper code indentation and make sure you maintain the same coding style when writing code.
Final Thoughts
Equipped with this article, you now have a solution for WordPress changes not showing on your site. But more than that, you can also make well-informed decisions about various types of caching solutions and select the one that is the best fit for your website. This knowledge will also help you troubleshoot future cache-related WordPress errors, as well as improve your coding knowledge and website speed.
