How to Verify Your WordPress Site on Pinterest

Pinterest is currently one of the most popular and the fastest growing social media platforms, which is why many businesses (though mainly those in the design, art, and architecture fields) cultivate a Pinterest presence. Pinterest in particular lends itself to sharing of visual content, so you shouldn’t neglect optimizing your content for Pinterest if you think you can benefit from it.
If you want more than just a social media presence, though, you can switch to a business account and also verify your WordPress website on Pinterest in order to reap the benefits of increased integration. But what are the benefits, exactly? How can you get a business account? We will attempt to answer these and other questions you might have in this article. Here’s what we’re going to talk about:
Qode Themes: Top Picks
View Collection


Getting on Pinterest is easy enough; anyone can do it, but verifying your account (making it “official”) gives you access to additional functionalities.
The first and most obvious benefit is the access to Pinterest Analytics. You can use Pinterest Analytics to learn more about your visitors who are also Pinterest users, and use this knowledge to inform your content creation and marketing strategies.
Not only that, you will be able to gain insights on how your Pinterest content is performing: you’ll know how many clicks, engagements, and saves your pins achieve, further informing you of which content performs best.
Finally, you will only be able to monetize your Pinterest content through the use of ads if you have a verified account.
In order to convert an ordinary Pinterest account into a business account, you first need to log into your Pinterest account.
Click on the down arrow menu in the upper right hand-side corner, and select Convert to business.

On the next screen, click the Convert account button.

Next, you need to fill out some information about your business: its name, website, and location. You can also add an image to your profile. Click Next when done.

On the next screen, you can select a focus for your business and select up to three goals. When you have made your selections, click Next.

Up next, you need to describe your business by selecting its type. Click Next when done.

To gain access to the full range of Pinterest‘s capabilities, select that you intend to run ads, then click Next.

You will then be asked to enter more details in order to get targeted ad assistance. You can Skip this part for now.

Pinterest will then offer you some help getting started with your business account. There are plenty of options, but they are beyond the scope of this tutorial. You can click the X in the upper right-hand corner to skip this part.

And now you have a Pinterest Business account! It still isn‘t connected to your website, though, regardless of whether you entered a website or not.
To connect your WordPress website to Pinterest, you need to claim it. Claiming a website for a Pinterest profile involves adding a piece of code to your website. You may be uneasy about modifying your website‘s code. If that is the case, it may be a good idea to back up everything before attempting to make any changes.
While logged on to your Pinterest account, click on the Down arrow menu and select Settings.

Then, select Claim from the left hand-side menu.

From the next menu, select Website.

You will have now found the code you need to add to your website‘s header. Click on it to copy it.

Once copied, click Continue. You may want to paste the code snippet somewhere you can easily save it, like a separate text file.

Once you have the code in your clipboard (ready to paste it), you need to find your theme‘s header section. Navigate to it by selecting Appearance/Theme Editor from your WordPress dashboard.
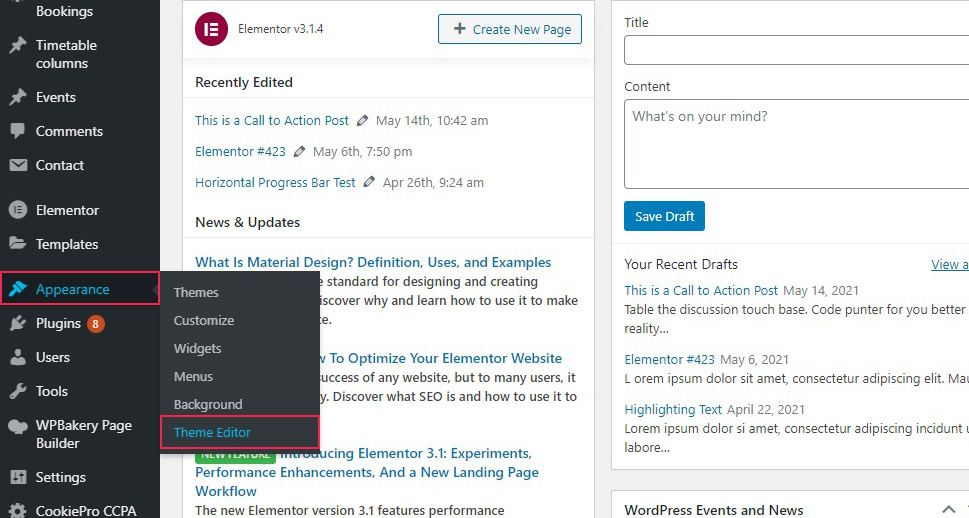
Select the header.php file from the right hand-side menu, and then find the <head> tag. Paste your code immediately underneath it taking care not to disturb any other code. Scroll down and click Update File when done.

Go back to your Pinterest profile. It should be showing a window headed Verify. Enter your website URL into the requisite field, then click the Verify button.

After a while, you should see the Connected message. Your website is now verified by Pinterest!

In Conclusion
As you have seen, it is easy enough to verify your WordPress website on Pinterest – all you need to do is follow the prompts on your screen – and the benefits abound. Of course, we cannot tell you how to actually grow your social following in any certain terms. We do, however, have some great tips, especially on how to promote your website on social media or how to use your content to grow a brand. Whatever your approach to Pinterest turns out to be in the end, we feel that we have placed a powerful tool at your disposal with this tutorial.
