How to Embed Google Data Studio Report in a WordPress Website

A testament to WordPress’s versatility is its ability to play well with others, by which we mean to integrate with third-party software. Google being the tech giant that it is, it should come as no surprise that WordPress offers numerous possibilities for integration with various Google products and services. You could set up Google Tag Manager for your website, replace WordPress’s search function with Google Search, or, as we will be demonstrating in this article, embed Google Data Studio reports into your website.
But before we do that, we would like to take some time to discuss what Google Data Studio is, specifically, briefly touch upon what kind of data it can use and what kind of reports it can present, as well as what your website’s users can gain from an embedded Google Data Studio report. We will be showing you the simple way of embedding a Data Studio report, but you first need to know whether your website needs it at all. If you are confident your website can use it, do scroll all the way down and find the tutorial section in our table of contents. If you need a little more context, keep on reading.
Here’s what we’ll be covering:

Google Data Studio is a tool typically used in conjunction with Google Analytics. It is primarily used to create various data visualizations, including charts, maps, graphs, tables, and the like. Google Data Studio reports are visual, informative, and interactive, and may include a host of useful features such as filters and links.
Google Data Studio collects and interprets data from a great deal of sources, including a lot of Google products and marketing platforms. Its reports are optimized for easy sharing, and that includes them being embedded into websites.

Obviously, if you want to share your data with everyone, you could do worse than embed a Google Data Report in the open sections of your website. Perhaps you want to show off how popular you are and how easy your content is to find, and use the data for leverage when discussing partnerships and other deals.
However, we feel the embed feature probably works best for client portals – if you can sell data, you can do it through a membership website. The reports could be tailor-made to cater to a specific user of your data gathering service, for instance. If you are selling ads, you might want to inform your logged-in portal users about how effective they are, for instance.
Google Data Studio is a Google product. To use it, you need to have a Google account. We will begin our demonstration logged into our Google account.
Furthermore, you need data. You can use data from your Google Analytics account, for instance, but that is not a must. Google Data Studio can accept data from various other sources, such as YouTube (another Google product), social media platforms, and even CSV files. This tutorial presupposes you have a report you wish to share with your website visitors.
To start, you need to create a report you wish to share using Google Data Studio. As a full Google Data Studio tutorial would go beyond the scope of this article, we will not be giving it here. We will refer you instead to Google’s own free tutorial in case you are new to the service.
We will be using a sample Google Search Console report, but it works more or less the same with any report. Our report will be embedded into a page, but you can also use it as part of a post or widget area. We will start with a page with a title and some Lorem Ipsum text.
Next, on your report page, click the Share drop-down menu and select Embed.

You will get a window where you will be able to configure the iframe in which your report will appear. First, the Enable embedding checkmark needs to be checked. If you wish to include the report navigation control in the embedded version of the report, check the Show report navigation in embedded mode checkmark.
You can either embed the report as an iframe, which we want to do for our website, or a URL, which is more suitable for social media. This is why we will not be switching the radio button, leaving it on the Embed Code setting.
Beneath the code box, you will find the width and height of the element expressed in pixels. You can adjust them to your liking, but we will be showing you the default 600 by 450 pixels element. A different aspect ratio may work better for your website. Once you have set that up, copy the code either directly from the box or by clicking the Copy to clipboard button.

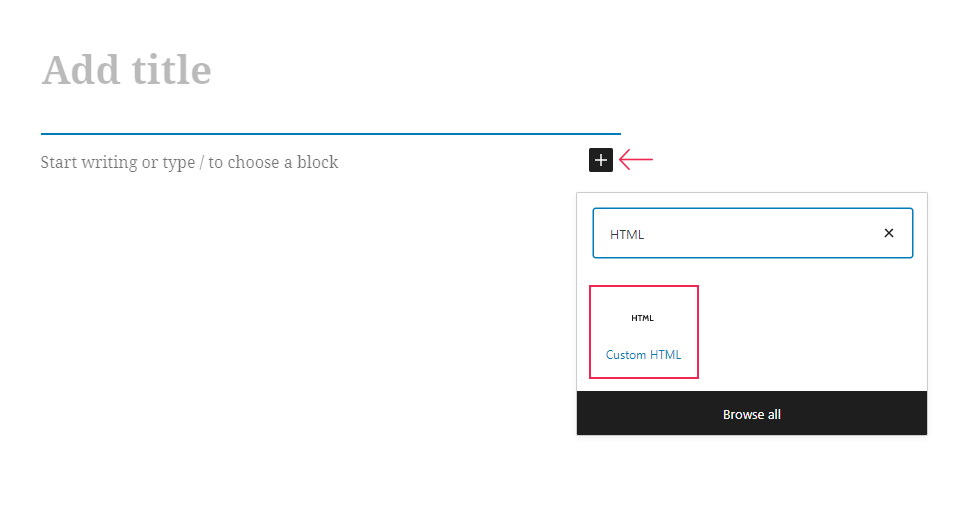
From then on, you follow the steps you would when embedding any iframe code. To embed this iframe on your page, click on the plus sign icon to add a block and select a Custom HTML block.

Finally, paste your code into the block’s input field. Once you have done that, click the Publish button.

And, as you can see, any visitors able to access this page will also be able to see the embedded report.

In Conclusion
If WordPress does anything well, it is customizability: you can make your website more or less how you like it, and that includes compatibility with third-party software. While sometimes it may happen that compatibility issues occur, there is no shortage of third-party solutions WordPress works well with, and, completely unsurprisingly, Google is one of them.
We have shown you an easy way of embedding Google Data Studio reports into your website, for your visitors’ benefit. As you can see, it works just the same as any iframe embed: with just a few clicks of the mouse, your website visitors have the reports at a glance.


