How to Use Gmail With Your Own Domain Name

Having a custom email address is important for the authenticity of every brand. For this very reason, most businesses strive to have their email addresses match the domain name of their website. Not only can using emails with your own domain name make you more reliable in the eyes of your potential customers, but it also helps emphasize your professionalism by a long shot. Therefore, if you want your business to stand out in a deserving way, switching to using a custom email address with the name of your domain is practically mandatory. But the true question is – can you achieve this by using Gmail?
The short answer is – yes, you can. And this time around, we are going to list all the steps necessary to use the familiar Gmail platform with your domain name completely for free. We will also talk about how to connect your Gmail to your custom email hosting address using the help of SMTP and POP3 mail protocols (more on this later). Make sure to stick around as we cover:
Qode Themes: Top Picks
View Collection


To get started, aside from your domain name, you will also need to have your own web hosting provider and a free Gmail account. Many hosting providers offer a free domain name for at least a year, and this includes WordPress-friendly providers like Bluehost and Hostinger.
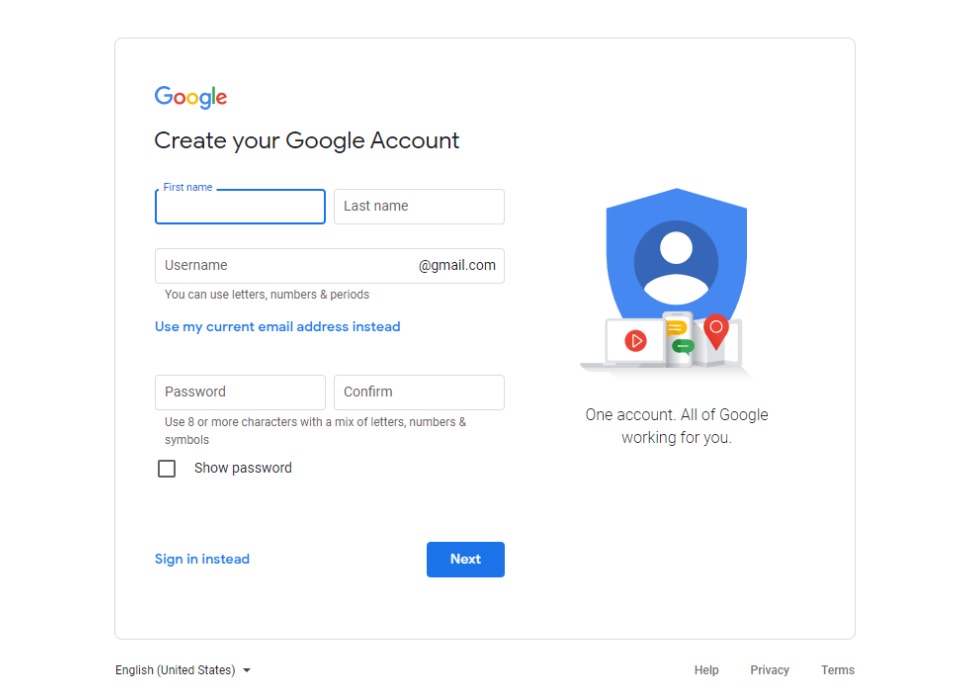
Having these two accounts is important so that you can connect them and send and/or receive emails using your custom domain name while on your Gmail account. But, as we’ve already mentioned, you need to have a regular free Gmail account set up first.
In case you already have a Gmail account ([email protected]), you can use it. That being said, we do recommend separating your business account from the personal one as doing so is far more professional. All in all, you should make sure to add the name of your business or organization when creating your free Gmail address (i.e. [email protected]).
Your next step should be the creation of your custom email using your email hosting ([email protected]), that is if you haven’t already done that. Go through all of the steps to create your account and sign in.
For example, if you use a hosting service that uses cPanel like Hostinger, you can access your email hosting options by going to Email Accounts and hitting Add email account. Then, add your credentials and hit the Create button.
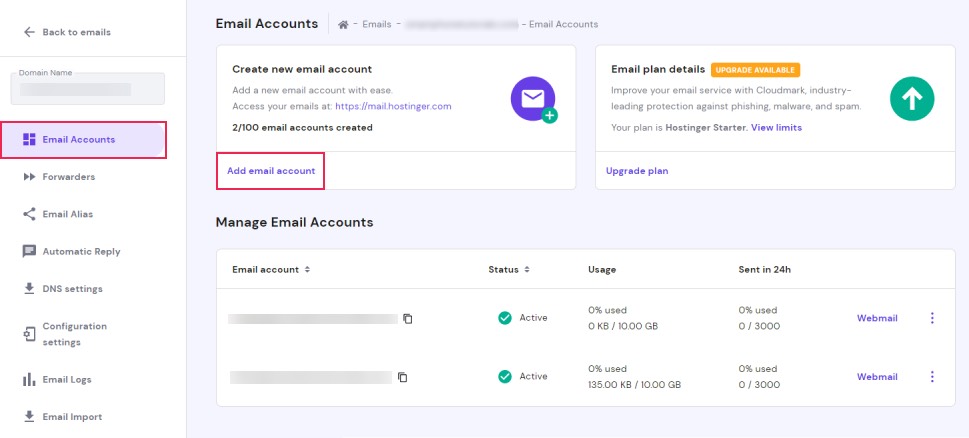
Most cPanel-based hosts have similar options, so creating an email account shouldn’t be too complicated regardless of the service you’re using.
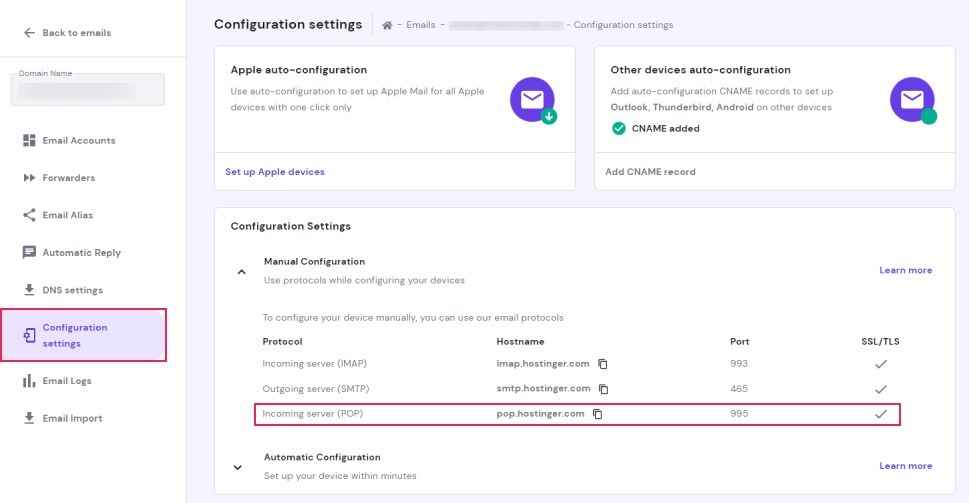
After you create your Gmail and custom email account (using your email hosting), you should allow your free Gmail account to import emails from your email hosting account. This can be easily done using the POP3 protocol. Make sure to find and access your POP3 settings in your hosting account.
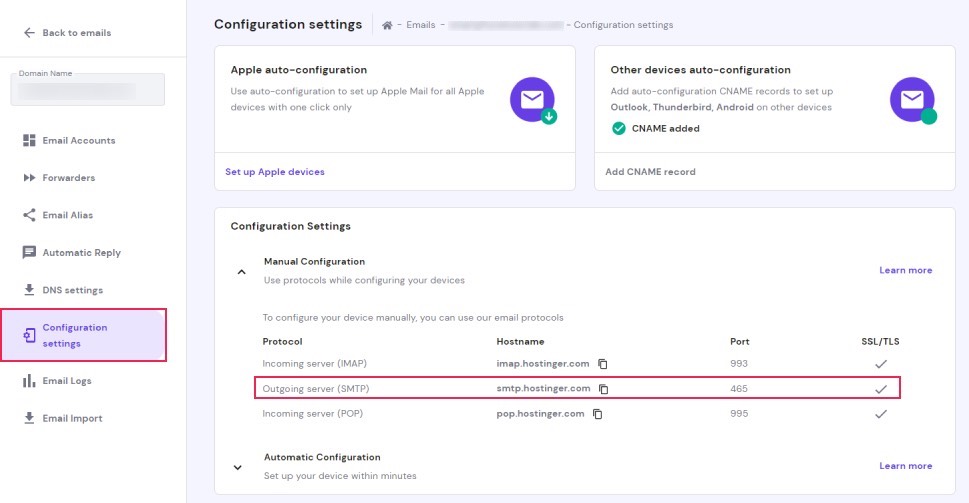
For example, if you’re using cPanel-based hosting like Hostinger, you should be able to find your POP3 information in your email account’s Configuration settings.
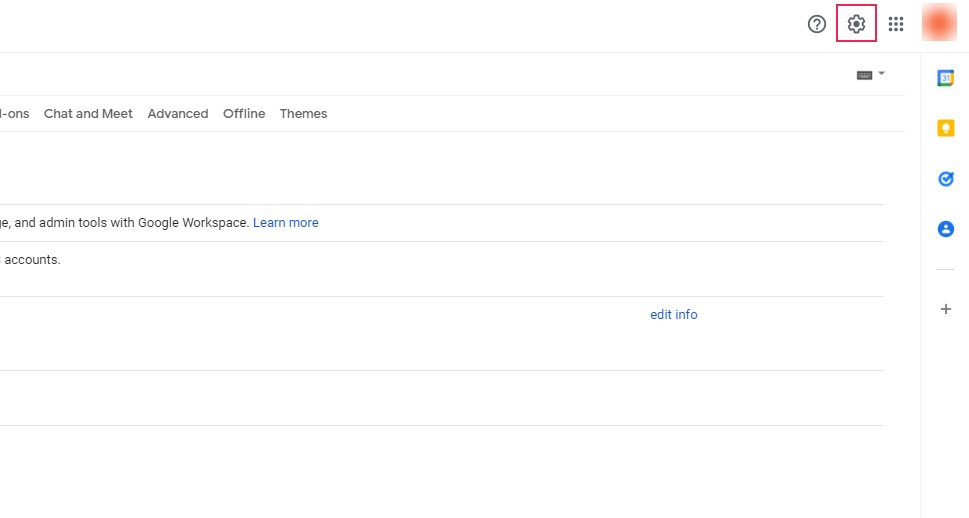
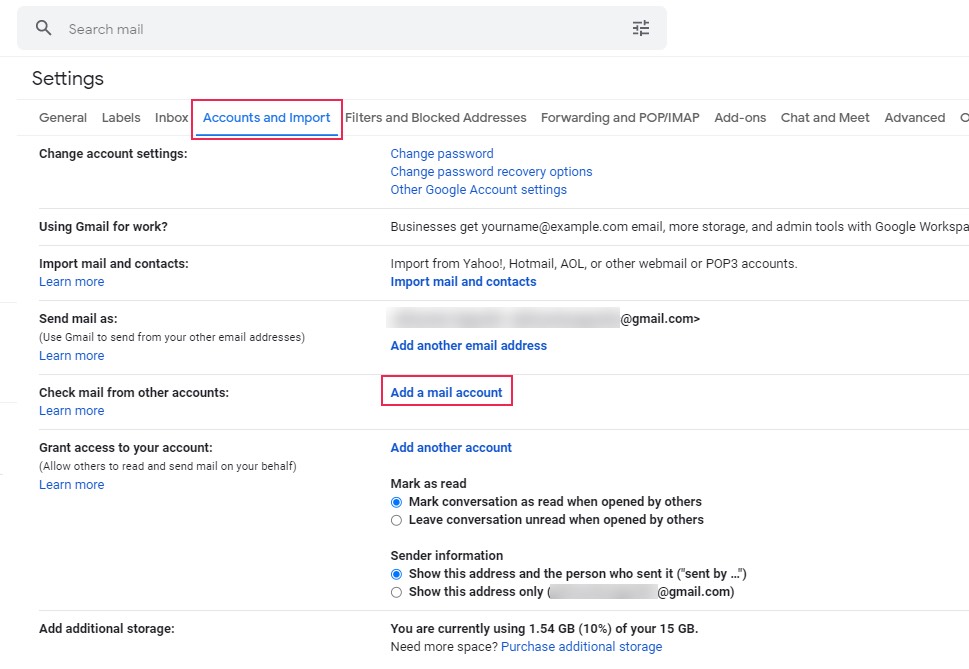
Next, you need to go back to your Gmail settings. You can do this by clicking on the gear icon (located in the upper right corner of your screen).
Hit the Accounts and Import tab and make sure to find the Check mail from other accounts option. Then, hit the button called “Add a mail account”.
A new window will pop up, providing you with the fields and steps you need to follow to add your custom email address to your Gmail account.
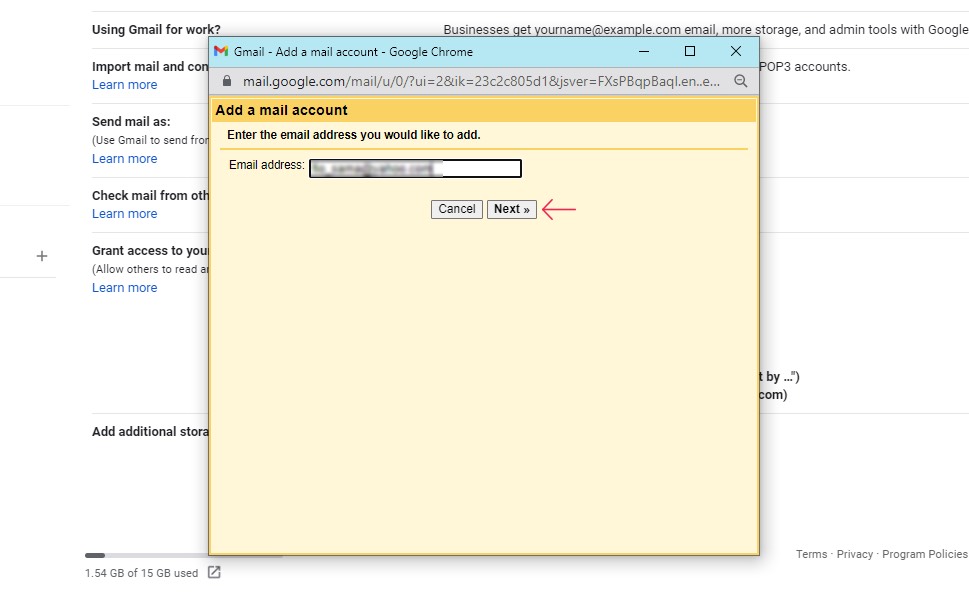
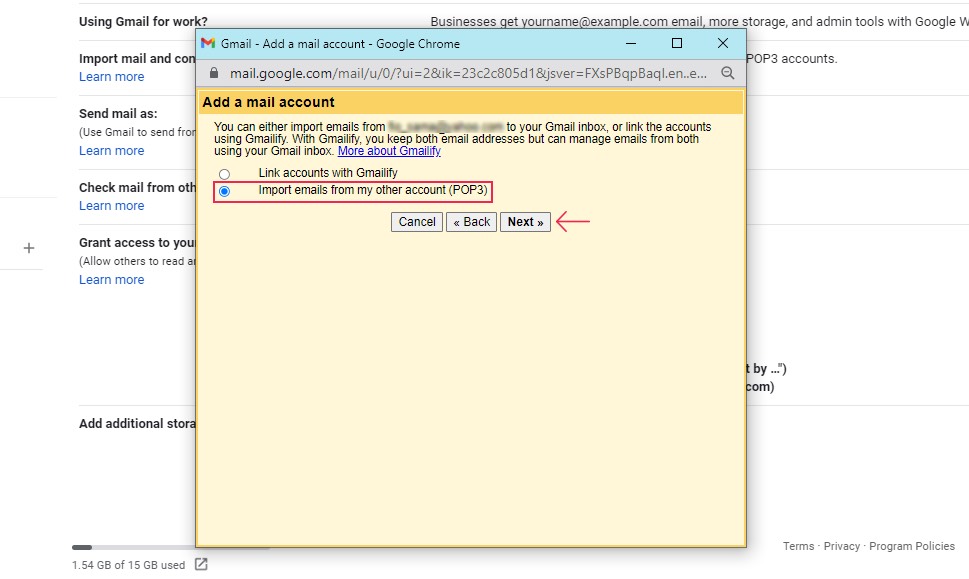
After you add your email address, you should click on Next and select the option named “Import emails from my other account (POP3). Hit Next once again.
Then, you will have to insert different bits of information. Make sure to enter your username (usually the part that comes before the “@” sign), password (the one you set when creating your custom Gmail), and Pop server and Port (you can find this using your host provider info).
Also, make sure to mark the first three checkboxes (“Leave a copy of the retrieved message on the server”, “Always use a secure connection”, and “Label incoming messages”).
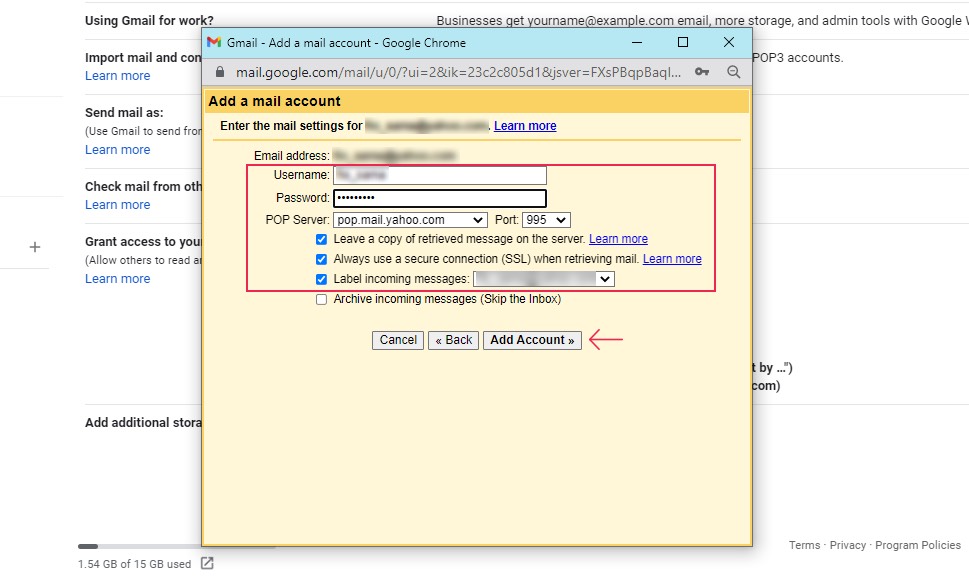
Finally, click on Add Account when you are done.
Your next step of the process should be allowing your Gmail to send from your custom email address using the help of SMTP. In other words, you will have to find the SMTP server information in your email hosting and then enter your information in Gmail. More often than not, the SMTP information is located in the same place as your POP3 info.
Once you’ve got the SMTP info you need, click on Accounts and Import in your Gmail settings once again. Search for the option called “Send mail as” and hit the “Add another email address” option.
The popup window will open once again with new steps.
You should insert your name, your custom email address, and make sure to mark the box “Treat as an alias”. Then, click on the next step.

You should simply insert the SMTP info that you found using your email hosting. This includes entering your SMTP server and choosing the Port.
Once again, you should enter the username and password of your custom email. Picking the secured connection method suggested by Gmail is your best bet.
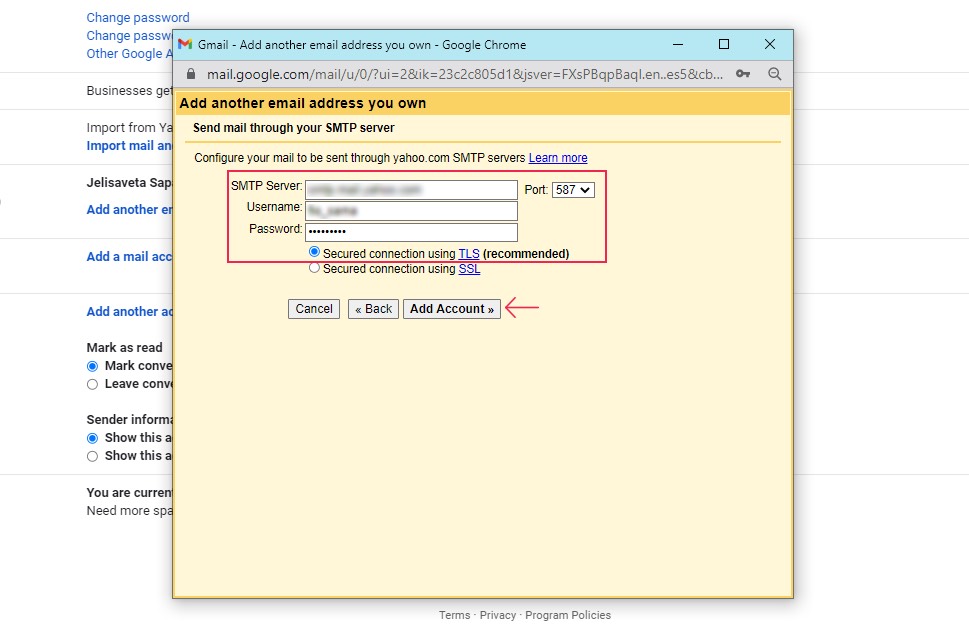
Hit the Add Account button and you’re all set. The only thing left for you to do is to click on the link located in the email automatically sent by the Gmail Team. This will be your confirmation code to use your custom email address.
Wrapping Things Up
And that completes our tutorial on how to enable Gmail to work with your custom domain name. While the process of creating and connecting Gmail to your custom email may seem a bit tricky at first, you will realize that it’s actually not that complicated once you start following the detailed steps we’ve shared with you above. Plus, the benefit of having a professional-looking email address with your brand name while still using the free Gmail service will be well worth it.
So, you should make sure to have a free Gmail account set up first, and then create a custom email account using the hosting provider that allows free email hosting. Next, you find the POP3 and SMTP information in your email hosting account and insert this information into your Gmail account to successfully connect Gmail to your custom email address. If you can’t find these settings in your hosting account or have any other issues, we suggest that you check with your hosting provider.
