QODE Wishlist for WooCommerce
- created: 12/14/2023
- latest update: 12/15/2023
- by: Qode Interactive
- helpcenter.qodeinteractive.com/
1. Getting Started
Hi, and welcome to the QODE Wishlist for WooCommerce User Guide. The User Guide covers all the information needed to use the QODE Wishlist for WooCommerce plugin with your theme to build an amazing eCommerce website.
If you need any additional assistance while using our plugin, you can always submit a topic to the support forum at wordpress.org/support/plugin/qode-wishlist-for-woocommerce and our support team will be glad to help you out. You can also send us an email at [email protected]
You can navigate through different sections of the User Guide by clicking on the links in the menu to the left of your screen. You will also notice that we have highlighted certain parts of the text throughout the User Guide, such as important pieces of information and useful tips.
The QODE Wishlist for WooCommerce is designed to let both your logged-in users and guests save and share comprehensive lists with products they are interested in purchasing, complete with user admin behavior area, promotional email campaign feature, multi wishlist creation and more.
The plugin is designed to work in tandem with the free WooCommerce plugin, so in order to ensure proper plugin functioning, please make sure you have installed and activated your copy of the WooCommerce plugin.
This user guide covers the full set of options that the plugin provides, including both its Free and Premium versions.
Installing QODE Wishlist for WooCommerce plugin
First off, here's a list of minimum requirements as well as recommended hosting parameters for running QODE Wishlist for WooCommerce plugin:
Minimum Requirements
- WordPress 5.0 or greater
- PHP version 5.6 or greater
- MySQL version 5.0 or greater
Recommended Hosting Parameters
- PHP version 7.0 or greater
- MySQL version 5.6 or greater
- WordPress Memory limit of 128 MB or greater
There are two ways you can go about installing the QODE Wishlist for WooCommerce plugin:
Installing From Your WordPress Dashboard
- Navigate to your WordPress Dashboard -> Plugins -> Add New
- Search for QODE Wishlist for WooCommerce
- Install and Activate Qode Essential Addons from your Plugins page.
Installing Directly From wordpress.org
- Locate and download QODE Wishlist for WooCommerce on wordpress.org
- Upload the qode-wishlist-for-woocommerce directory to your ‘/wp-content/plugins/’ directory, using your preferred method (ftp, sftp, scp, etc…)
- Install and Activate QODE Wishlist for WooCommerce from your Plugins page.
2. QODE Wishlist for WooCommerce Options
This section of the User Guide provides a comprehensive overview of all the settings available in the plugin's QODE Addons for WooCommerce section of your WordPress admin panel once you have installed and activated the QODE Wishlist for WooCommerces plugin.
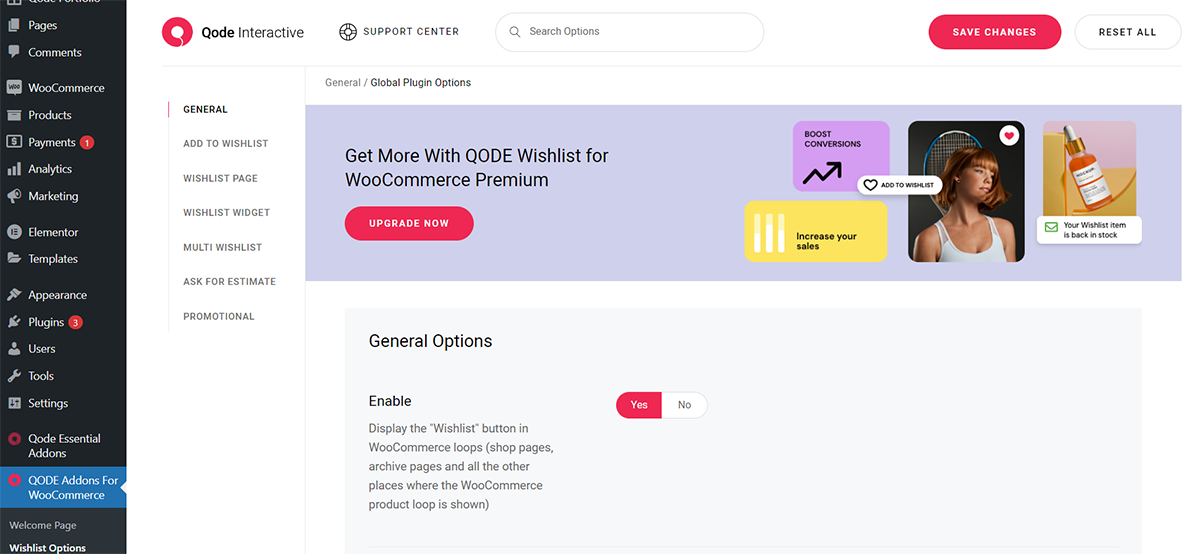
To access these settings, you should navigate to QODE Addons for WooCommerce > Wishlist Options.
The settings found here are applied globally and will affect the entirety of your website.
You can look up any of the available global options by typing in the keyword or a part of the option name in the search field located at the top of the screen in the Wishlist Options section.
There are seven sub-sections in the Quick View Options: General, Add to Wishlist, Wishlist Page, Wishlist Widget, Multi Wishlist, Ask for Estimate, and Promotional.
GENERAL

In the General section of the global plugin options you are presented with options for making general adjustments to the plugin funcionalities.
This is where you can enable displaying the 'Wishlist' button in WooCommerce loops for both desktop and mobile, and enable custom SVG uploads (please make sure you are familiar with security risks involved before doing so).
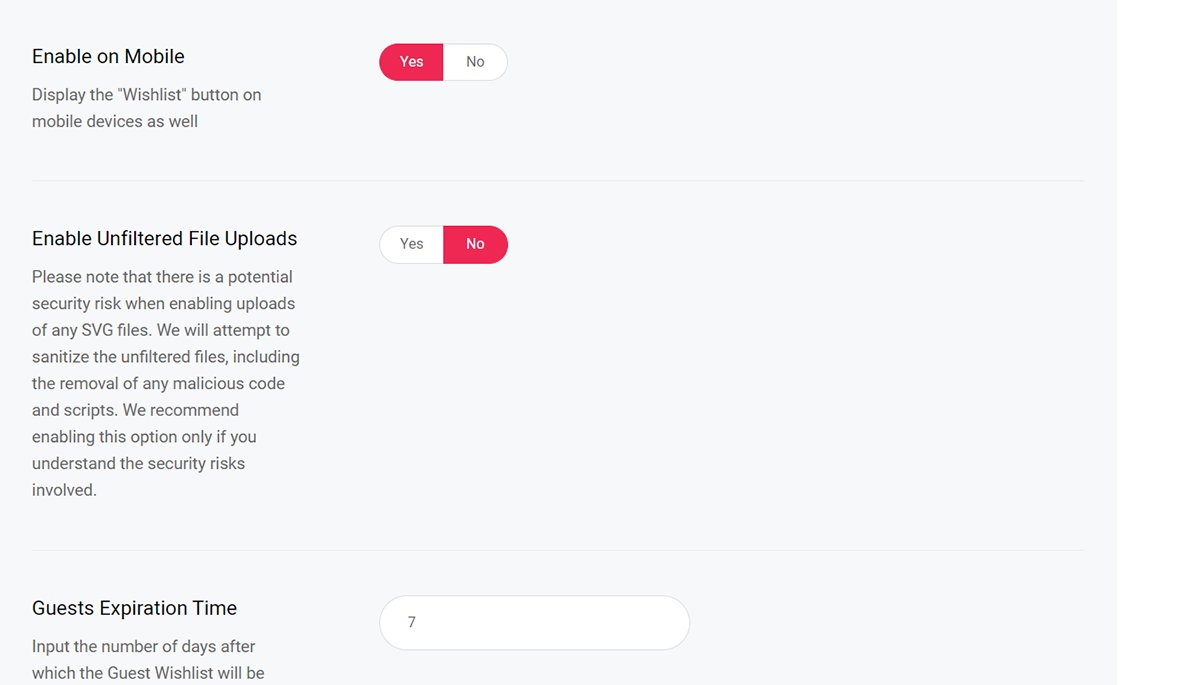
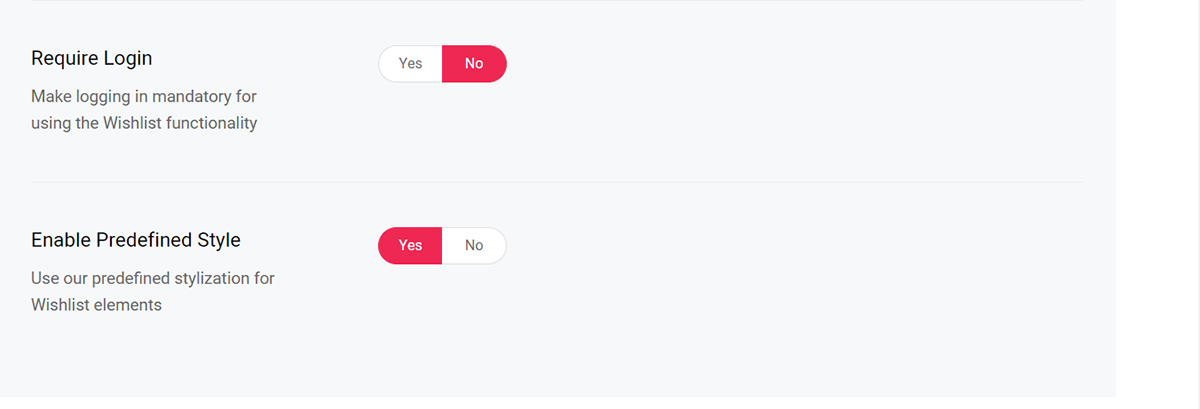
The remaining options in the General section let you input the number of days after which guest wishlists will be automatically removed, you can choose whether wishlist creation functionality requires users to log in first, and finally you can apply a predetermined, plugin-defined stylization to the wishlist.
ADD TO WISHLIST
This section provides you with a selection of options related to the 'Add to Wishlist' button and its appearance.
First up, you can choose a behavior type for the button when a product has already been added to a wishlist. You can display an 'Add to Wishlist' button, a 'Browse Wishlist' link, or a 'Remove from list' link for these.
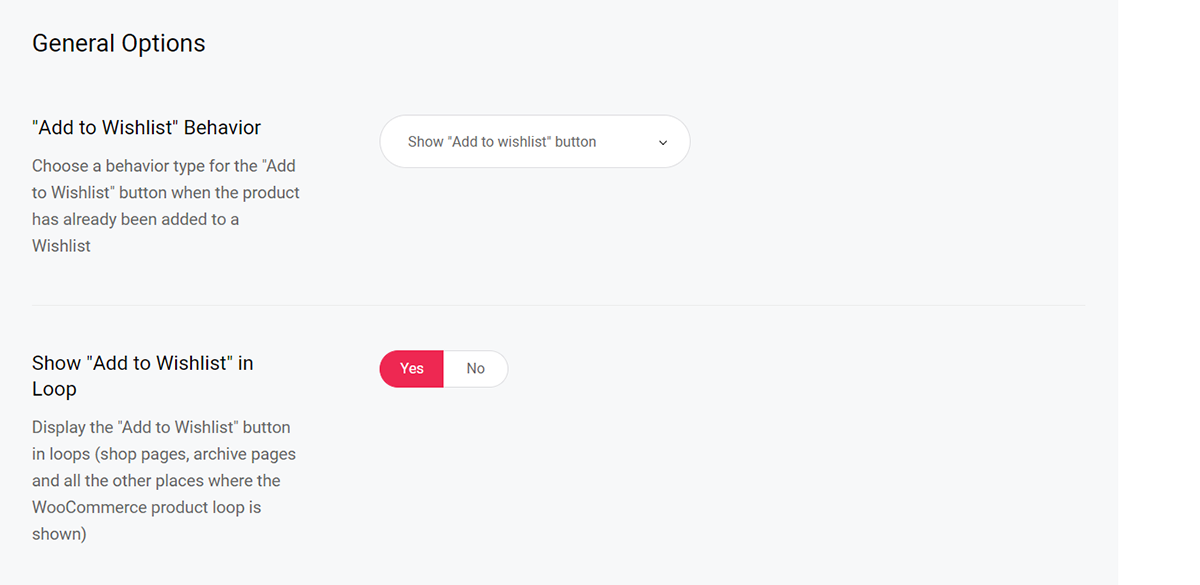
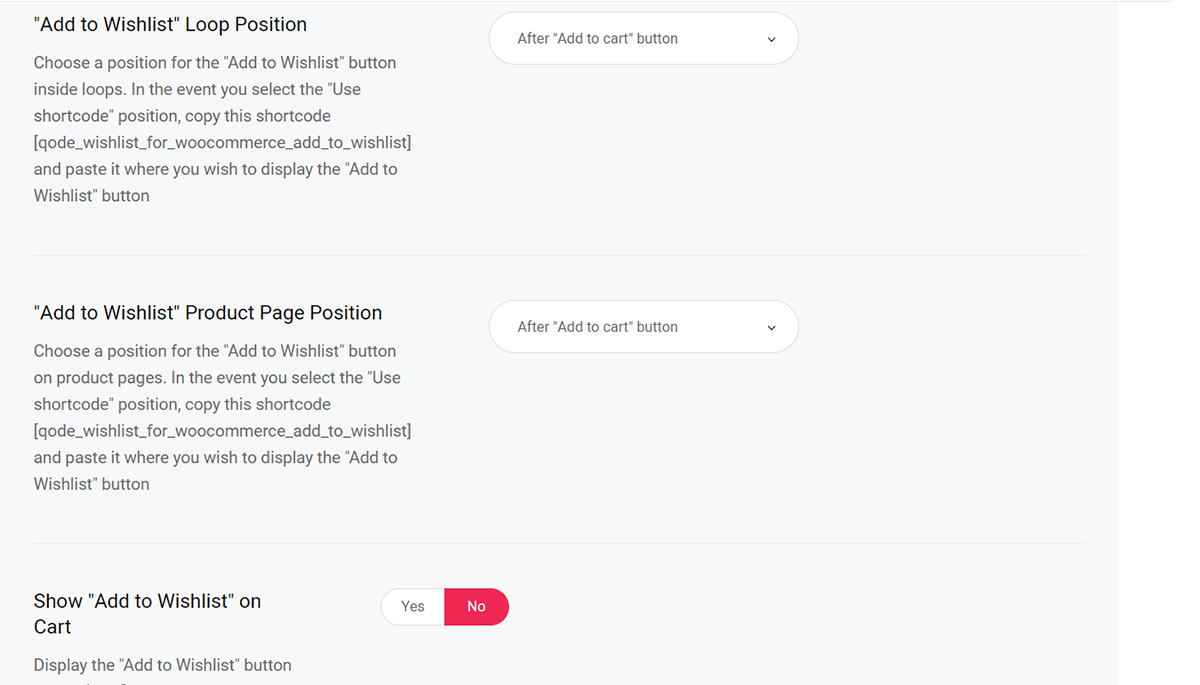
After this, you can choose whether you wish to display the 'Add to Wishlist' buttons in WooCommerce loops (shop pages, archives, and everywhere else where WooCommerce loops are shown), and you can choose where you wish to position the button inside loops and on shop single pages.
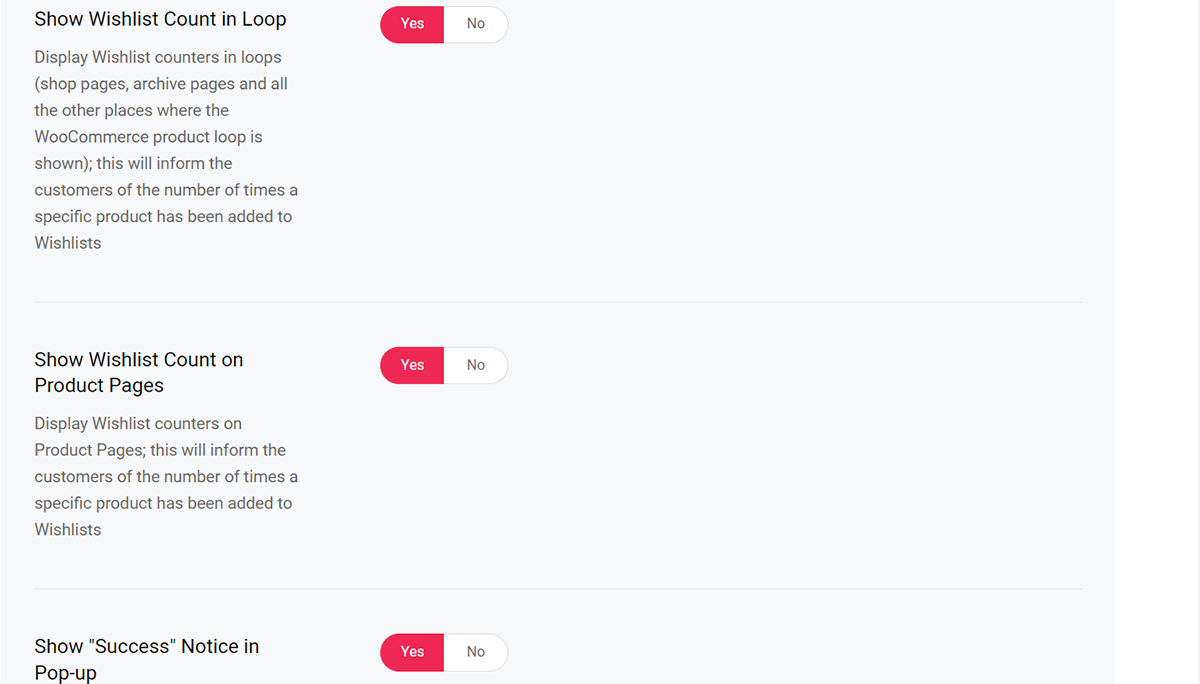
You can also enable the 'Add to Wishlist' buttons on cart pages, you can display wishlist counts in loops and shop single pages, and choose whether you wish to enable success notices for added products in pop-ups.
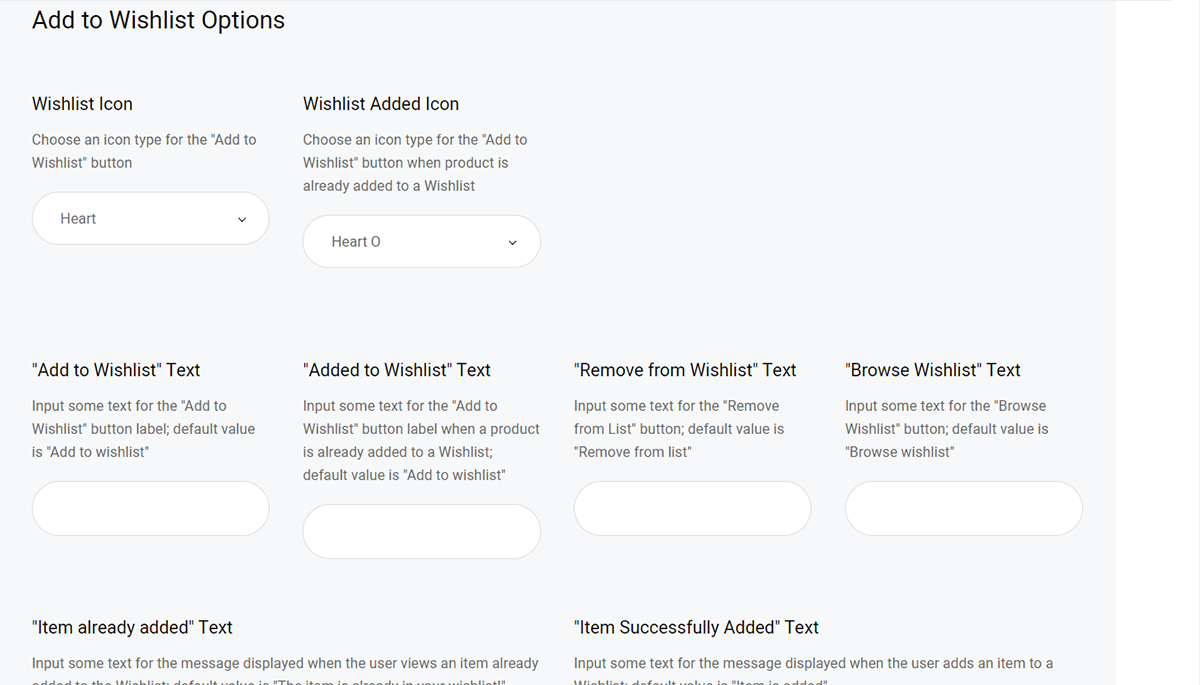
The next set of options relates to the 'Add to Wishlist' button appearance. Here you can choose between plugin-defined heart icon for the button, or use a custom icon of your own. You can do the same for the already added products too. After this, you can input some custom text for the 'Add to Wishlist' button, as well as for already added products, 'Remove From Wishlist' buttons, and 'Browse Wishlist' buttons. The same applies to 'Item Already Added' notice text, and "Item Successfully Added' notice text.
Following this, you can make further stylistic adjustments to the button. You can choose one of four 'Add to Wishlist' types: Icon with Text, Only Icon, Icon with Tooltip, and Only Text. You can do the same for the button in loops too. After this, you can adjust the thumbnail top and side offsets in loops, as well as top, side, and bottom thumbnail offsetts on shop single pages.
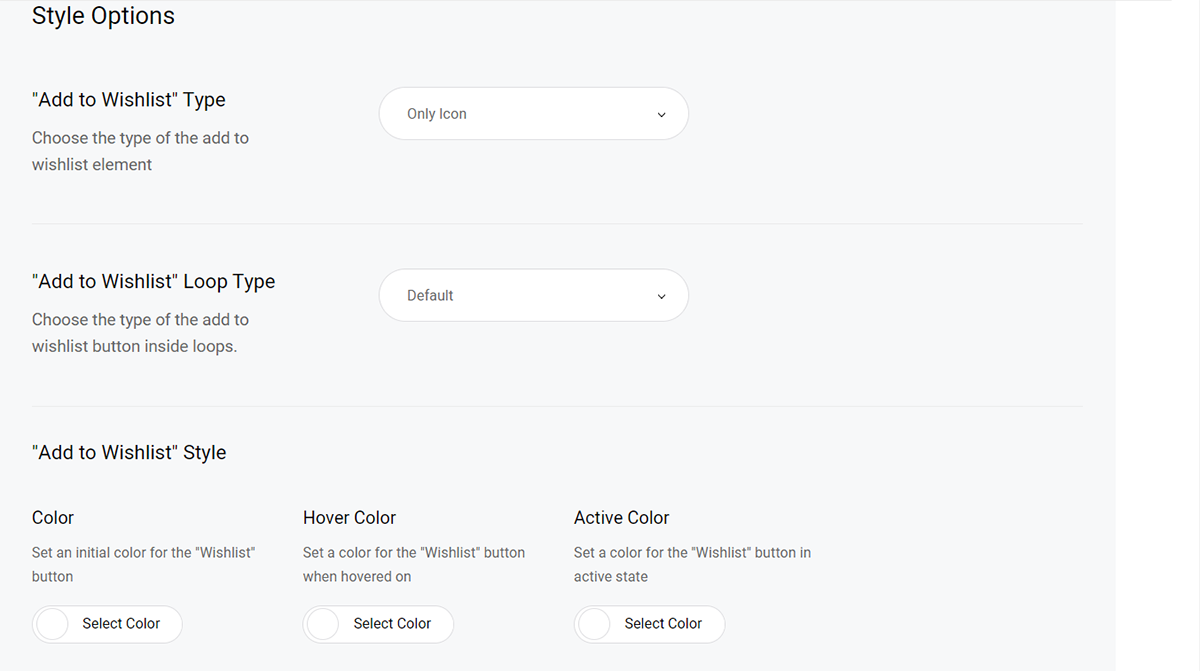
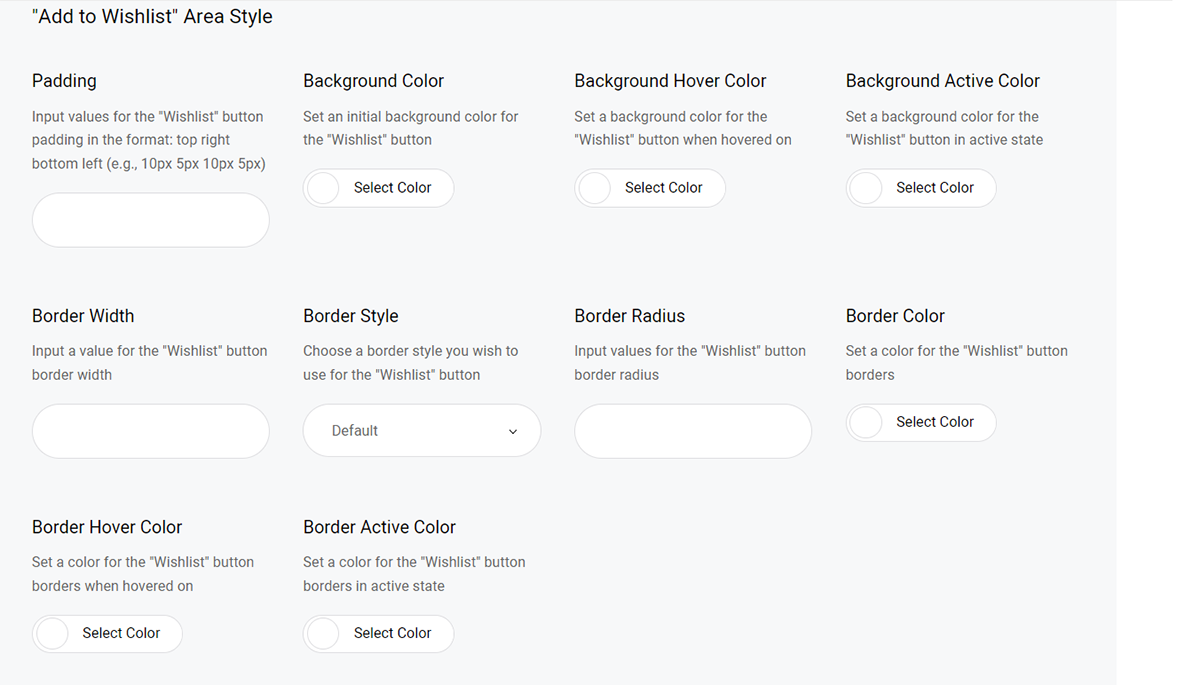
Next up, you can set the 'Add to Wishlist' button initial color, hover color, and active color. In addition to this, you can make adjustments to the 'Add to Wishlist' area styles. You can adjust the area padding, background color, background hover color, background active color, border width, style, radius, color, hover color and active border color.
The final set of options in this section allows you to configure the 'Add to Wishlist' SVG icon styles. Here you can set a fill color, stroke color, fill hover color, stroke hover color, fill active color, and lastly the stroke active color for the 'Add to Wishlist' SVG icon.

WISHLIST PAGE
In the Wishlist Page section you can make general adjustments to the wishlist pages and their appearance.
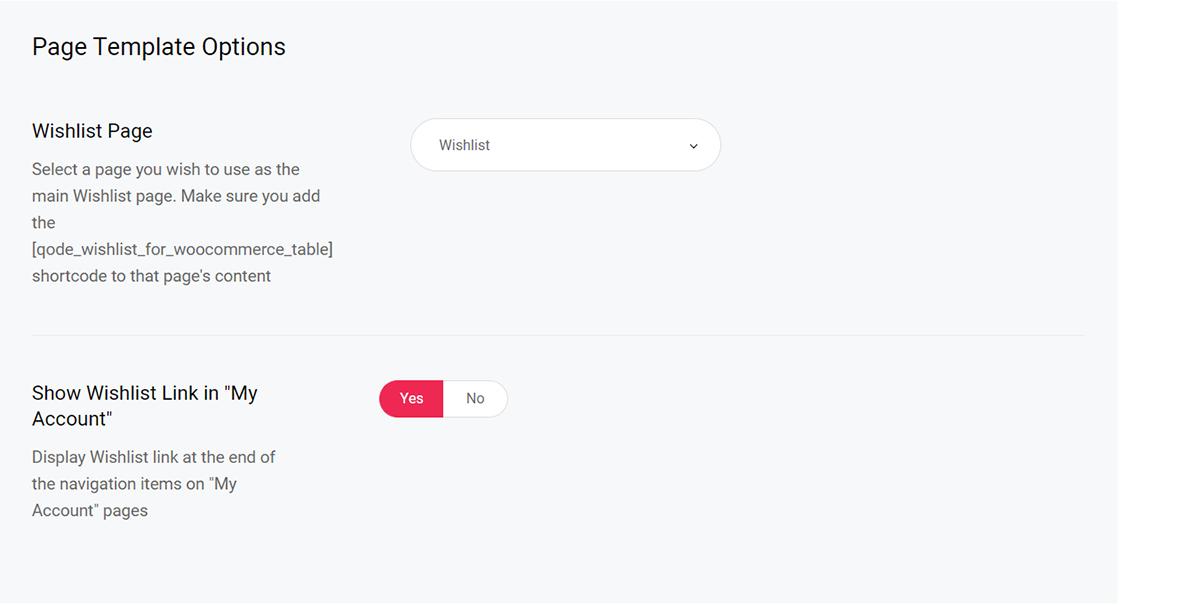
Firstly, you can choose a page you wish to use as the main wishlist page. Please make sure you also add the [qode_wishlist_for_woocommerce_table] shortcode to that page's content.
You can also choose whether you wish to show wishlist links on user's 'My Account' pages.
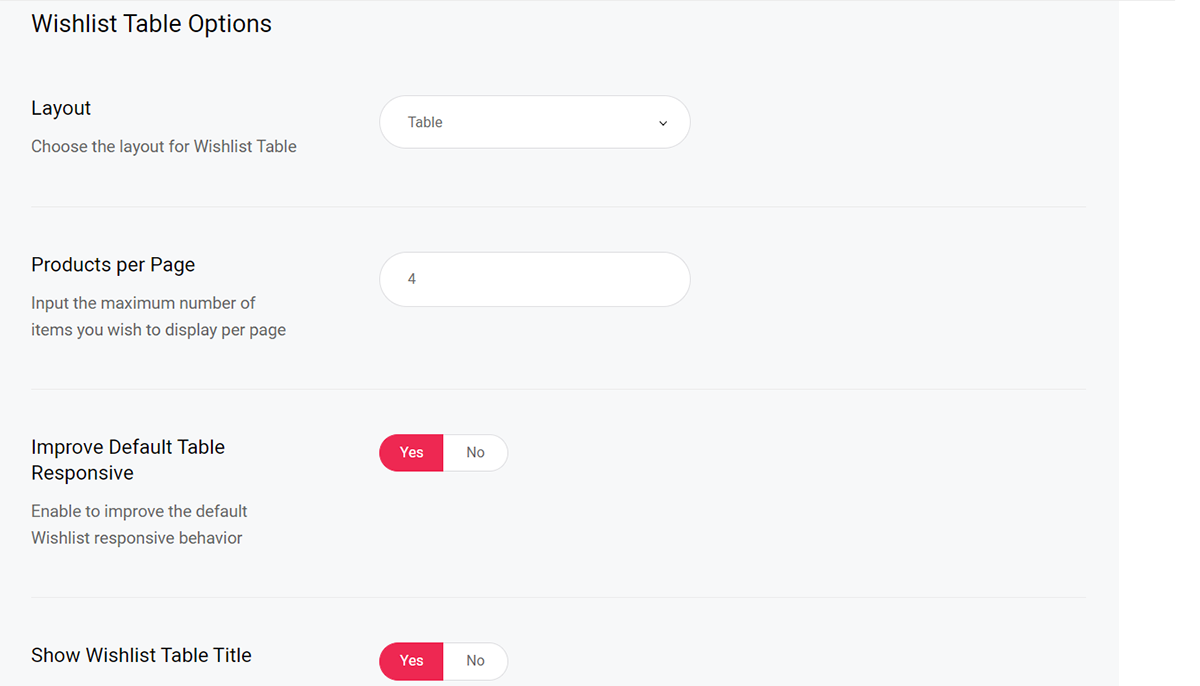
After this, you get presented with a set of options relating to the wishlist table. First up, you can choose one of two layouts for the wishlist table: table and grid. Next up, you can input a maximum number of items you wish to display per page, and you can enable improving default table responsive settings for securing a better look and feel on different screens.
This is also where you can choose whether you wish to display wishlist table titles, and set a heading tag for the title text. In addition to this, you can select which items you wish to hide from wishlist tables (prices, the 'Add to Cart' button, user-selected product variations, 'Remove Item' icons, added wishlist item dates, as well as the product stock status.
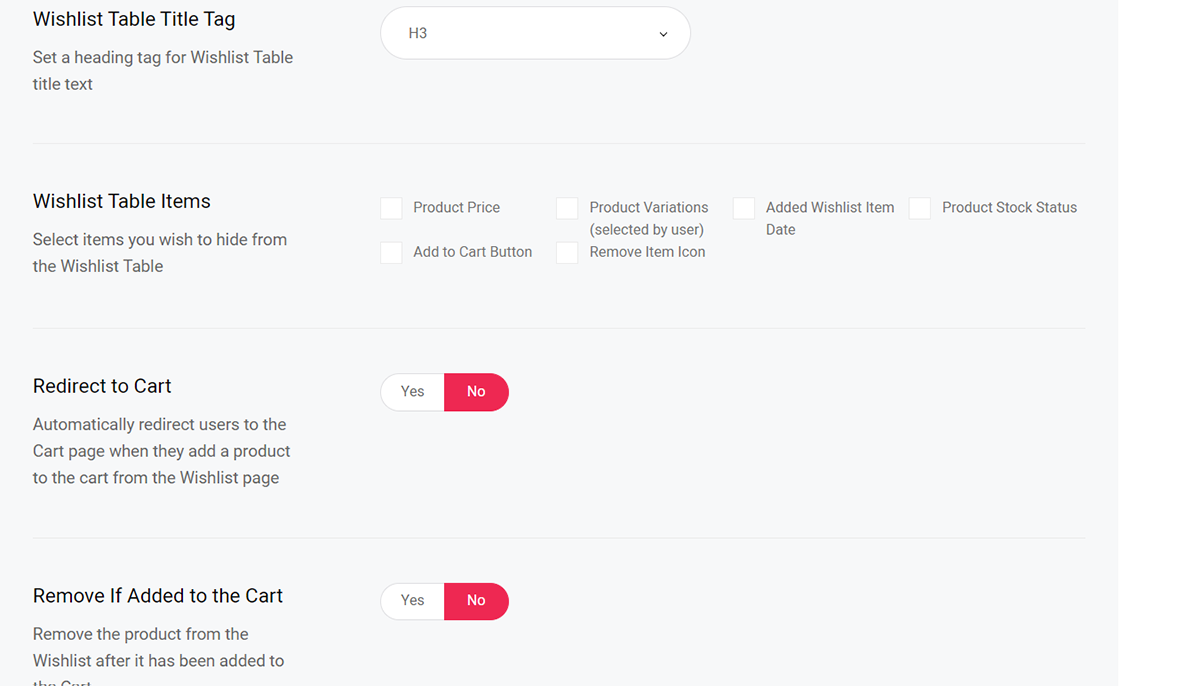
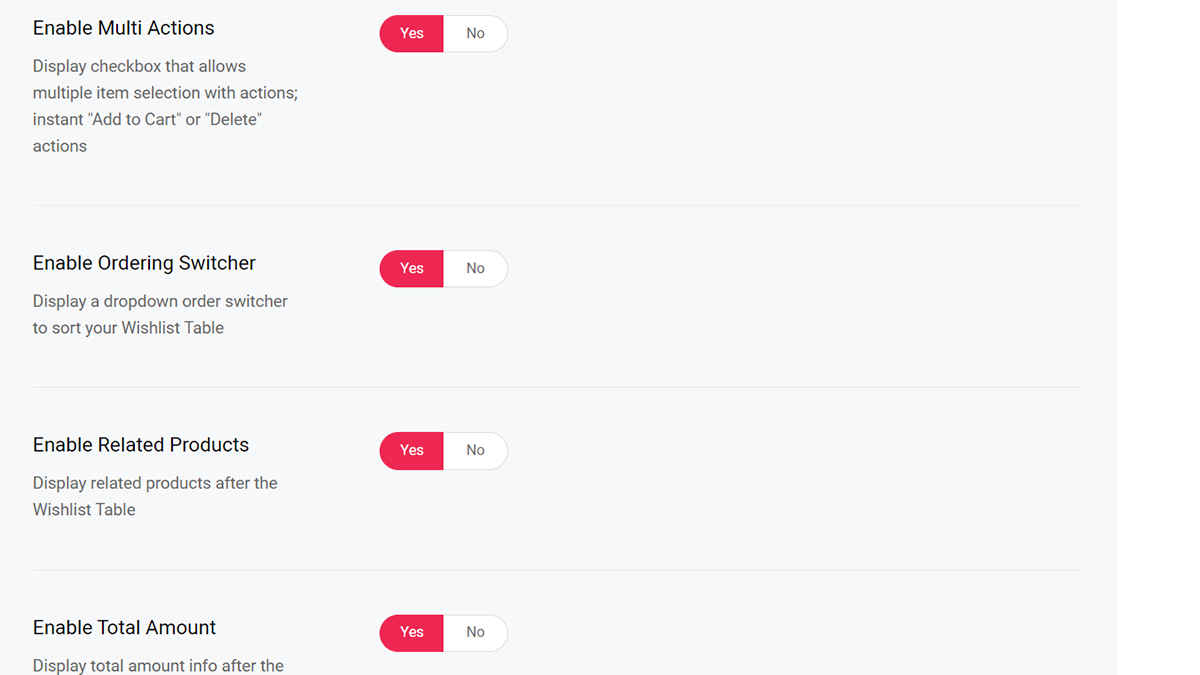
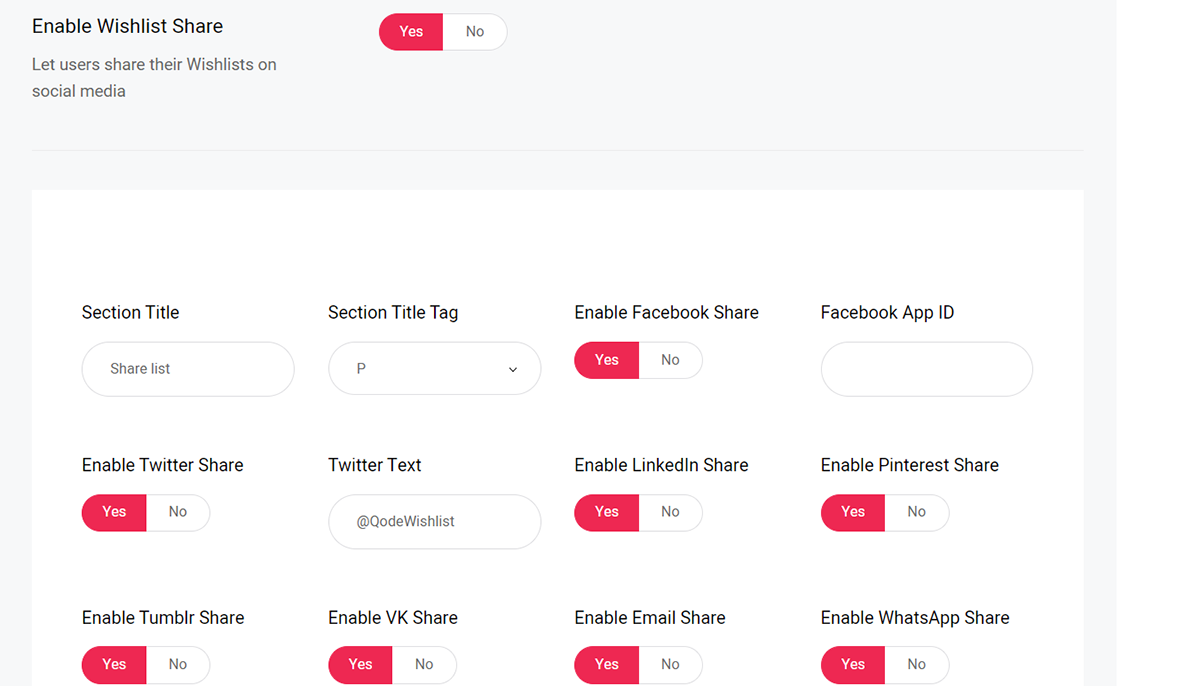
You can also choose if you wish to automatically redirect users to the cart page once they add a product from their wishlist to cart, you can select whether you wish to automatically remove wishlist items once they are added to cart, enable multi actions (effectivelly display checkboxes for selecting multiple items in wishlists), enable an item ordering switcher, display related products, total amounts, and you can also enable wishlist sharing here.
In the event that you enable the sharing feature, you can also input a section title for the social share section, set a heading tag for the title text, and you can choose which social networks you'd like to enable sharing for. You can enable Facebook, X, LinkedIn, Pinterest, Tumblr, VK, WhatsApp, and Email sharing.
The set of options that follows lets you make further stylistic adjustments to your wishlist pages.
Here you can set a heading background color, content background color, and border color.
The remainder of options in the Wishlist Page section of the settings lets you configure social share stylization.
Here you can set a section color, icon color, hover color, and icon size.
Finally, you can choose between predetermined, plugin-defined styles for each of the social network icons you decided to feature, and set a fill color, stroke color, fill hover color, and stroke hover color for each of them.
WISHLIST WIDGET
This section is divided into two tabs for both widgets you can use to display user wishlists: the Wishlist Dropdown and Wishlist Sidearea.
Wishlist Dropdown
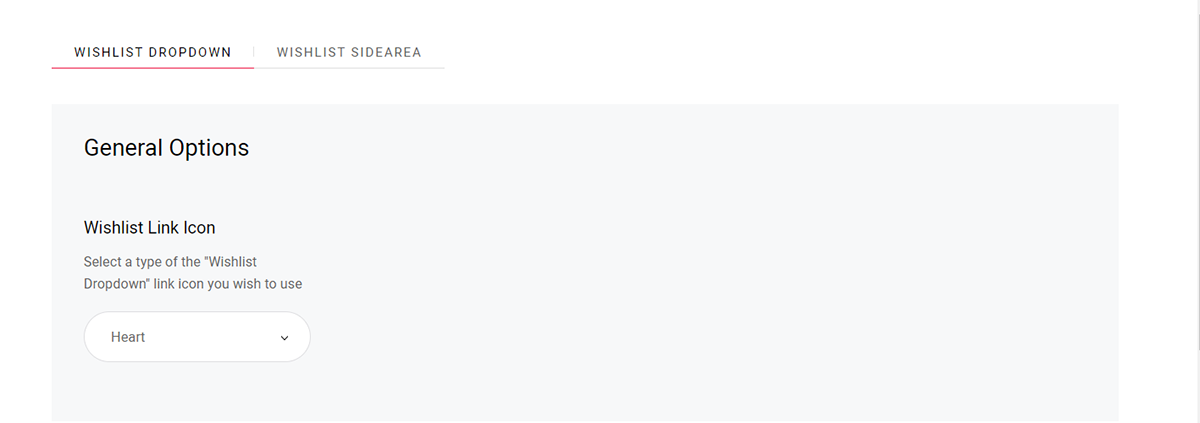
First off, you can choose between predetermined, plugin-defined heart icon and using a custom icon of your own for the Wishlist Dropdown widget.
The next set of options in this tab allows you to adjust the style of the wishlist link by setting its initial color, hover color, icon size, and count text size.
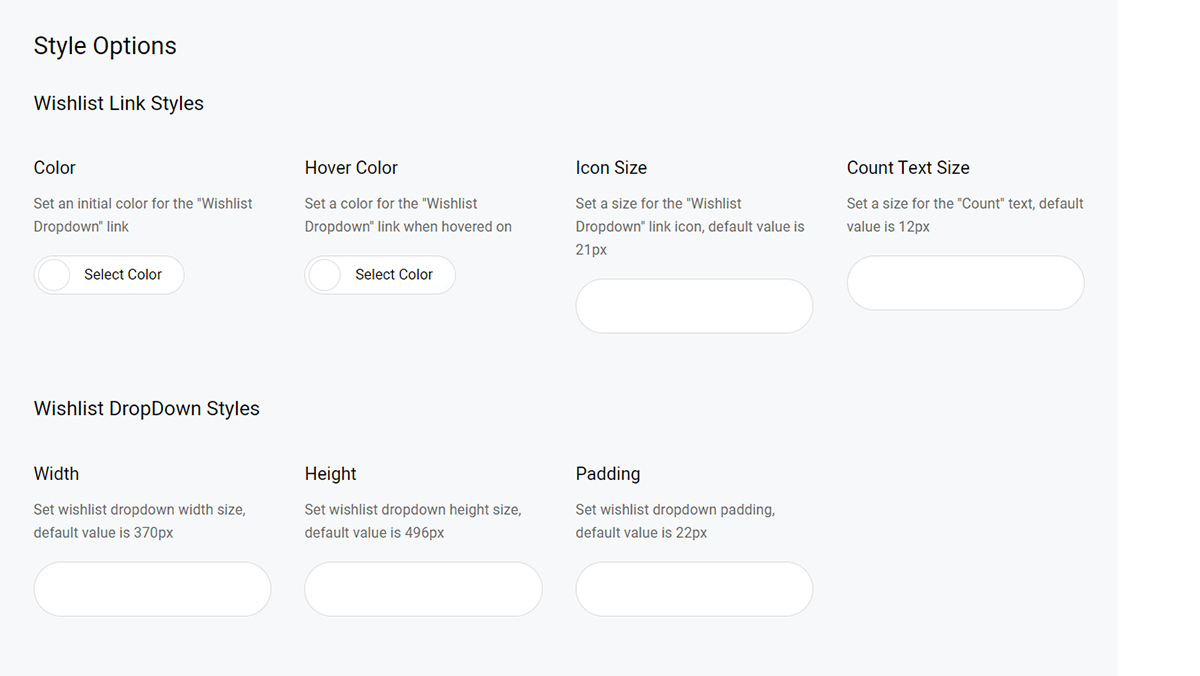
The final set of settings lets you configure the stylization of the Wishlist Dropdown widget. You can alter its width, height, and input values for the widget padding.
Wishlist Sidearea
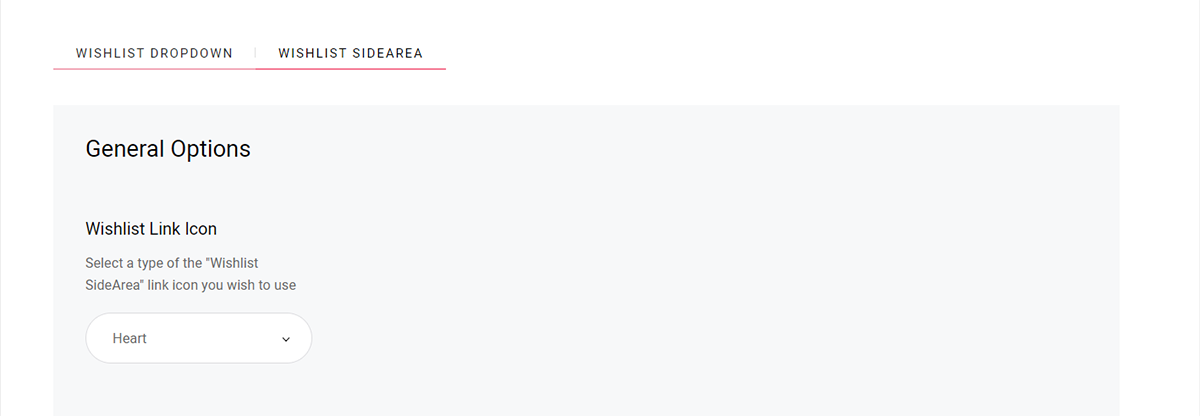
Much like in the case of the Wishlist Dropdown, here you can choose between plugin-defined heart icon and using a custom icon of your own for the Wishlist Sidearea widget.
After this you can make adjustments to the wishlist link by configuring its color, hover color, icon size and count text size.
Lastly, you can configure the width and input padding values for the Wishlist Sidearea widget.
MULTI WISHLIST

This is where you can enable and configure the creation of multiple wishlist for your visitors.
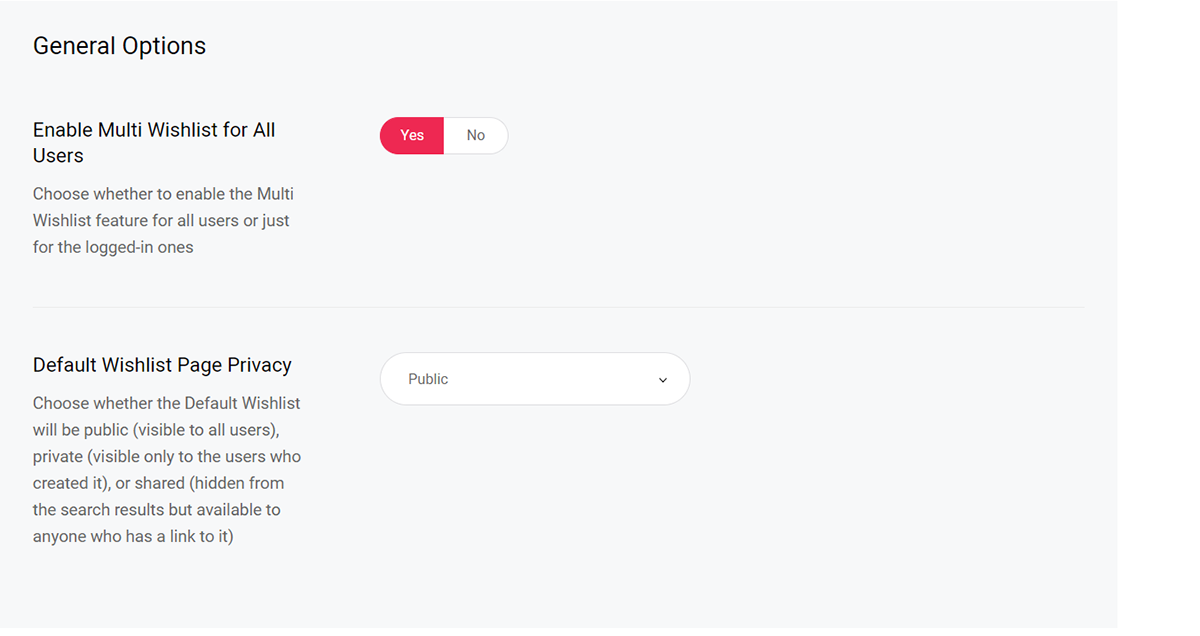
Firstly, you can enable the multi wishlist feature for your site. After you've done so, you can choose whether you wish to limit the multi wishlist creation only for the logged-in users or all users on your site. You can also define multi wishlists on your site as public, private or shared.
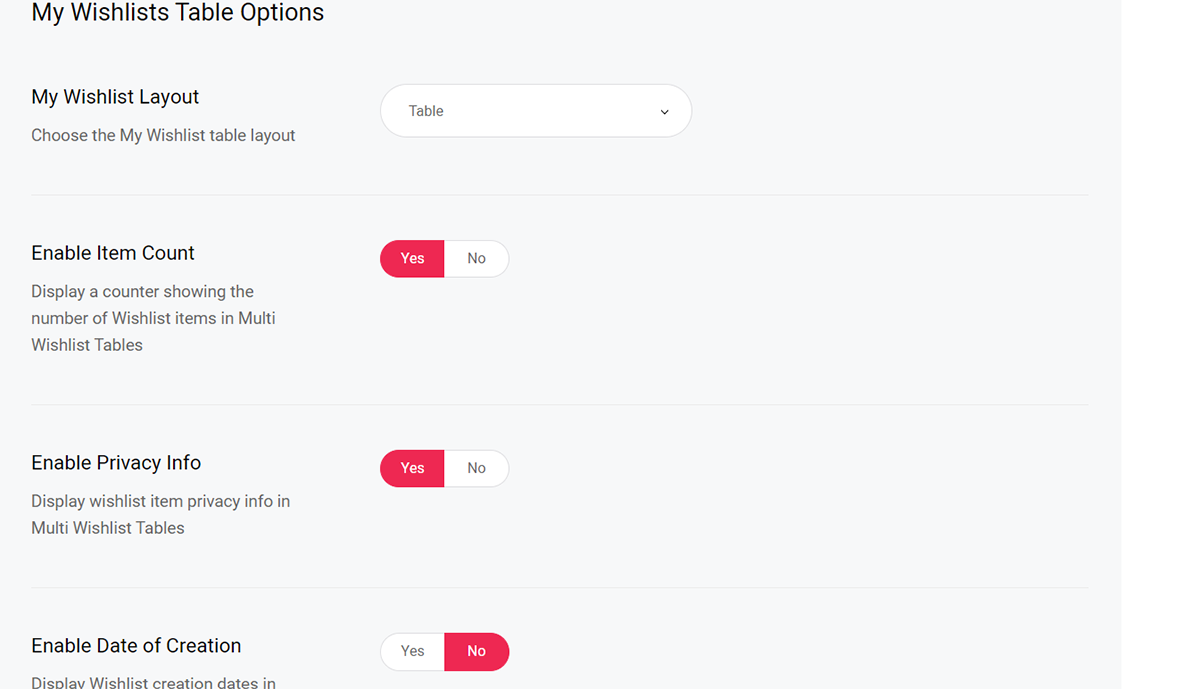
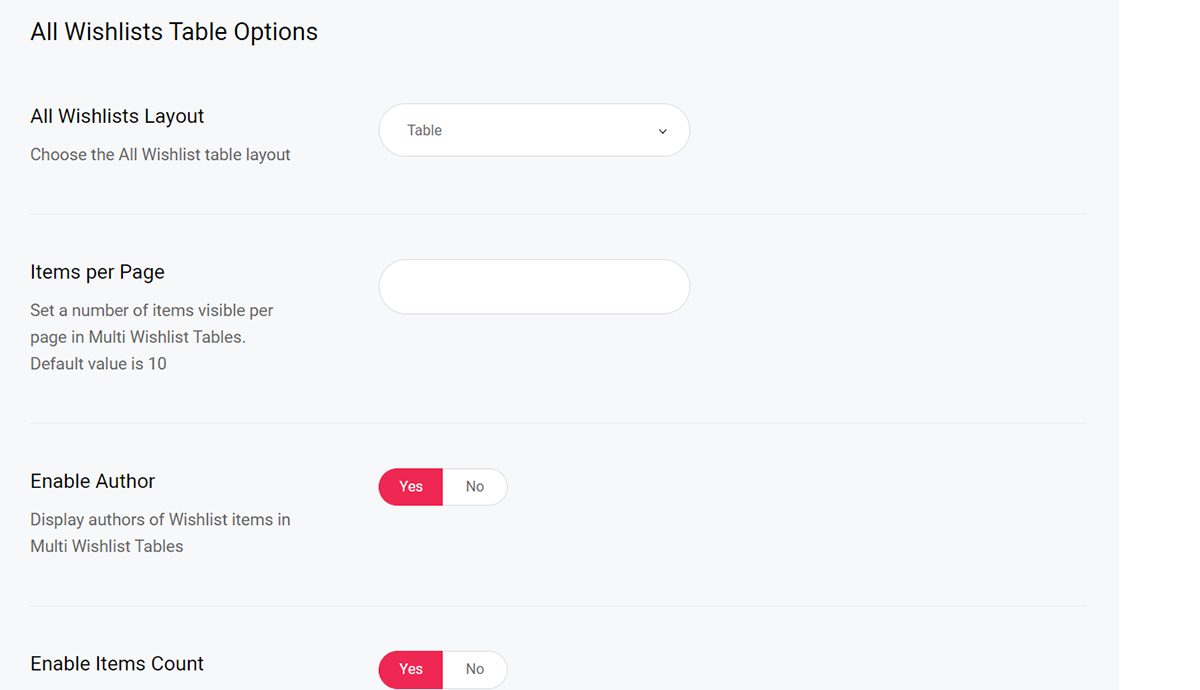
Next up, you can configure the multi wishlist table settings. Here you'll find options for adjusting how the users see their owh private wishlists, and you can choose one of two multi wishlist layouts (table and grid), and enable item counts, privacy info, creation dates, and a 'Print' button on multi wishlist.
After this, you can do pretty much the same, however, this time over, the settings relate to how the users see other people's wishlists; you can also choose between table and grid wishlist layouts, choose how many items per page should be visible, enable displaying wishlist author names, item counts, and creation dates.
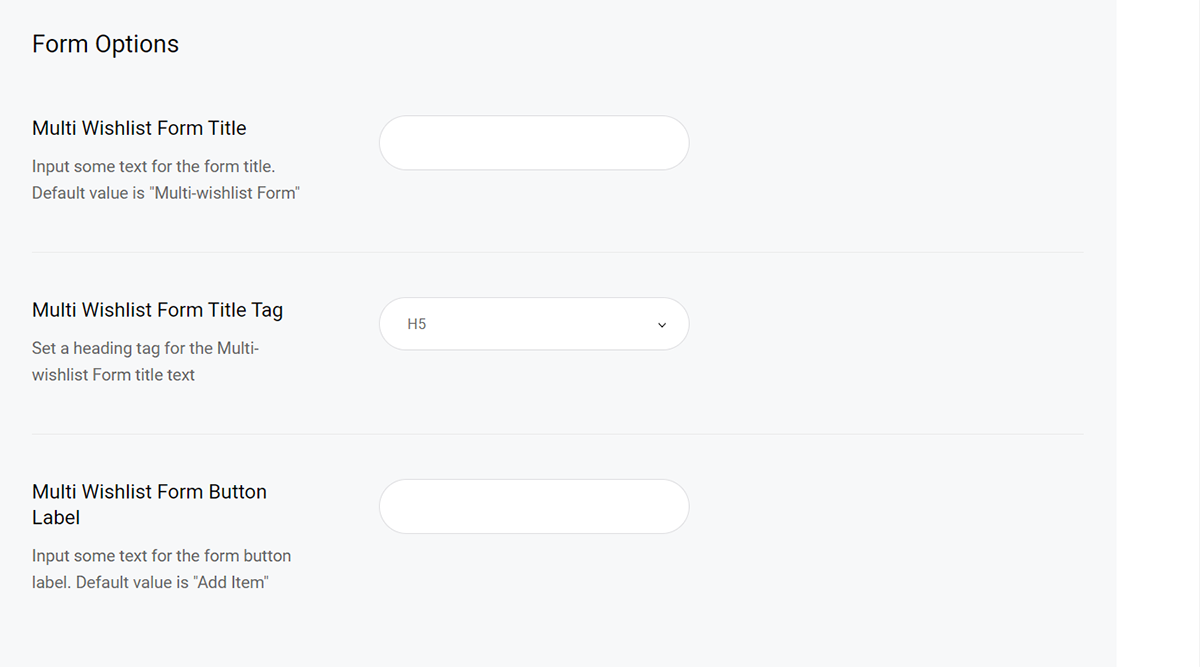
The following set of options lets you make adjustments to the modal pop-up forms. Here you'll find options for inputting the Multi Wishlist form title, setting the title heading tag, inputting the Multi Wishlist form button labels, and inputting a value which defines how long the Multi Wishlist form is going to stay visible.
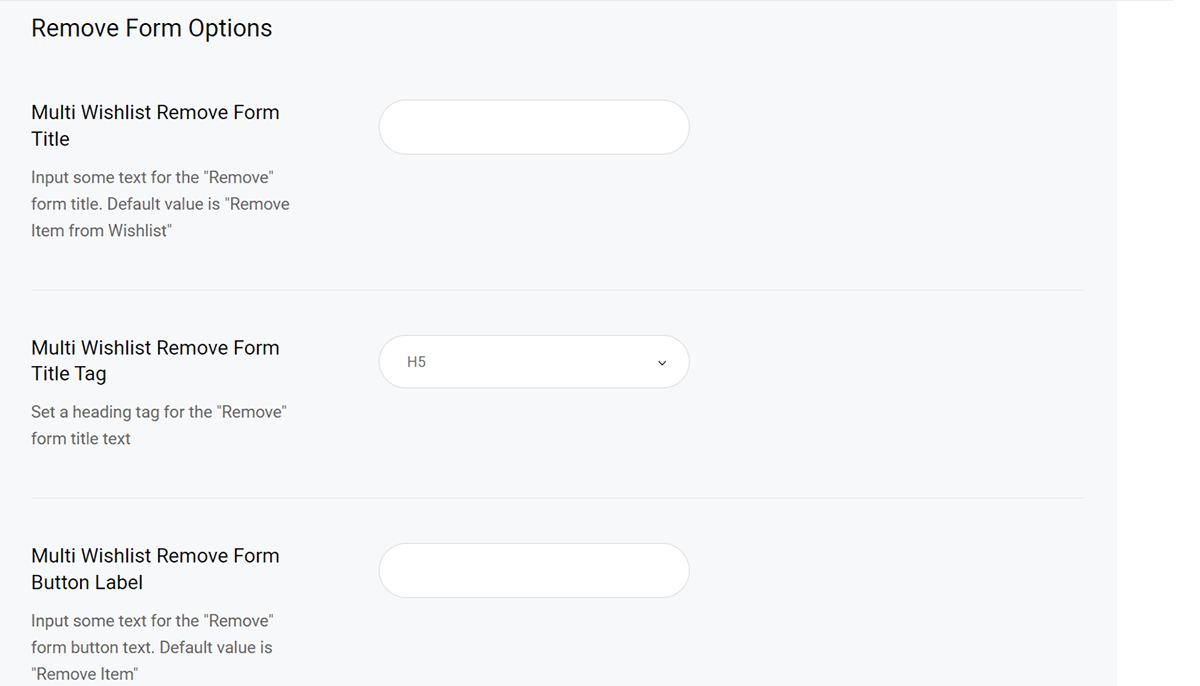
The final set of options in the Multi Wishlist section lets you modify the modal pop-up remove forms. Here you can input a title for the multi wishlist remove form, set a heading tag for the title, and input a label for the 'Remove' button located in the form.
ASK FOR ESTIMATE
This is where you can configure 'Ask for Estimate' forms on your site.
The first option lets you enable the 'Ask for Estimate' button for your visitors. This way, by clicking the button, they will be presented with an Ask for Estimate form.

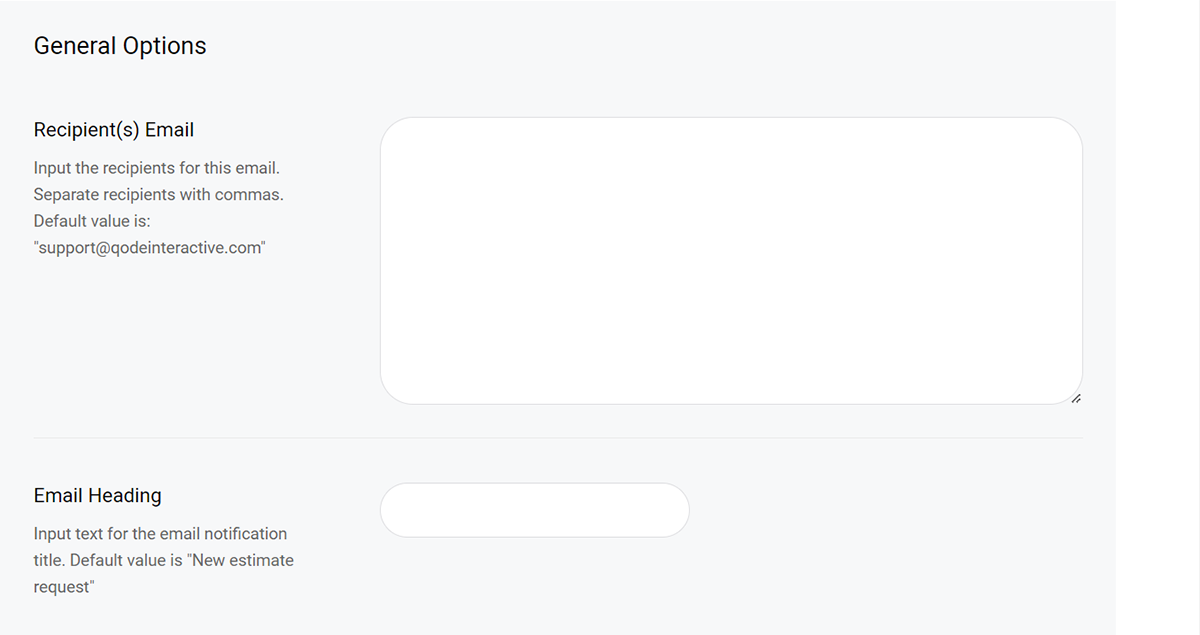
The set of options that follows lets you input the Ask for Estimate form recipient email address, the email heading, and the email subject.
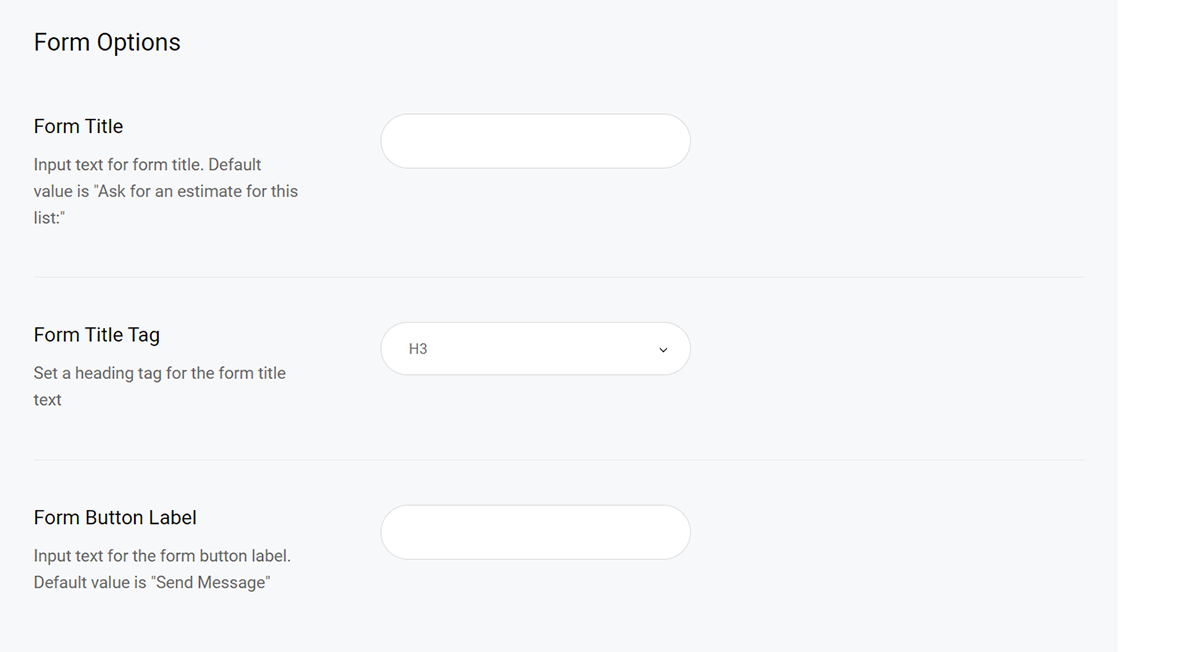
After this, you can make adjustments to the form itself. You can input a title for the form, set a heading tag for the form, and input a label for the form button.
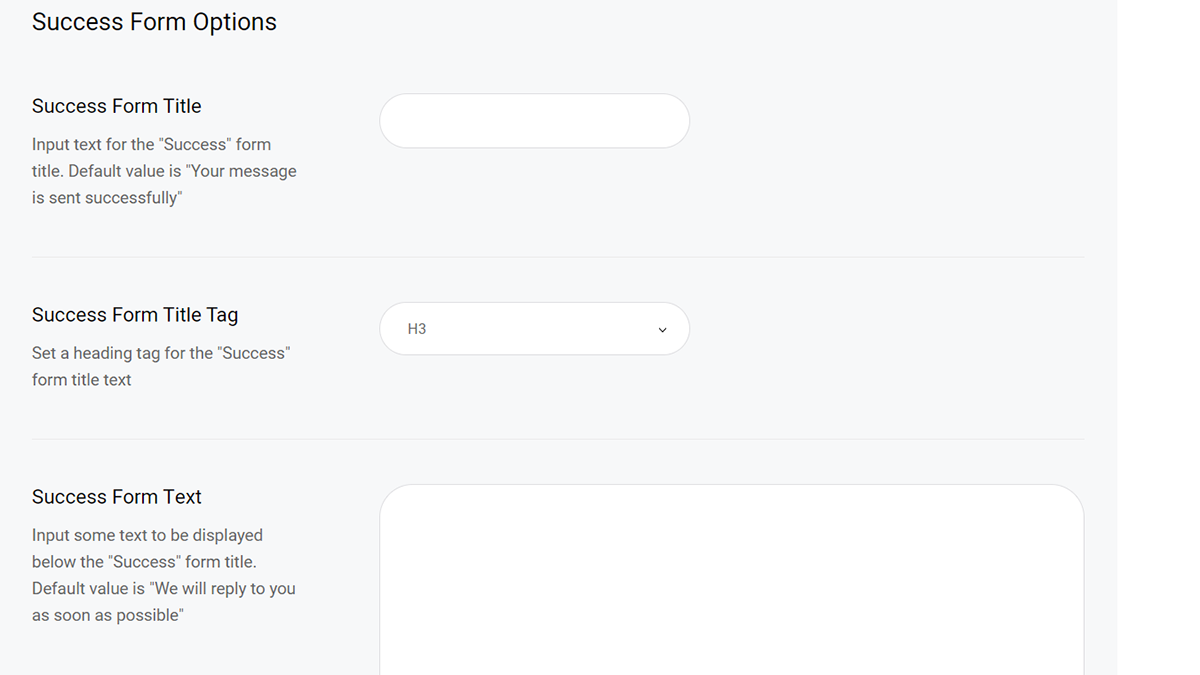
The final set of options found here allows you to adjust the Success notification form. You can input the success form title, set a heading tag for the title, input the success form text, and define the success form visibility time.
PROMOTIONAL
In this section of plugin options you can configure automatic promotional, back in stock, and on sale email campaigns.
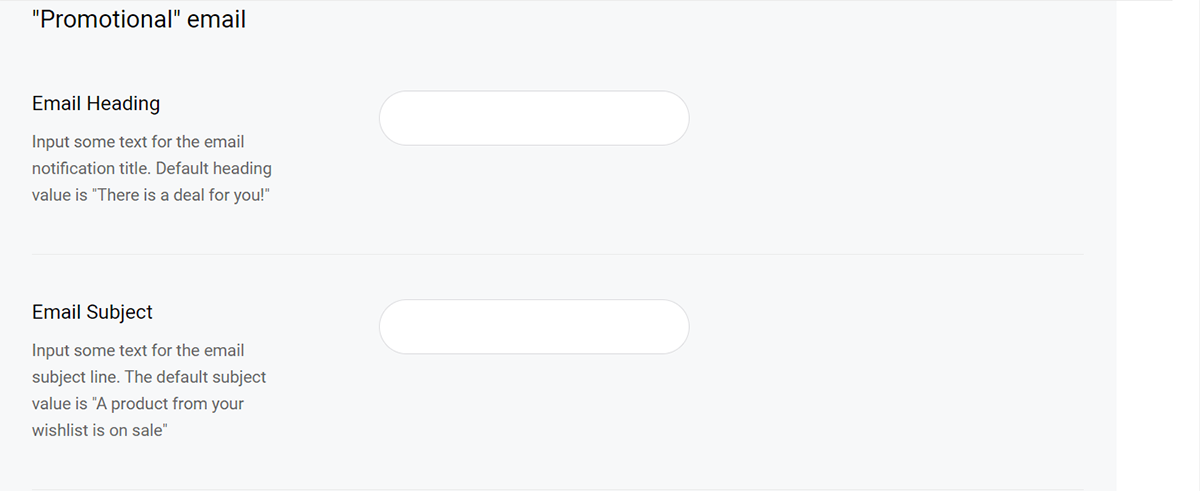
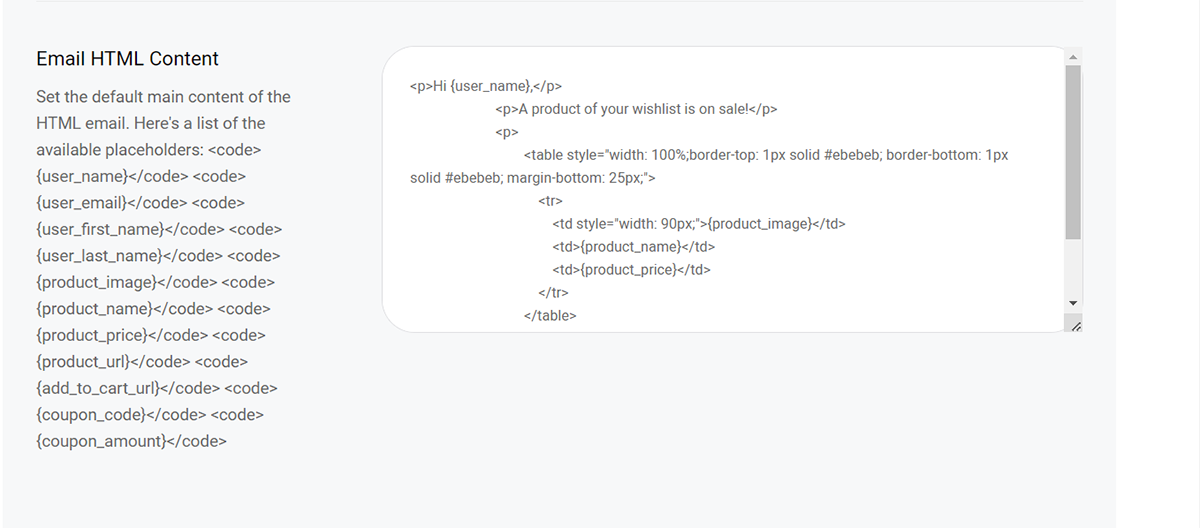
Here you can input a heading for promotional emails, as well as the email subject and HTML content.
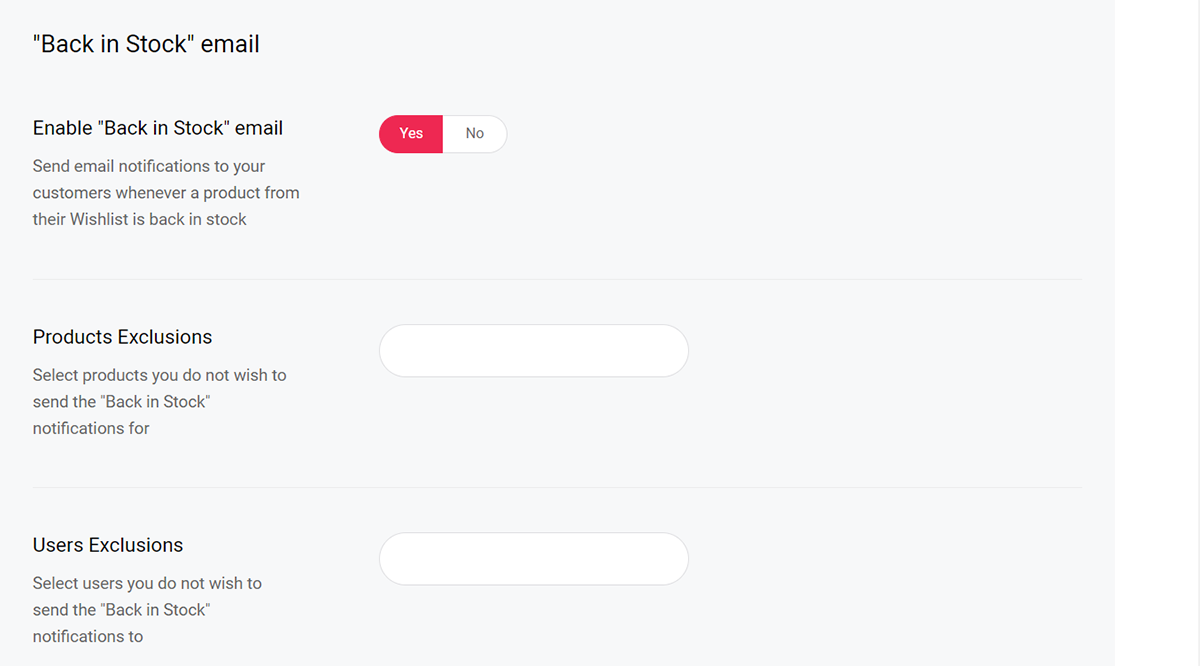
After this, you can enable and set up 'Back in Stock' emails for notifying users when their out-of-stock wishlist items are back. You can select products you do not wish to send 'Back in Stock' notifications for, as well as users you wish to omit from this campaign. In addition to this, you can input a heading, a subject, and configure the HTML content for the 'Back in Stock' email notifications.
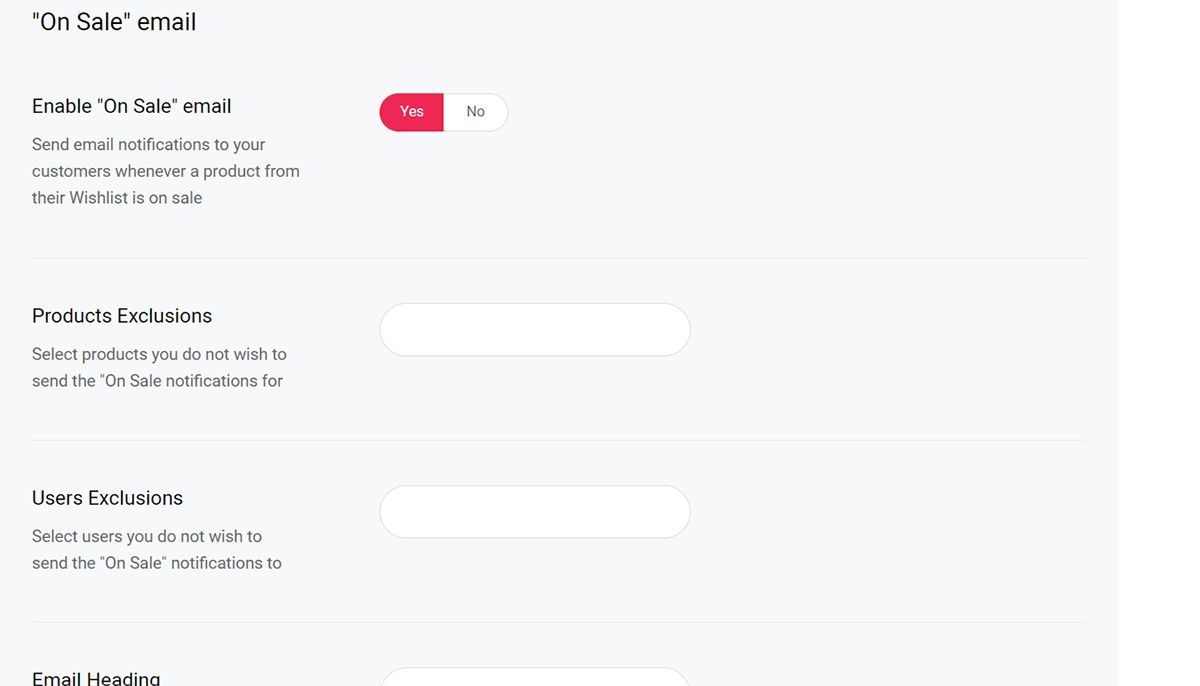
The final set of options found here allow you to enable 'On Sale' email notifications. Much like in the case of 'Back in Stock' emails, you can choose which products and users you do not wish to include in the campaign, and input the 'On Sale' email heading, subject and HTML content.
USER BEHAVIOR ADMIN AREA
The QODE Wishlist for WooCommerce plugin lets you monitor user behavior relating to wishlists on your site.
By navigating to QODE Addons for WooCommerce > Wishlist - All Wishlists you get a neat overview of all user-created wishlists on your site.
If you navigate to QODE Addons for WooCommerce > Wishlist - Popular Products you'll be presented with individual products with their corresponding wishlist counts, which effectively lets you know how many times a product has been added to user-generated wishlists.